1. Important Safety Instructions
Read all instructions carefully before using the appliance. Failure to follow these instructions may result in electric shock, fire, or serious injury.
- Ensure the power supply voltage matches the rating label on the dehumidifier.
- Do not operate the unit with a damaged cord or plug. If the cord is damaged, it must be replaced by the manufacturer or a qualified service agent.
- Always place the unit on a stable, level surface.
- Do not block air inlets or outlets. Maintain at least 20 cm clearance around the unit.
- Do not insert objects into the air vents.
- Unplug the unit before cleaning, maintenance, or moving.
- Do not use the unit in areas where flammable gases or liquids are stored.
- This appliance is not intended for use by persons (including children) with reduced physical, sensory or mental capabilities, or lack of experience and knowledge, unless they have been given supervision or instruction concerning use of the appliance by a person responsible for their safety.
- Children should be supervised to ensure that they do not play with the appliance.
- Do not immerse the unit in water or other liquids.
2. Product Overview
The WDH-DS3 is an adsorption dehumidifier designed for effective moisture removal, especially in cooler environments. It features an electronic hygrostat, multiple operating modes, and a timer function.

Figure 2.1: Front view of the WDH-DS3 Adsorption Dehumidifier, showing the control panel and air outlet.

Figure 2.2: Close-up of the WDH-DS3 control panel with buttons for Sleep, Norm, Turbo, Auto, Dry, Humidity, Power, Timer, and Air Clean modes, along with a digital display.
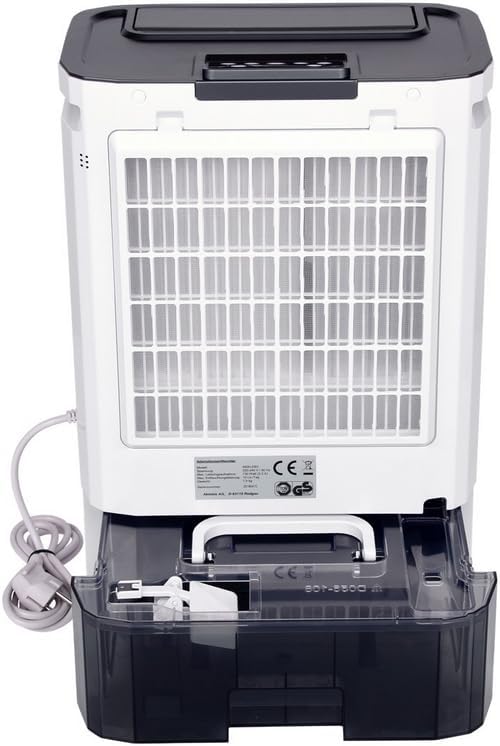
Figure 2.3: Rear view of the WDH-DS3, showing the air intake filter and the transparent water collection tank at the bottom.
3. Setup and Installation
3.1 Unpacking
- Carefully remove the dehumidifier from its packaging.
- Check for any signs of damage during transit. If damaged, contact your retailer immediately.
- Retain the packaging for future storage or transport.
3.2 Placement
- Place the dehumidifier on a firm, level surface in the area requiring dehumidification.
- Ensure there is at least 20 cm (8 inches) of clear space around all sides of the unit for proper airflow.
- Avoid placing the unit near heat sources or in direct sunlight.
- Do not place the unit directly against a wall or furniture.
3.3 Power Connection
- Plug the power cord into a grounded electrical outlet.
- Ensure the outlet meets the electrical requirements specified on the unit's rating label.
3.4 Continuous Drainage (Optional)
For continuous operation without needing to empty the water tank, you can connect a drainage hose.
- Locate the continuous drainage outlet on the back of the unit.
- Attach a suitable hose (not included) to the drainage outlet.
- Ensure the hose is sloped downwards to allow gravity drainage into a floor drain or larger container.
- Verify that the hose connection is secure to prevent leaks.

Figure 3.1: Illustration of connecting a hose for continuous drainage to the dehumidifier.
4. Operating Instructions
4.1 Control Panel Functions
Refer to Figure 2.2 for the layout of the control panel.
- POWER Button: Press to turn the unit ON or OFF.
- HUMIDITY Button: Press to set the desired humidity level (40%, 50%, 60%, 70% RH) or continuous operation (CO). The unit will automatically maintain the set humidity.
- DRY (Turbo) Mode: Activates maximum dehumidification power for rapid moisture removal.
- NORM Mode: Standard dehumidification mode.
- SLEEP Mode: Operates at the lowest fan speed for quiet operation, suitable for nighttime use.
- AUTO Mode: The unit automatically selects the appropriate fan speed and dehumidification level based on the ambient humidity.
- AIR CLEAN Button: Activates the air purification function. An optional HEPA filter (not included) is required for this feature to be fully effective.
- TIMER Button: Sets the operating duration (1-24 hours) or a delayed start time.
- Display: Shows the current humidity level, set humidity, or timer settings. Indicators for ON and FULL (water tank full) are also present.
4.2 Initial Operation
- Plug in the unit. The display will show the current room humidity.
- Press the POWER button to turn on the dehumidifier.
- Select your desired operating mode (e.g., NORM, DRY, AUTO, SLEEP).
- Adjust the target humidity using the HUMIDITY button if not in AUTO mode.
- The unit will begin dehumidifying.
4.3 Automatic Functions
- Automatic Shut-off (Full Water Tank): When the water tank is full, the unit will automatically stop operating, and the "FULL" indicator will illuminate. Empty the tank to resume operation.
- Power Outage Memory: In case of a power interruption, the unit will resume operation with the last settings once power is restored.
5. Maintenance
Regular maintenance ensures optimal performance and extends the lifespan of your dehumidifier.
5.1 Cleaning the Air Filter
The air filter should be cleaned every two weeks or more frequently depending on usage and air quality.
- Turn off the unit and unplug it from the power outlet.
- Remove the air filter from the back of the unit (refer to Figure 2.3).
- Gently vacuum the filter to remove dust and debris. For stubborn dirt, wash it with lukewarm water and a mild detergent.
- Rinse thoroughly and allow the filter to air dry completely before reinserting it into the unit.
- Never operate the dehumidifier without the air filter.
5.2 Emptying and Cleaning the Water Tank
When the water tank is full, the unit will stop operating. Empty the tank as follows:
- Gently pull out the water tank from the front/side of the unit.
- Carefully pour out the collected water.
- Clean the tank with warm water and a mild detergent periodically to prevent mold and mildew growth. Rinse thoroughly.
- Reinsert the empty tank firmly into the unit until it clicks into place. The unit will resume operation.

Figure 5.1: Illustration of removing the water collection tank from the dehumidifier for emptying.
5.3 Long-Term Storage
- Unplug the unit and empty the water tank.
- Clean the air filter and the exterior of the unit.
- Allow the unit to dry completely for at least 24 hours in a well-ventilated area.
- Store the dehumidifier in its original packaging in a cool, dry place.
6. Troubleshooting
Before contacting customer support, please refer to the following troubleshooting guide:
| Problem | Possible Cause | Solution |
|---|---|---|
| Unit does not turn on. | No power supply; Power button not pressed; Water tank full or incorrectly inserted. | Check power cord and outlet; Press POWER button; Empty and reinsert water tank correctly. |
| No water collected / Low dehumidification. | Room humidity too low; Air filter clogged; Air inlets/outlets blocked; Temperature too low; Unit in fan-only mode. | Check room humidity (unit may not be needed); Clean air filter; Ensure clear space around unit; Adsorption dehumidifiers are effective at low temperatures, but extreme cold can reduce efficiency; Select a dehumidification mode (e.g., NORM, DRY). |
| Unit is noisy. | Unit not on a level surface; Air filter clogged; Foreign object in fan. | Place on a level surface; Clean air filter; Turn off and unplug, then check for obstructions (contact service if unable to remove). |
| Unpleasant odor. | New unit odor (normal initially); Dirty water tank; Clogged filter. | Operate in a well-ventilated area for a few days (odor should dissipate); Clean water tank; Clean air filter. |
7. Specifications
| Feature | Detail |
|---|---|
| Brand | WDH |
| Model Number | WDH-DS3 |
| Dehumidification Capacity | Up to 10 liters/day |
| Water Tank Volume | 5 Liters |
| Recommended Floor Area | Up to 25 square meters |
| Dimensions (D x W x H) | 24 cm x 36 cm x 51.5 cm |
| Color | White |
| Fan Speeds | 3 (Sleep, Normal, Turbo) |
| Special Features | Timer, Electronic Hygrostat, Auto-off (full tank), Power Outage Memory, Air Purification (with optional HEPA filter) |
| Manufacturer | Aktobis |
| Country of Origin | China |
8. Warranty and Support
For warranty information or technical support, please contact the manufacturer or your retailer.
Manufacturer: Aktobis AG
Please have your model number (WDH-DS3) and purchase date available when contacting support.


