ele ELEOPTION JD-13/16
Automatic Battery Powered Strapping Machine User Manual
Brand: ele ELEOPTION | Model: JD-13/16
1. Introduction
This user manual provides comprehensive instructions for the safe and efficient operation, maintenance, and troubleshooting of your ele ELEOPTION Automatic Battery Powered Strapping Machine, model JD-13/16. This portable electric baler is designed for fast and easy packing using PP and PET straps, suitable for various industrial applications.
The machine features a rechargeable battery for portability and efficiency, adjustable tightening force, and automatic welding for consistent strapping. It is widely used in industries such as paper, textile, steel, logistics, farm, and metal for securing packages.
2. Product Overview and Components
Familiarize yourself with the main components of the strapping machine to ensure proper operation.

Figure 2.1: Main Components of the Strapping Machine
This image illustrates the key parts of the strapping machine, including the LED indicator, weld button, tighten button, non-slip handle, and various adjustment points for tightening force and welding. Understanding these components is crucial for effective use.
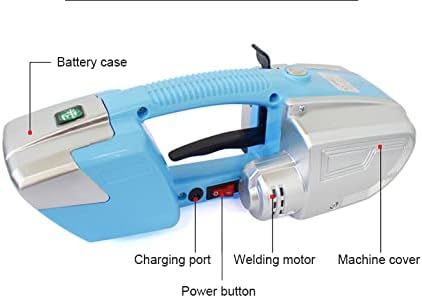
Figure 2.2: Side View and Power Components
This image provides a side view, highlighting the battery case, charging port, power button, welding motor, and the machine cover. These elements are essential for power management and overall machine function.
- LED Indicator: Provides status feedback (e.g., battery level, operation status).
- Weld Button: Initiates the welding process to seal the strap.
- Tighten Button: Activates the motor to tension the strap.
- Non-slip Handle: Ergonomically designed for secure grip during operation.
- Tightening Force Adjustment: Dial or button to set the desired strap tension.
- Welding Adjustment: Controls the duration or intensity of the welding process.
- Battery Case: Houses the rechargeable battery.
- Charging Port: Connects the charger to the machine.
- Power Button: Turns the machine on and off.
3. Package Contents
Upon opening the package, verify that all items listed below are present and in good condition.

Figure 3.1: Included Accessories
This image displays the complete set of items you should find in your product package, ensuring you have all necessary components to begin operation and maintenance.
- 1X Electric Strapping Machine (Packer host)
- 1X Charging Line
- 1X Charger
- 1X Battery
- 1X Instructions Manual
- 1X Wrench
- 2X Screwdriver (including one Hexagon screwdriver)
- 1X Small accessory bag
4. Specifications
Detailed technical specifications for the ele ELEOPTION Automatic Battery Powered Strapping Machine.
Note: The machine size specification of 340 * 130 * 118cm appears to be an error in the source data and likely refers to millimeters (mm) rather than centimeters (cm) for a handheld device. Please refer to the product's physical dimensions for accurate measurement.

Figure 4.1: Compatible Packing Belt Types
This image visually confirms the machine's compatibility with both PET and PP packing belts, highlighting its versatility for different strapping needs.
5. Setup
5.1 Charging the Battery
Before first use, fully charge the battery. A full charge takes approximately 90 minutes.
- Remove the battery from the machine if it is inserted.
- Connect the charging cable to the charger.
- Plug the charger into a standard 100-240V AC power outlet.
- Connect the charging cable to the battery's charging port.
- The LED indicator on the battery or charger will show the charging status. It typically turns green when fully charged.
- Once fully charged, disconnect the charger and reinsert the battery into the machine.

Figure 5.1: Battery Insertion and Removal
This image details the machine's interface, showing the removable battery, LED indicator, the 'Tighten' button for tensioning, and the 'Weld' button for sealing. It also indicates the battery box cover assembly and the maximum tightening force.
5.2 Loading the Strapping Belt
Ensure the correct type and size of strap (13-16mm width, 0.4-1.2mm thickness PP or PET) is used.
- Turn on the machine using the power button.
- Open the strap guide or feed mechanism on the machine.
- Feed the strapping belt through the designated slot, ensuring it passes smoothly through the tensioning and welding mechanisms.
- Pull the strap through until a sufficient length is available for your package.
- Close the strap guide securely.
6. Operating Instructions
Follow these steps for effective strapping of your packages.
6.1 Basic Strapping Procedure
- Prepare the Package: Position the package on a stable surface.
- Wrap the Strap: Wrap the strapping belt around the package, ensuring it is snug but not yet tensioned. Overlap the two ends of the strap.
- Insert Strap Ends: Insert the overlapping ends of the strap into the machine's strap entry slots. Ensure the bottom strap is fully inserted into the lower guide and the top strap is inserted into the upper guide, overlapping the bottom strap.
- Adjust Tightening Force: Use the tightening force adjustment dial/buttons to set the desired tension (60-2800N). Start with a lower setting and increase as needed.
- Tension the Strap: Press and hold the Tighten Button. The machine will pull the strap tight around the package. Release the button once the desired tension is achieved.
- Weld the Strap: Press and hold the Weld Button. The machine will perform a friction weld to seal the strap ends together. This typically takes 2-5 seconds. The LED indicator may change color to confirm successful welding.
- Cut the Strap: Once welded, the machine will automatically cut the excess strap, or you may need to manually cut it depending on the model.
- Remove the Machine: Carefully remove the strapping machine from the newly secured strap.
6.2 Adjustable Modes
The machine supports various operating modes for different strapping needs:
- Automatic Mode: The machine automatically tensions, welds, and cuts the strap with a single button press.
- Semi-Automatic Mode: Allows manual control over tensioning, with automatic welding and cutting.
- Manual Mode: Provides full manual control over tensioning and welding.
- Soft Mode (for fragile packages): Reduces the maximum tightening force to prevent damage to delicate items.
Refer to the specific controls on your machine to switch between these modes. Typically, there are dedicated buttons or a mode selection switch.

Figure 6.1: Application Examples
This image illustrates the versatility of the strapping machine by showcasing its use on various types of packages, such as cardboard boxes and wooden spools, across different industrial settings.
7. Maintenance
Regular maintenance ensures the longevity and optimal performance of your strapping machine.
- Cleaning: Regularly clean the strap guides, tensioning wheels, and welding plates to prevent strap residue buildup. Use a dry cloth or soft brush. Do not use abrasive cleaners or solvents.
- Battery Care:
- Store the battery in a cool, dry place when not in use.
- Avoid fully discharging the battery frequently.
- Charge the battery at least once every three months if stored for long periods to maintain its health.
- Lubrication: Periodically check the moving parts for smooth operation. Consult the manufacturer's guidelines for specific lubrication points if necessary.
- Inspection: Before each use, inspect the machine for any visible damage, loose parts, or excessive wear on the tensioning wheels or welding plates. Replace worn parts promptly.
8. Troubleshooting
This section addresses common issues you might encounter and their potential solutions.
9. Safety Information
Always observe the following safety precautions to prevent injury and damage to the machine.
- Read and understand all instructions before operating the machine.
- Wear appropriate personal protective equipment (PPE), such as safety glasses and gloves, when operating the machine.
- Ensure the work area is clear of obstructions and well-lit.
- Do not operate the machine in wet or damp conditions.
- Keep hands and loose clothing away from moving parts and the welding area during operation.
- Only use the specified types and sizes of strapping belts (PP/PET, 13-16mm width, 0.4-1.2mm thickness).
- Do not attempt to strap packages that exceed the machine's capacity or are unstable.
- Never point the machine at yourself or others.
- Disconnect the battery before performing any maintenance or cleaning.
- Do not modify the machine or use non-original replacement parts.
- Keep out of reach of children.
10. Warranty and Support
For warranty information, technical support, or to purchase replacement parts, please contact ele ELEOPTION customer service or refer to the warranty card included with your product.
You can visit the official ele ELEOPTION store on Amazon for more information: ele ELEOPTION Amazon Store.
Ask a question about this manual
Ask about setup, troubleshooting, compatibility, parts, safety, or missing instructions. Manuals+ will review the question and use this page’s manual context to help answer it.