1. Important Safety Instructions
Always read and understand all safety warnings and instructions before operating this power tool. Failure to follow the warnings and instructions may result in electric shock, fire, and/or serious injury.
- Wear Eye Protection: Always wear appropriate eye protection, such as safety goggles, to protect against flying debris.
- Keep Hands Clear: Never place hands or fingers in the path of the saw blade. Use push sticks or blocks when cutting small pieces.
- Unplug Before Adjustments: Disconnect the bandsaw from the power supply before making any adjustments, changing blades, or performing maintenance.
- Secure Workpiece: Always ensure the workpiece is firmly supported and guided. Do not attempt to cut freehand.
- Maintain a Clean Work Area: Keep the work area well-lit and free of clutter. Ensure proper ventilation to remove sawdust.
- Use Correct Blade: Only use saw blades suitable for the material being cut and the specifications of this machine.
- Avoid Overreaching: Maintain proper footing and balance at all times. Do not overreach.
- Supervise Others: Do not allow untrained personnel or children to operate the bandsaw.
2. Product Overview
The HBM 250 Profi Wood Bandsaw (Model 3390) is designed for precise cutting of wood materials. It features a robust construction and user-friendly adjustments for various cutting tasks.
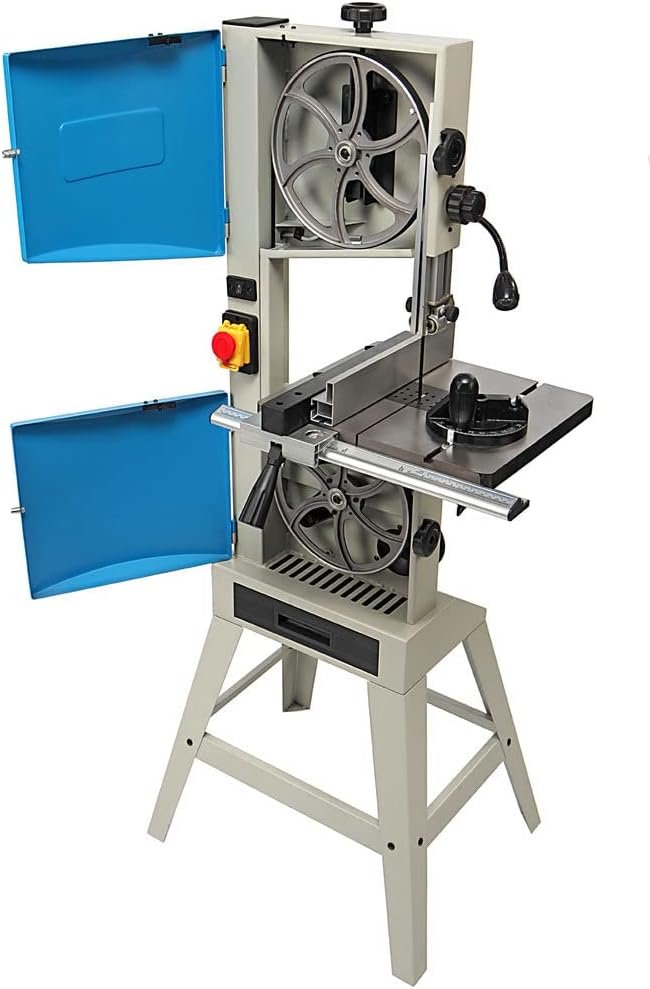
Figure 2.1: Front view of the HBM 250 Profi Wood Bandsaw with the blade covers open, showing the upper and lower wheels and the work table.
Key Features:
- Integrated LED lighting for improved visibility of the cutting area.
- Tiltable work table for angled cuts up to 45 degrees.
- Robust construction for stability and precision.
Included Components:
The following components are typically included with your HBM 250 Profi Wood Bandsaw:
- Saw blade (1826 x 8 mm)
- Work stand with chip collection tray
- Length guide
- Miter gauge
- LED lighting unit (if not pre-installed)
- 1 x Saw blade tensioner
- 3 x Wrenches for work table adjustment
- 2 x Tensioners for upper shaft adjustment
- 1 x Drill (for assembly or specific adjustments)
3. Setup and Assembly
Carefully unpack all components and ensure all parts listed in the 'Included Components' section are present and undamaged. Place the bandsaw on a stable, level surface capable of supporting its weight and the workpiece.
3.1. Stand Assembly
Assemble the work stand according to the diagrams provided in the separate assembly guide (if applicable). Ensure all bolts are securely tightened.

Figure 3.1: Side view of the HBM 250 Profi Wood Bandsaw, illustrating the motor housing and dust extraction port.
3.2. Blade Installation and Tensioning
- Ensure Power is Off: Disconnect the machine from the power supply.
- Open Covers: Open the upper and lower blade covers.
- Install Blade: Carefully place the saw blade around the upper and lower wheels, ensuring the teeth are pointing downwards towards the work table.
- Adjust Blade Guides: Position the blade guides so they are close to, but not touching, the blade. There should be a small gap (e.g., 0.05mm) between the blade and the guides.
- Tension Blade: Use the provided saw blade tensioner and upper shaft tensioners to apply appropriate tension to the blade. The blade should be taut but not overly stressed. Refer to the tension indicator if available.
- Close Covers: Securely close the blade covers before connecting power.
3.3. Work Table and Accessories
- Install Work Table: Mount the work table onto the machine, ensuring it is level and secure. Use the provided wrenches for adjustment.
- Attach Length Guide: Secure the length guide to the work table for straight cuts.
- Attach Miter Gauge: Insert the miter gauge into the slot on the work table for angled cross-cuts.
- Connect Dust Extraction: If available, connect a dust extraction system to the machine's dust port for a cleaner work environment.
4. Operating Instructions
Before each use, inspect the machine for any damage, loose parts, or worn blades. Ensure all safety guards are in place and functioning correctly.
4.1. Powering On/Off
- Connect Power: Plug the machine into a grounded 230 Volt power outlet.
- Start Machine: Press the green 'ON' button or switch to start the motor. Allow the blade to reach full speed before beginning a cut.
- Stop Machine: Press the red 'OFF' button or switch to stop the motor. Wait for the blade to come to a complete stop before leaving the machine unattended.
4.2. Adjusting the Work Table Angle
The work table can be tilted for bevel cuts up to 45 degrees.
- Loosen Locking Knob: Locate and loosen the locking knob or lever beneath the work table that secures its angle.
- Adjust Angle: Carefully tilt the work table to the desired angle, using the angle scale for reference.
- Tighten Locking Knob: Securely tighten the locking knob or lever to fix the table at the chosen angle.

Figure 4.1: Detail view of the HBM 250 Profi Wood Bandsaw's work table, showing the tilting mechanism and angle scale for precise adjustments.
4.3. Using the LED Lighting
Activate the integrated LED light to illuminate the cutting area for better visibility, especially in low-light conditions. The switch for the LED light is typically located near the light unit or on the main control panel.
4.4. Cutting Techniques
- Straight Cuts: Use the length guide for accurate straight cuts. Ensure the guide is parallel to the blade.
- Angled Cuts: Use the miter gauge for cross-cuts at specific angles, or tilt the work table for bevel cuts.
- Curve Cuts: For curve cuts, slowly feed the workpiece into the blade, guiding it carefully. Avoid forcing the material.
- Feed Rate: Apply steady, even pressure when feeding the workpiece. Do not force the material, as this can cause the blade to bind or break.
5. Maintenance
Regular maintenance ensures the longevity and safe operation of your HBM 250 Profi Wood Bandsaw. Always disconnect the power supply before performing any maintenance.
5.1. Cleaning
- Dust and Chips: Regularly clean sawdust and wood chips from the work table, blade guides, and inside the blade covers. The chip collection tray should be emptied frequently.
- Machine Exterior: Wipe down the exterior of the machine with a damp cloth. Do not use harsh chemicals or solvents.
5.2. Blade Replacement
Replace dull or damaged blades promptly. Follow the blade installation steps in Section 3.2 in reverse to remove the old blade, then install the new blade.
5.3. Blade Guide Adjustment
Periodically check and adjust the blade guides to ensure they are properly aligned and provide adequate support to the blade without causing excessive friction.
5.4. General Inspection
Inspect all moving parts, belts, and electrical connections for wear or damage. Tighten any loose fasteners. If any part is damaged, replace it with genuine HBM spare parts before further use.
6. Troubleshooting
This section addresses common issues you might encounter with your bandsaw. For problems not listed here, contact HBM customer support.
| Problem | Possible Cause | Solution |
|---|---|---|
| Machine does not start | No power supply; Emergency stop engaged; Faulty switch | Check power connection; Release emergency stop button; Contact service |
| Blade breaks frequently | Incorrect blade tension; Worn blade guides; Forcing workpiece; Wrong blade type | Adjust blade tension; Adjust/replace blade guides; Reduce feed rate; Use correct blade |
| Inaccurate cuts | Blade guides misaligned; Dull blade; Loose work table; Incorrect fence setting | Adjust blade guides; Replace blade; Tighten work table fasteners; Adjust fence parallel to blade |
| Excessive vibration or noise | Loose components; Unbalanced wheels; Worn bearings; Incorrect blade tension | Check and tighten all fasteners; Inspect wheels for damage; Contact service for bearings; Adjust blade tension |
7. Technical Specifications
| Specification | Value |
|---|---|
| Manufacturer | HBM |
| Model Number | 3390 |
| Voltage | 230 Volt |
| Wattage | 375 Watt |
| Saw Blade Length | 1826 mm |
| Saw Blade Width | 8 mm |
| Max. Cutting Capacity (Throat/Height) | 250 mm (This refers to the maximum width or height of material that can be cut) |
| Blade Material | High-speed steel |
| Recommended Surface | Wood |
| Special Features | LED lighting, Tiltable work table |
| Max. Cutting Angle | 45 Degrees |
| Number of Teeth (included blade) | 80 |
8. Warranty and Support
For warranty information, technical support, or to order replacement parts, please contact HBM customer service directly. Retain your proof of purchase for warranty claims.
Please refer to the official HBM website or your purchase documentation for the most up-to-date contact information and warranty terms.