1. Introduction
The CGOLDENWALL PS-40 10L Ultrasonic Cleaner is designed for effective cleaning of various items using ultrasonic technology. This manual provides essential information for the safe and efficient operation, setup, and maintenance of your ultrasonic cleaner. It is suitable for cleaning items such as watches, glasses, dentures, jewelry, and printer ink nozzles.

Figure 1: CGOLDENWALL PS-40 10L Ultrasonic Cleaner. This image shows the complete unit with its stainless steel casing and lid.
2. Safety Instructions
Please read and understand all safety instructions before operating the ultrasonic cleaner. Failure to follow these instructions may result in electric shock, fire, or serious injury.
- Always connect the unit to a grounded power outlet.
- Do not operate the unit without liquid in the tank. Ensure the liquid level is between the MIN and MAX marks.
- Do not immerse the main unit in water or other liquids.
- Keep the unit away from children and pets.
- Unplug the unit from the power outlet before cleaning, filling, or draining.
- Do not touch the tank or cleaning solution when the heating function is active, as temperatures can be high.
- Avoid using flammable or corrosive cleaning solutions. Consult the solution manufacturer's guidelines.
- If the unit is damaged, do not operate it. Contact customer support for assistance.
- Ensure proper ventilation when operating, especially if using specialized cleaning solutions.
3. Product Overview
3.1 Components
- Main Unit: Stainless steel casing housing the ultrasonic transducers and heating elements.
- Cleaning Tank: Industrial grade 304 stainless steel liner with a capacity of 10 liters. Dimensions: 300mm x 240mm x 150mm (L x W x H).
- Lid: Stainless steel lid to cover the tank during operation.
- Control Panel: Features temperature and time adjustment knobs, and indicator lights.
- Drain Valve: Located on the side for convenient draining of the cleaning solution.
- Power Inlet: Secure power connection with an integrated power switch.
- Cleaning Basket: Special stainless steel anti-corrosion basket for holding items during cleaning.
3.2 Control Panel

Figure 2: Operation Panel. This image highlights the temperature and time control knobs, along with the heating and ultrasonic indicator lights.
- TEMP Knob: Adjusts the heating temperature from 20°C to 80°C. Turn clockwise to increase temperature.
- TIME Knob: Sets the cleaning duration from 1 to 30 minutes. Turn clockwise to increase time.
- HEATING Indicator: Illuminates when the heating function is active.
- ULTRASONIC Indicator: Illuminates when the ultrasonic cleaning function is active.
3.3 Tank and Shell Details

Figure 3: Stainless Steel Liner. This image shows the internal tank with its dimensions (300mm x 240mm) and indicates it is industrial grade 304 stainless steel, 1.1mm thick.
The internal cleaning tank is constructed from industrial grade 304 stainless steel, approximately 1.1mm thick, ensuring durability and resistance to corrosion. The overall product shell is also made from printed stainless steel, providing an anti-corrosion and robust exterior.

Figure 4: Shell Material. This image illustrates the printed stainless steel case, emphasizing its anti-corrosion properties and durability.
3.4 Power and Accessories
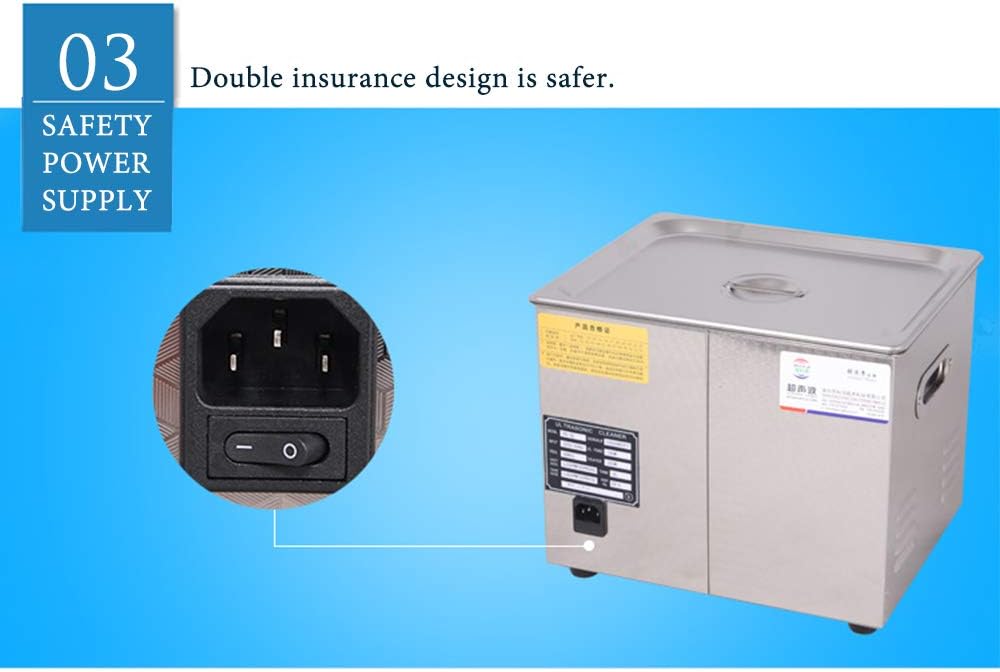
Figure 5: Safety Power Supply. This image shows the power inlet with an integrated switch, highlighting the double insurance design for safety.
The unit features a double insurance design for its power supply, enhancing safety during operation. It includes a robust power inlet with an integrated on/off switch.

Figure 6: Stainless Steel Cleaning Basket. This image displays the special anti-corrosion stainless steel basket designed for holding items during ultrasonic cleaning.

Figure 7: Ultrasonic Cleaner with Basket. This image shows the ultrasonic cleaner unit alongside its cleaning basket, demonstrating how the basket is used with the cleaner.
A special stainless steel anti-corrosion cleaning basket is provided to hold items, reducing direct contact with the tank and ensuring thorough cleaning.
4. Setup
- Placement: Place the ultrasonic cleaner on a stable, level, and dry surface. Ensure there is adequate ventilation around the unit.
- Fill the Tank: Open the lid and fill the stainless steel tank with an appropriate cleaning solution. Ensure the liquid level is sufficient to cover the items to be cleaned, but do not exceed the maximum fill line.
- Connect Power: Plug the power cord into the unit's power inlet, then connect it to a grounded electrical outlet (AC 100-120V, 50/60Hz or AC 220-240V, 50/60Hz, depending on your model).
5. Operating Instructions
- Prepare Items: Place the items to be cleaned into the stainless steel cleaning basket. Ensure items are not overcrowded and are fully submerged in the cleaning solution.
- Place Basket: Carefully lower the basket with items into the cleaning tank.
- Close Lid: Close the lid to minimize noise and prevent splashing.
- Set Temperature (Optional): If heating is desired, turn the TEMP knob to the desired temperature (20-80°C). The HEATING indicator will illuminate. Allow time for the solution to reach the set temperature.
- Set Cleaning Time: Turn the TIME knob to select the desired cleaning duration (1-30 minutes). The ULTRASONIC indicator will illuminate, and the ultrasonic cleaning process will begin.
- Monitor Process: The unit will operate for the set time. You may hear a gentle humming sound, which is normal.
- End of Cycle: Once the set time expires, the ultrasonic function will automatically stop. The ULTRASONIC indicator will turn off.
- Remove Items: Carefully open the lid. Using the basket handle, lift the basket out of the tank. Rinse the cleaned items with clean water and dry them thoroughly.
- Drain Solution: When finished cleaning, turn off the unit and unplug it. Use the drain valve on the side to empty the used cleaning solution into an appropriate container.
6. Maintenance
- Cleaning the Tank: After draining the solution, wipe the inside of the tank with a soft cloth. Do not use abrasive cleaners or steel wool.
- Exterior Cleaning: Wipe the exterior of the unit with a damp cloth. Do not spray water directly onto the unit.
- Solution Replacement: Replace the cleaning solution regularly, especially if it becomes visibly dirty or its cleaning effectiveness diminishes.
- Storage: When not in use, ensure the unit is clean, dry, and unplugged. Store it in a cool, dry place away from direct sunlight.
7. Troubleshooting
| Problem | Possible Cause | Solution |
|---|---|---|
| Unit does not power on. | Power cord not properly connected. Power switch is off. No power from outlet. |
Ensure power cord is securely plugged into the unit and outlet. Turn on the power switch. Check the power outlet with another appliance. |
| Ultrasonic function not working. | Time knob not set. Insufficient liquid in tank. |
Set the TIME knob to a desired duration. Ensure liquid level is adequate. |
| Heating function not working. | TEMP knob not set. | Set the TEMP knob to a desired temperature. |
| Poor cleaning results. | Incorrect cleaning solution. Insufficient cleaning time. Overcrowded tank. Solution needs replacement. |
Use an appropriate cleaning solution for the items. Increase cleaning time. Clean fewer items at once. Replace the cleaning solution. |
8. Specifications
| Model | PS-40 |
| Frequency | 40 KHz |
| Internal Material | Stainless Steel Fuel Tank (304 Grade, 1.1mm thick) |
| Capacity | 10 Liters |
| Timer | Digital Control 0-30 minutes |
| Ultrasonic Power | 240 W |
| Ultrasonic Vibrator Number | 4 sheets |
| Heating Function | Mechanical Heating, 20-80°C Adjustable |
| Weight | 8 kg |
| Power Supply | AC 100-120V, 50/60Hz or AC 220-240V, 50/60Hz |
| Content Tank Size (L x W x H) | 300 x 240 x 150 mm |
| Product Size (L x W x H) | 330 x 270 x 270 mm |
9. Warranty and Support
CGOLDENWALL is committed to providing quality products and excellent service. This product comes with a standard warranty against manufacturing defects. For warranty claims, technical support, or any inquiries regarding your PS-40 Ultrasonic Cleaner, please contact CGOLDENWALL customer service through your purchase platform or the official brand website.
Please retain your proof of purchase for warranty validation.