ZENY ZENYJA0190205
ZENY Arc Welding Machine User Manual
Model: MMA-160A (ZENYJA0190205)
Brand: ZENY
1. Introduction
Thank you for choosing the ZENY Arc Welding Machine. This DC Inverter Dual Voltage 110/230V IGBT Welder is designed for efficient and reliable stick welding. Its smart inverter technology converts AC power to DC, then steps down to the appropriate voltage and current for optimal welding performance. The compact and portable design, featuring an easy-carrying handle, makes it suitable for various applications, from home projects to professional use.
This manual provides important information regarding the safe operation, setup, maintenance, and troubleshooting of your welding machine. Please read it thoroughly before use to ensure proper function and to prevent injury or damage.
2. Safety Information
WARNING: Welding can be dangerous. Always follow safety precautions to prevent serious injury or death.
- Electric Shock: This machine uses high voltage. Ensure proper grounding. Do not touch live electrical parts. Wear dry welding gloves and protective clothing.
- Fumes and Gases: Welding fumes and gases can be hazardous to your health. Work in a well-ventilated area. Use local exhaust ventilation or a respirator if ventilation is poor.
- Arc Rays: Arc rays can injure eyes and burn skin. Wear a welding helmet with a proper shade filter. Protect other exposed skin with appropriate clothing.
- Fire and Explosion: Welding sparks and hot metal can cause fires. Keep flammable materials away from the welding area. Have a fire extinguisher readily available.
- Burns: Hot metal and electrodes can cause severe burns. Do not touch hot parts with bare hands.
- Noise: Excessive noise can damage hearing. Wear ear protection.
- Maintenance: Disconnect power before performing any maintenance or service.
3. Package Contents
Upon opening the package, please verify that all the following items are included and in good condition:

This image displays the ZENY Arc Welding Machine along with all its standard accessories, including the electrode holder, work clamp, power adapter cable, welding mask, and wire brush.
- ZENY MMA-160A Welding Machine
- Electrode holder with 6.4 ft. cable
- Work clamp with 5 ft. cable
- Input power adapter cable & plug (for dual voltage operation)
- Basic Welding Mask
- Wire Brush / Chipping Hammer
- Owner's Manual
4. Product Overview
Familiarize yourself with the main components of your ZENY Arc Welding Machine.

This image shows the front panel of the ZENY MMA-160A welder, highlighting the digital current meter, electrode diameter indicators, power indicator, O.C. (overcurrent) indicator, and the current adjustment knob. The positive and negative output terminals are also visible at the bottom.
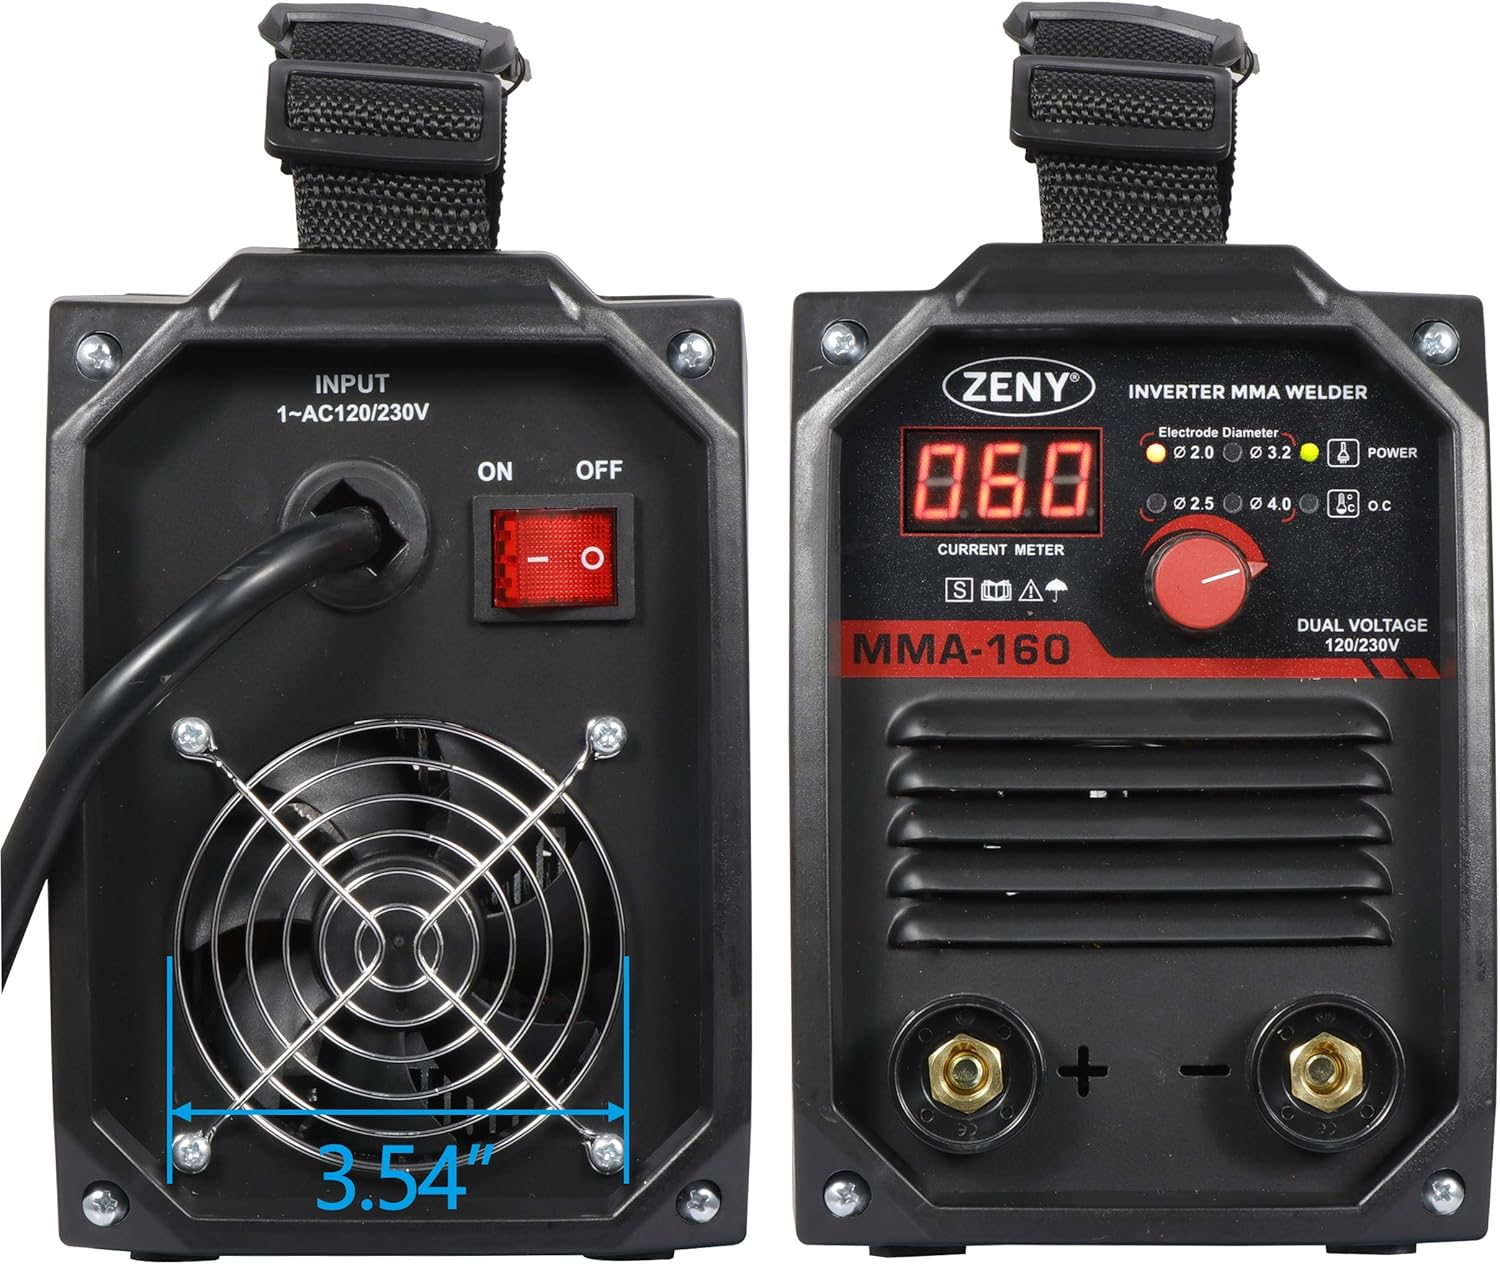
This image provides both front and back views of the ZENY MMA-160A welder. The front shows the control panel, while the back displays the power input, ON/OFF switch, and cooling fan. The fan's diameter is indicated as 3.54 inches.
- Front Panel: Features a digital display for current, indicators for electrode diameter (2.0, 2.5, 3.2, 4.0 mm), power status, and overcurrent warning. The large red knob adjusts the welding current.
- Output Terminals: Positive (+) and Negative (-) terminals for connecting the electrode holder and work clamp.
- Rear Panel: Includes the power input socket, ON/OFF switch, and a cooling fan for heat dissipation.
- Carrying Handle: A sturdy handle on top for easy portability.
5. Setup
Proper setup is crucial for safe and effective welding.

This image illustrates the different power plugs compatible with the ZENY welder, including a standard 120V plug and a 230V adapter plug, demonstrating its dual voltage capability. The top view also shows the robust carrying handle.
- Choose a Location: Select a dry, well-ventilated area free from flammable materials. Ensure adequate space around the machine for air circulation.
- Power Connection: The welder supports dual voltage (110V/230V). Connect the appropriate power cable to the machine and then to a suitable power outlet. Ensure the outlet is properly grounded.
- Connect Work Clamp: Attach the work clamp cable to the negative (-) terminal on the welder's front panel. Securely clamp the other end to the workpiece or a clean, bare metal part of the welding table, ensuring good electrical contact.
- Connect Electrode Holder: Attach the electrode holder cable to the positive (+) terminal on the welder's front panel. Insert the welding electrode into the electrode holder.
- Electrode Selection: Choose an electrode appropriate for the material thickness and type you are welding. The front panel indicators (2.0, 2.5, 3.2, 4.0 mm) can guide your selection.
- Personal Protective Equipment (PPE): Always wear appropriate PPE, including a welding helmet with a suitable shade, welding gloves, flame-resistant clothing, and safety shoes.
6. Operating Instructions
Follow these steps for effective welding with your ZENY machine.
- Turn On the Welder: Flip the ON/OFF switch on the rear panel to the 'ON' position. The digital display will light up, and the power indicator on the front panel will illuminate.
- Set Welding Current: Use the large red knob on the front panel to adjust the welding current (Amperage). The digital display will show the set current. Refer to electrode manufacturer's recommendations for optimal current settings based on electrode type and diameter, and material thickness.
- Prepare Workpiece: Ensure the workpiece is clean and free of rust, paint, or grease. This ensures a stable arc and quality weld.
- Start Welding: With your PPE on, bring the electrode into contact with the workpiece to strike an arc. Maintain a consistent arc length and travel speed for a smooth weld bead.
- Monitor Performance: Pay attention to the arc stability and the appearance of the weld. Adjust current as needed. If the O.C. (overcurrent) indicator lights up, the machine may be overheating or drawing too much current; allow it to cool down.
- Finish Welding: Once welding is complete, lift the electrode from the workpiece. Turn off the welder using the ON/OFF switch. Allow the machine to cool down before storing.
7. Maintenance
Regular maintenance ensures the longevity and optimal performance of your welding machine.
- Cleaning: Periodically clean the machine's exterior with a dry cloth. Use compressed air to blow out dust and debris from the cooling vents and internal components. Ensure the machine is unplugged before cleaning.
- Cable Inspection: Regularly inspect all cables (electrode holder, work clamp, power cable) for cuts, fraying, or damaged insulation. Replace damaged cables immediately.
- Terminal Connections: Ensure all cable connections to the welder are tight and free of corrosion. Loose connections can cause overheating and poor performance.
- Storage: Store the welder in a dry, clean environment, away from excessive dust, moisture, and extreme temperatures.
8. Troubleshooting
This section addresses common issues you might encounter and their potential solutions.
| Problem | Possible Cause | Solution |
|---|---|---|
| Welder does not turn on | No power supply; Power switch off; Faulty power cable | Check power outlet and circuit breaker; Ensure power switch is ON; Inspect and replace power cable if damaged. |
| No arc or weak arc | Poor work clamp connection; Incorrect current setting; Wet or old electrode; Workpiece not clean | Ensure work clamp has good contact; Adjust current higher; Use dry, new electrodes; Clean workpiece thoroughly. |
| Machine overheats (O.C. indicator on) | Exceeded duty cycle; Poor ventilation; Clogged cooling vents | Allow machine to cool down; Ensure adequate airflow around the machine; Clean cooling vents. |
| Excessive spatter | Current too high; Arc length too long; Incorrect electrode angle | Reduce current; Shorten arc length; Adjust electrode angle. |
9. Specifications
Detailed technical specifications for the ZENY Arc Welding Machine MMA-160A.

This image provides the key dimensions of the ZENY MMA-160A welder: 10.8 inches in length, 5.43 inches in width, and 7.87 inches in height, illustrating its compact size.
| Feature | Specification |
|---|---|
| Model | MMA-160A |
| Input Voltage | 120V / 230V / 60Hz (Dual Voltage) |
| Input Current at Rated Output | 20 - 105A (120V), 20 - 160A (230V) |
| Duty Cycle | 60% (120V), 25% (230V) |
| Technology | IGBT Inverter |
| Dimensions (L x W x H) | 11 x 5.35 x 7.7 inches (approx. 10.8 x 5.43 x 7.87 inches) |
| Item Weight | 18 pounds |
| Material | PE + Iron |
| Certifications | ETL Listed |
10. Warranty and Support
For warranty information, technical support, or service inquiries, please refer to the warranty card included with your product or contact ZENY customer service directly. Contact details can typically be found on the manufacturer's official website or on the product packaging.
Please retain your purchase receipt as proof of purchase for any warranty claims.