Introduction
The Seaflo SFSP-015-02 control panel is designed to operate any bilge pump equipped with an automatic float switch. This rocker switch features three positions: Automatic, Off, and Manual. It includes a spring-return mechanism with a built-in safety feature to return from the 'Manual' position to 'Off'. The panel is constructed from durable black plastic and includes an LED indicator that illuminates when the switch is active. This panel controls and protects pump operation when used with an automatic float switch, preventing the impact of intermittent high current.

Figure 1: Front view of the Seaflo 3-Way Bilge Pump Switch Panel.
Features and Benefits
- Simple and Clean Installation: Designed for straightforward mounting and wiring.
- Universal Compatibility: Controls any bilge pump equipped with an automatic float switch.
- Current Protection: Helps prevent damage from intermittent high current surges.
- LED Indicator: An integrated LED illuminates when the switch is in an active position (Automatic or Manual).
- Three-Position Control: Offers Automatic, Off, and Manual operating modes.
- Dual Voltage Support: Compatible with both 12V and 24V DC electrical systems.
- Durable Construction: Features a robust black aluminum panel.
- Compact Design: Measures approximately 75 x 63 mm for easy integration.
Setup and Installation
Proper installation is crucial for the safe and effective operation of your bilge pump switch panel. Follow these steps carefully.
1. Mounting the Panel
Select a suitable, easily accessible location for the switch panel. Ensure there is sufficient space behind the mounting surface for wiring connections. Use appropriate fasteners (not included) to secure the panel through the four mounting holes.
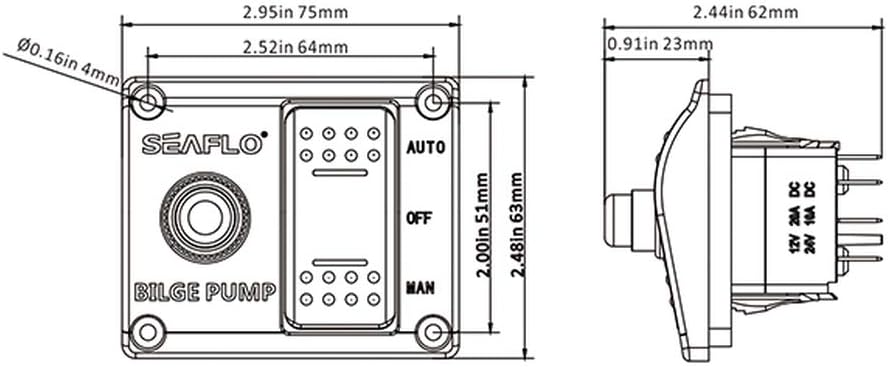
Figure 2: Dimensions of the Seaflo Bilge Pump Switch Panel for mounting.
2. Wiring Connections
Before beginning any wiring, ensure the power supply to the battery is disconnected to prevent electrical shock or damage. Refer to the wiring diagram below for correct connections. All wiring should be marine-grade and properly insulated.

Figure 3: Wiring diagram for the Seaflo 3-Way Bilge Pump Switch Panel.
- Battery Positive (+): Connect the positive terminal of your 12V or 24V battery to the input side of the Overload Protector.
- Overload Protector Output: Connect the output side of the Overload Protector to the common power input terminal on the switch panel (typically labeled 'LOAD' or similar, often the center terminal of the rocker switch).
- Automatic (AUTO) Connection: Connect the 'AUTO' terminal of the switch panel to the positive wire of your automatic float switch.
- Manual (MAN) Connection: Connect the 'MAN' terminal of the switch panel to the positive wire of your bilge pump for manual operation.
- Bilge Pump Negative (-): Connect the negative wire of the bilge pump directly to the negative terminal of your battery.
- Float Switch Negative (-): If your float switch requires a separate negative connection, connect it to the battery's negative terminal.
Ensure all connections are tight, corrosion-free, and protected from moisture. After wiring, reconnect the battery and test the system.

Figure 4: Rear view of the switch panel showing terminal connections.
Operating Instructions
The Seaflo 3-Way Bilge Pump Switch Panel provides three distinct operating modes for your bilge pump:
- Automatic (AUTO) Position: Move the rocker switch to the 'AUTO' position. In this mode, the bilge pump will activate automatically when the water level rises and triggers the connected float switch. The pump will then turn off automatically once the water level drops below the float switch's activation point. The LED indicator will illuminate when the pump is running in this mode.
- Off (OFF) Position: Center the rocker switch to the 'OFF' position. In this mode, the bilge pump is completely deactivated and will not operate, regardless of the water level or float switch position. The LED indicator will be off.
- Manual (MAN) Position: Push and hold the rocker switch in the 'MAN' position. This will manually activate the bilge pump, allowing you to pump water regardless of the float switch position. This position is spring-loaded; the switch will return to the 'OFF' position when released, providing a safety feature to prevent continuous manual operation. The LED indicator will illuminate while the switch is held in this position.
Maintenance
Regular maintenance ensures the longevity and reliable operation of your bilge pump switch panel and associated system.
- Inspect Wiring: Periodically check all wiring connections for signs of corrosion, fraying, or damage. Replace any compromised wiring immediately.
- Clean Panel: Keep the switch panel clean and free from salt, dirt, and debris. Use a damp cloth for cleaning; avoid abrasive cleaners or solvents.
- Test Operation: Regularly test the bilge pump system in both 'AUTO' and 'MAN' modes to ensure proper function. Simulate a high water level to test the float switch.
- Check Float Switch: Ensure the float switch is free from obstructions (e.g., debris, oil) that could prevent it from moving freely and activating correctly.
- Overload Protector: Familiarize yourself with the location and operation of the overload protector. If it trips, investigate the cause before resetting.
Troubleshooting
If you encounter issues with your Seaflo bilge pump switch panel, refer to the following troubleshooting guide:
- Pump Does Not Operate (AUTO or MAN Mode):
- Check battery connections and ensure adequate voltage (12V or 24V).
- Verify all wiring connections are secure and correctly installed according to the wiring diagram (Figure 3).
- Inspect the overload protector; if tripped, press to reset. If it trips repeatedly, there may be an electrical short or overload.
- Check the bilge pump itself for blockages, debris, or mechanical failure.
- Ensure the float switch is not obstructed and is functioning correctly (for AUTO mode).
- LED Indicator Does Not Light Up:
- Confirm power supply to the panel is active.
- Ensure the switch is in an active position ('AUTO' with pump running, or 'MAN' held).
- Inspect the LED wiring for any loose connections.
- Pump Runs Continuously in AUTO Mode:
- Check the float switch for debris or malfunction that prevents it from returning to the 'off' position.
- Verify wiring to the float switch for any shorts or incorrect connections.
Specifications
| Specification | Detail |
|---|---|
| Model Number | SFSP-015-02 |
| Voltage | 12V and 24V DC |
| Max Current | 15A |
| LED Indicator | Yes |
| Panel Material | Aluminum |
| Switch Positions | MANUAL-OFF-AUTO |
| Dimensions (Panel) | 75 x 63 mm (2.95 x 2.48 inches) |
| Overall Product Dimensions | 8.28 x 5.08 x 5.08 cm |
| Weight | 90.7 grams (0.1 kg) |
| Manufacturer | SEAFLO |
| UPC | 617566946194 |
| Power Source | Wired Electric |
| Electrical Plug Type | Panel Mount |
Warranty
This Seaflo product is covered by a 2-year warranty from the date of purchase. This warranty covers defects in materials and workmanship under normal use. Additionally, spare parts availability in the EU is guaranteed for 2 years. Please retain your proof of purchase for any warranty claims.
Support
For technical assistance, troubleshooting beyond this manual, or to inquire about warranty service, please contact your authorized Seaflo dealer or visit the official Seaflo website for the most up-to-date contact information and support resources. Always refer to the latest product documentation available from the manufacturer for comprehensive information.


