Pro-Tect 2000 Safety Cutter 09760
Pro-Tect 2000 Safety Cutter Instruction Manual
Model: #09760
Introduction
This manual provides comprehensive instructions for the safe and effective use, maintenance, and troubleshooting of your Pro-Tect 2000 Safety Cutter. Please read this manual thoroughly before operating the device.

Image 1: The Pro-Tect 2000 Safety Cutter. This image displays the overall design of the black plastic safety cutter, highlighting its ergonomic shape and integrated blade.
Safety Information
- Always handle the cutter with care. The blade is sharp.
- Keep fingers clear of the blade path during operation and blade changes.
- Store the cutter in a safe place, out of reach of children.
- Do not attempt to cut materials beyond the intended capacity of the cutter.
- Wear appropriate personal protective equipment (PPE) such as gloves and eye protection when using the cutter.
Product Features and Components
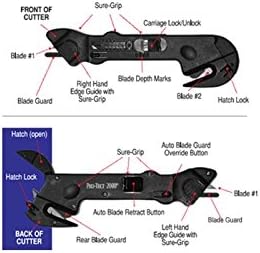
Image 2: Diagram of the Pro-Tect 2000 Safety Cutter, illustrating key components such as Blade #1, Blade Guard, Sure-Grip, Carriage Lock/Unlock, Blade Depth Marks, Right Hand Edge Guide, Blade #2, Hatch Lock, Auto Blade Retract Button, and Auto Blade Guard Override Button.

Image 3: The Pro-Tect 2000 Safety Cutter displayed in its original retail packaging, highlighting the product name and brand.
The Pro-Tect 2000 Safety Cutter features multiple components designed for safe and efficient cutting. Refer to the diagrams above for visual identification.
- Blade #1: Primary cutting blade, typically used for general cutting tasks.
- Blade #2: Secondary blade, often used for specific applications like tape cutting or film slitting.
- Blade Guard: Mechanism to cover the blade when not in use, enhancing safety.
- Sure-Grip: Textured areas on the handle for improved grip and control.
- Carriage Lock/Unlock: Mechanism to secure or release the blade carriage.
- Blade Depth Marks: Indicators for adjusting cutting depth.
- Hatch Lock: Secures the hatch for blade access.
- Auto Blade Retract Button: Retracts the blade automatically when pressure is released.
- Auto Blade Guard Override Button: Allows temporary override of the blade guard for specific cutting needs.
Setup
- Unpacking: Carefully remove the Pro-Tect 2000 Safety Cutter from its packaging. Inspect the device for any visible damage.
- Blade Inspection: Ensure that the blades are properly seated and the safety mechanisms are functional before first use. The cutter typically comes with blades pre-installed.
- Familiarization: Before cutting, familiarize yourself with the location and function of all safety features, including the blade guards and retraction mechanisms.
Operating Instructions
General Cutting (Blade #1)
- Grip the cutter firmly using the Sure-Grip areas.
- Position the material to be cut on a stable, flat surface.
- Engage Blade #1 by pressing the appropriate button or sliding the carriage lock/unlock mechanism. Ensure the blade is extended to the desired depth using the Blade Depth Marks if adjustable.
- Apply steady, even pressure and guide the cutter along the desired cutting line.
- Release the button or mechanism to retract the blade automatically after the cut is complete.
Specialized Cutting (Blade #2)
Blade #2 is designed for specific tasks, such as cutting through film or tape without damaging contents underneath. To use Blade #2, position the material under the secondary blade and pull the cutter towards you with controlled motion.
Using the Edge Guides
The Right Hand Edge Guide and Left Hand Edge Guide (as shown in diagrams) assist in making straight cuts by running along the edge of the material. Select the appropriate guide based on your cutting direction and dominant hand.
Maintenance
Cleaning
- Periodically clean the cutter to remove debris, dust, or adhesive residue.
- Use a dry cloth or a soft brush. Avoid using harsh chemicals or abrasive materials.
- Ensure the blade area is free from obstructions for proper operation.
Blade Replacement
When blades become dull, they should be replaced to maintain cutting efficiency and safety. Specific replacement blade models are typically available from the manufacturer or authorized retailers. Refer to the diagram showing the "Hatch (open)" for accessing the blade compartment.
- Ensure the blade is fully retracted and the cutter is locked in a safe position.
- Locate and open the Hatch Lock to access the blade compartment.
- Carefully remove the dull blade, taking precautions to avoid direct contact with the sharp edge.
- Insert a new, compatible replacement blade, ensuring it is correctly seated.
- Close and secure the Hatch Lock.
- Test the blade retraction and extension mechanisms before resuming use.
Troubleshooting
| Problem | Possible Cause | Solution |
|---|---|---|
| Blade jams or drags during cutting. | Dull blade, excessive material thickness, or debris in blade path. | Replace blade, reduce material thickness, or clean blade area. |
| Blade does not retract fully. | Debris obstructing the retraction mechanism, or damaged spring. | Clean the blade carriage. If the issue persists, the unit may require professional inspection or replacement. |
| Blade comes out of the loading end. | Improper blade installation or a faulty Hatch Lock mechanism. | Ensure the blade is correctly seated and the Hatch Lock is securely closed. If the problem continues, discontinue use and contact support. |
Specifications
- Brand: Pro-Tect 2000 Safety Cutter
- Model: #09760
- Manufacturer: ADCO Industries
- Material: Plastic (Body and Handle)
- Blade Material: Plastic (Note: This specification is provided in the product data. Typically, cutting blades are metal. This may refer to a plastic-encased safety blade or a specific type of non-metal blade.)
- Item Weight: 3.13 ounces
- Package Dimensions: 7.72 x 2.48 x 0.87 inches
- UPC: 789797097607
- Date First Available: August 1, 2018
- Batteries Required: No
Warranty and Support
Information regarding specific warranty terms or direct customer support contacts for the Pro-Tect 2000 Safety Cutter is not available in the provided product data. For warranty inquiries or support, please refer to the product packaging or contact ADCO Industries directly.
Ask a question about this manual
Ask about setup, troubleshooting, compatibility, parts, safety, or missing instructions. Manuals+ will review the question and use this page’s manual context to help answer it.