Introduction
This manual provides comprehensive instructions for the safe and effective installation, operation, and maintenance of your Homelite 2700 PSI Pressure Washer Pump. Please read this manual thoroughly before attempting any installation or operation to ensure proper function and to prevent injury or damage.
Safety Information
Always observe the following safety precautions when working with pressure washer pumps:
- Disconnect the pressure washer from its power source (engine off, spark plug wire disconnected) before performing any maintenance or installation.
- Wear appropriate personal protective equipment, including safety glasses and gloves.
- Ensure all connections are secure to prevent leaks and potential hazards.
- Do not operate the pump without water supply, as this can cause severe damage.
- Keep children and pets away from the work area.
Package Contents
Verify that all items listed below are included in your package:
- Homelite 2700 PSI Pressure Washer Pump
- Mounting bolts and lock washers
- Shaft key
- Thermal relief valve
- Outlet spin connector end for twist-type pressure hose
- Installation Instructions (this manual)

Image: The Homelite 2700 PSI Pressure Washer Pump shown with its accompanying parts, including mounting bolts, washers, and a shaft key.
Compatibility
This replacement pump is designed for specific pressure washer configurations. Please ensure your unit meets the following requirements:
- Shaft Type: This pump is designed for 3/4 inch horizontal shaft motors only. It is not compatible with vertical shaft engines.
- Pump Type: This pump does not work with radial strap pumps.
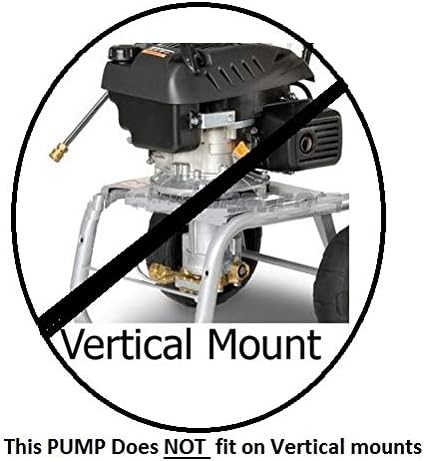
Image: A visual warning indicating that this pump is not suitable for vertical mount pressure washer engines.
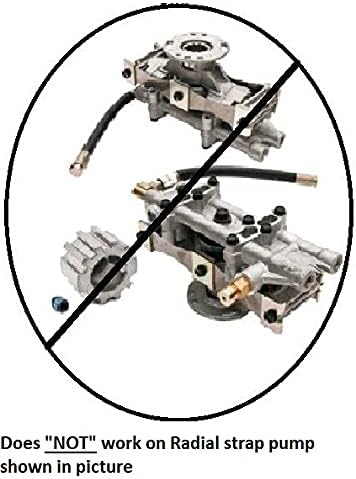
Image: A visual warning indicating that this pump is not compatible with radial strap pump designs.
Setup and Installation
Follow these steps to install your new pressure washer pump:
- Preparation: Ensure the pressure washer engine is off and cooled down. Disconnect the spark plug wire for safety. Remove the old pump by unbolting it from the engine.
- Clean Shaft: Clean the engine's drive shaft thoroughly to remove any rust or debris.
- Install Shaft Key: Insert the provided shaft key into the keyway on the engine's drive shaft. Applying a small amount of lubricant to the shaft key can help it stay in place during installation.
- Mount New Pump: Carefully slide the new pump onto the engine's drive shaft, aligning the keyway on the pump with the shaft key. Ensure the pump seats fully against the engine.
- Secure Pump: Use the provided mounting bolts and lock washers to secure the pump to the engine. Tighten the bolts evenly and securely.
- Connect Hoses: Connect the water inlet hose to the pump's inlet port and the high-pressure outlet hose to the pump's outlet spin connector. Ensure all connections are tight.
- Install Thermal Relief Valve: Install the thermal relief valve into its designated port on the pump.
- Final Check: Double-check all connections and ensure the pump is securely mounted before proceeding to operation.
Operating Instructions
Once the pump is installed, follow your pressure washer's engine starting procedure. Ensure a continuous water supply is connected and turned on before starting the engine. Squeeze the spray gun trigger to purge air from the system before applying pressure. Refer to your pressure washer's main manual for specific operating instructions.
Maintenance
Regular maintenance ensures the longevity and performance of your pump:
- Water Supply: Always ensure a clean, adequate water supply to prevent cavitation and pump damage.
- Winterization: In freezing temperatures, drain all water from the pump or use a pump protector/antifreeze solution to prevent damage.
- Storage: Store the pressure washer in a dry, protected area when not in use.
- Leak Checks: Periodically inspect for leaks around connections and seals. Address any leaks promptly.
Troubleshooting
If you encounter issues, consider the following common problems and solutions:
| Problem | Possible Cause | Solution |
|---|---|---|
| No pressure or low pressure | Insufficient water supply, air in pump, clogged nozzle, worn seals | Check water source, purge air by squeezing trigger, clean/replace nozzle, inspect/replace seals. |
| Water leaks from pump | Loose connections, damaged O-rings/seals, cracked housing | Tighten connections, replace O-rings/seals, inspect for physical damage. |
| Pump making unusual noise | Air in pump, cavitation, loose components | Purge air, ensure adequate water supply, check for loose bolts. |
Specifications
- Brand: Homelite
- Model Number: HLNEWPump
- Pressure Rating: 2700 PSI (as per product title)
- Shaft Compatibility: 3/4 inch Horizontal Shaft
- Material: Aluminum, Plastic
- Item Weight: 2 Pounds
- UPC: 036663577016
Warranty and Support
For warranty information or technical support, please refer to the original pressure washer manufacturer's documentation or contact Homelite customer service directly. Keep your purchase receipt as proof of purchase.


