Huepar 621CG#EU
Huepar 621CG 360-Degree Green Cross Line Laser Level User Manual
Model: 621CG#EU
1. Safety Information
Please read and understand all safety information before operating this tool. Failure to follow these instructions may result in laser radiation exposure, electric shock, or serious injury.
Laser Safety
WARNING: Avoid direct eye exposure to the laser beam. The device is a Class 2 laser product according to IEC/EN60825-1/2014. It is permissible to use the device without further safety precautions. Eye protection is generally ensured by aversion reactions and the blink reflex.
- Do not stare directly into the laser beam.
- Do not intentionally direct the laser beam at other people or reflective surfaces.
- Do not operate the laser level in explosive atmospheres, such as in the presence of flammable liquids, gases, or dust.
- Keep the laser level out of reach of children.
2. Product Overview
The Huepar 621CG is a versatile laser level designed for various alignment and leveling tasks. It projects a 360-degree horizontal green line, a 140-degree vertical green line, and two red plumb dots (up and down).

Figure 2.1: Huepar 621CG Laser Level in operation, showing 360-degree horizontal line and vertical line with plumb dots.
Package Contents
Verify that all items listed below are included in your package:
- 1 x Huepar 621CG Green Laser Level
- 1 x Magnetic Pivoting Base
- 1 x Green Laser Target Plate
- 4 x AA Batteries
- 1 x Carry Pouch
- 1 x User Manual

Figure 2.2: All components included in the Huepar 621CG package.
Component Identification

Figure 2.3: Detailed view of the Huepar 621CG laser level with key components labeled.
- Metal Protective Cover: Protects the laser emitter.
- Laser Window: Where the laser beams exit.
- Keypad: For controlling power and laser modes.
- Pendulum/Transit Lock: Secures the pendulum for transport and enables manual mode.
- Battery Compartment: Holds 4 AA batteries.
- 5/8"-11 Threaded Mount: For heavy-duty tripods.
- 1/4"-20 Threaded Mount: For standard tripods and the magnetic base.
3. Setup
3.1 Battery Installation
The Huepar 621CG requires 4 AA batteries for operation.
- Locate the battery compartment on the bottom of the device.
- Open the battery cover.
- Insert 4 AA batteries, ensuring correct polarity (+/-) as indicated inside the compartment.
- Close the battery cover securely.

Figure 3.1: Battery installation and power-on methods.
3.2 Mounting the Device
The 621CG offers multiple mounting options:
- Magnetic Pivoting Base: Attach the laser level to the magnetic base using the 1/4"-20 thread. The magnetic base can then be attached to metal surfaces or mounted on a tripod.
- Tripod Mounting: The device has both 1/4"-20 and 5/8"-11 threaded mounts on its base, allowing direct attachment to standard or heavy-duty tripods.

Figure 3.2: Magnetic base attachment and tripod thread options.
4. Operating Modes
4.1 Self-Leveling Mode
This mode is used for projecting perfectly level or plumb lines. The device will automatically level itself within its self-leveling range of 3.5°.
- Unlock the pendulum by sliding the pendulum lock switch to the unlocked position.
- Press the power button to turn on the device. The laser lines will activate and self-level.
- If the device is outside its self-leveling range, the laser lines will flash rapidly to indicate it cannot self-level. Adjust the device's position until the lines stop flashing.
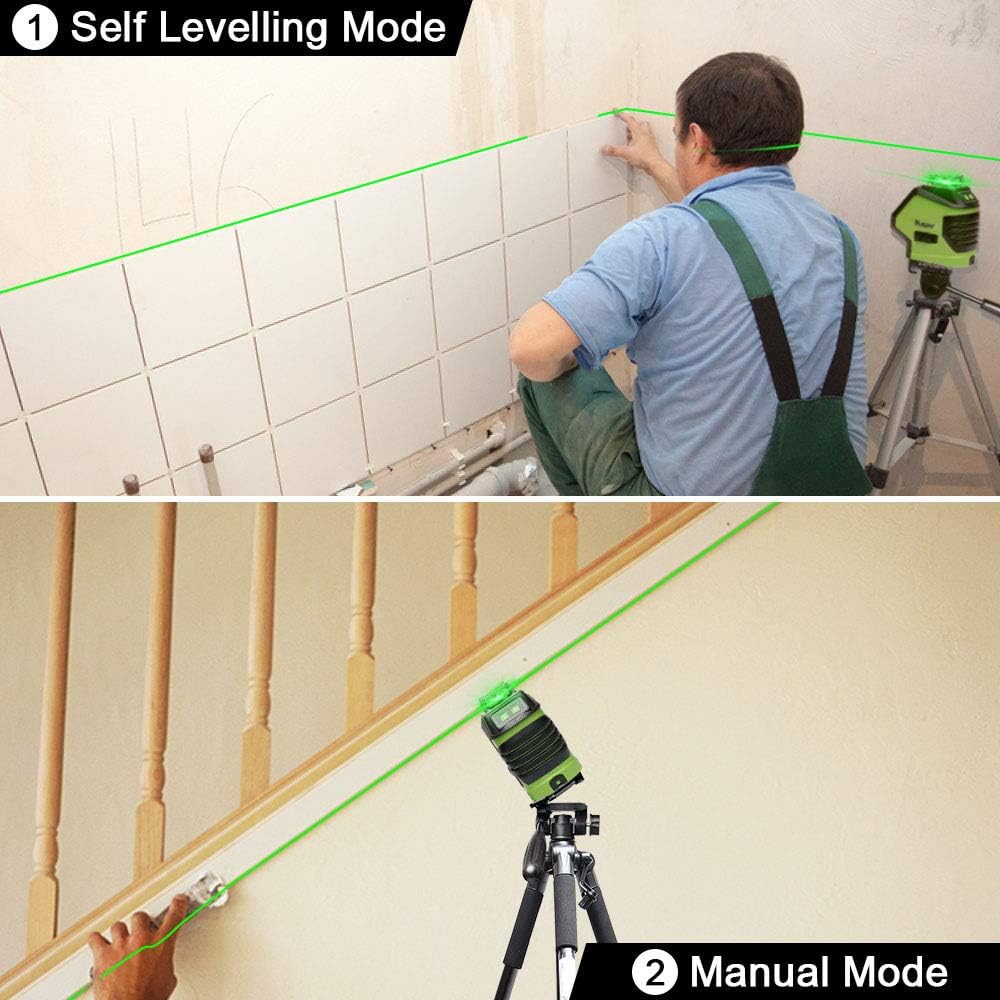
Figure 4.1: Using the laser level in self-leveling mode for tile installation.
4.2 Manual Mode (Tilt Mode)
Manual mode allows you to project laser lines at any angle, useful for tasks like installing stair railings.
- Lock the pendulum by sliding the pendulum lock switch to the locked position.
- Press and hold the power button for approximately 3 seconds to turn on the device. The laser lines will activate without self-leveling, allowing for angled projection.
- The laser lines will not flash in manual mode, indicating that they are not level or plumb.
Figure 4.2: Using the laser level in manual mode for stair railing installation.
4.3 Pulse Mode (Outdoor Mode)
Pulse mode extends the working range of the laser level, especially in bright outdoor conditions, by allowing it to be used with a laser receiver (sold separately).
- In self-leveling mode, short press the 'P' button (or the button with a pulse icon) to activate pulse mode. The indicator light will turn on.
- When pulse mode is active, the laser lines will appear slightly dimmer to the naked eye but are optimized for detection by a compatible Huepar laser receiver (e.g., Huepar LR-6RG).
- To deactivate pulse mode, short press the 'P' button again.
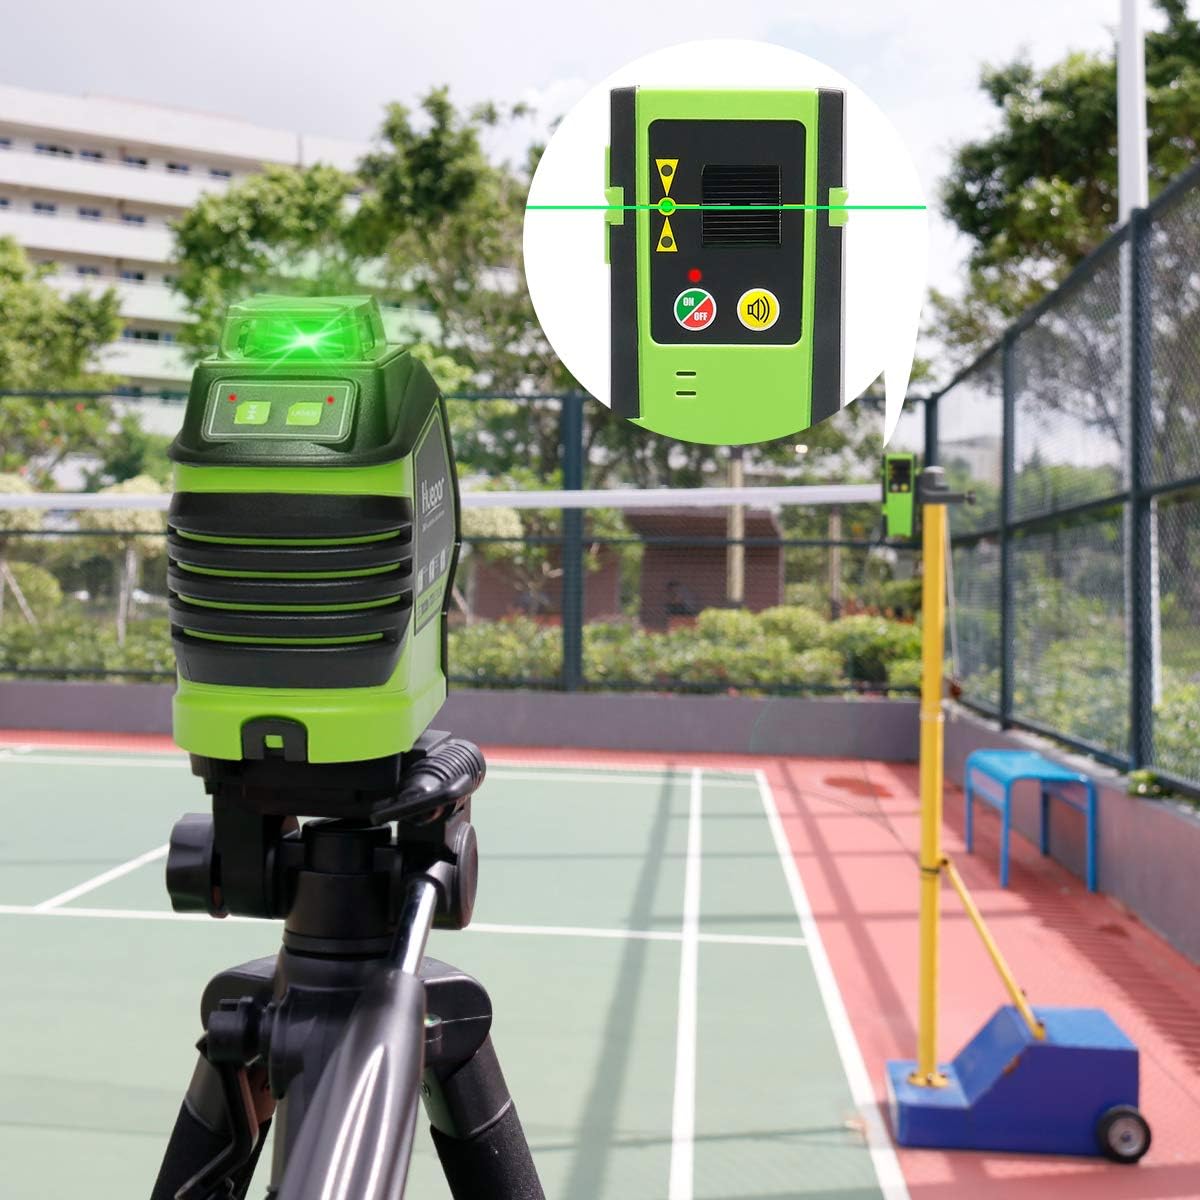
Figure 4.3: Laser level used outdoors, compatible with a receiver in pulse mode.
4.4 Switching Line Combinations
The 621CG allows you to switch between different laser line combinations to suit your specific task.
- In self-leveling mode, short press the power button to cycle through the available laser line combinations:
- Horizontal line + Vertical line + Plumb dots
- Horizontal line only
- Vertical line only
- Horizontal line + Plumb dots
- Plumb dots only

Figure 4.4: Available laser line modes and combinations.
5. Specifications
| Feature | Specification |
|---|---|
| Laser Color | Green Beam |
| Laser Projection | 1 x 360° Horizontal Line, 1 x 140° Vertical Line, 2 x Red Plumb Dots |
| Laser Class | Class 2 (IEC/EN60825-1/2014) |
| Laser Wavelength | 505-520nm (Green Lines), 635nm (Red Dots) |
| Leveling Accuracy | ±3mm at 10m (± 1/9 In. at 33 Ft) |
| Dot Accuracy (down) | 3mm at 10m (1/9 In. at 33Ft) |
| Self-leveling Range | ±3.5° |
| Leveling Duration | 3 seconds |
| Working Distance (Line/Dot) | 25m / 82Ft (100 LUX) |
| Operating Time | 4 hours (with all laser beams on) |
| Power Supply | 4 x 1.5V LR6 (AA) Batteries |
| Tripod Thread | 1/4"-20 & 5/8"-11 |
| IP Rating | IP54 (Dust and Splash Proof) |
| Operating Temperature | 0 ℃ to +45 ℃ (32°F to 113°F) |
| Storage Temperature | -20 ℃ to +60 ℃ (-4°F to 140°F) |
| Product Dimensions | Approx. 14cm (H) x 11.9cm (W) x 6.4cm (D) |
| Product Weight | 1.26 Kilograms (including batteries) |
6. Maintenance
- Cleaning: Regularly clean the laser window and the device housing with a soft, damp cloth. Do not use abrasive cleaners or solvents.
- Storage: When not in use for extended periods, remove the batteries to prevent leakage. Store the device in its carry pouch in a dry, cool place, away from direct sunlight and extreme temperatures.
- Calibration: While the device is factory-calibrated, significant impacts or prolonged use may affect its accuracy. If you suspect a calibration issue, contact Huepar support for assistance.
7. Troubleshooting
- Laser lines are flashing rapidly: This indicates the device is outside its self-leveling range. Adjust the device's position until it is on a more level surface.
- No laser lines or weak laser:
- Check battery levels and replace if necessary.
- Ensure the pendulum lock is in the correct position for the desired mode (unlocked for self-leveling, locked for manual).
- Clean the laser window if it is obstructed.
- Device does not turn on:
- Verify batteries are inserted correctly and have sufficient charge.
- Ensure the power button is pressed firmly or held for manual mode activation.
For further assistance, please refer to the Warranty and Support section.
8. Warranty and Support
Huepar products are designed and manufactured to the highest quality standards. For warranty information, technical support, or service inquiries, please contact Huepar customer service through the official website or your purchase platform.
Please have your model number (621CG#EU) and purchase details ready when contacting support.
Related Documents - 621CG#EU
 |
Huepar 5011G Self-leveling Cross Line Laser Level User Manual User manual for the Huepar 5011G self-leveling cross line laser level. Provides instructions on product overview, safety, operation, charging, and warranty. |
 |
Huepar 9011G/9011R, 9211G/9211R Cross Line/Plumb Spot Combo Laser Level User Manual User manual for the Huepar 9011G/9011R and 9211G/9211R Cross Line/Plumb Spot Combo Laser Level, covering safety instructions, product overview, operation modes, specifications, and warranty. |
 |
Huepar 7211CG/7211CR Laser Level User Manual Comprehensive user manual for the Huepar 7211CG/7211CR Cross Line/Plumb Spot Combo Laser Level, covering product overview, safety instructions, operation modes, specifications, and warranty. |
 |
Huepar HM03CG 360° Self-leveling Cross Line Laser Level User Manual This user manual provides detailed instructions for the Huepar HM03CG 360° Self-leveling Cross Line Laser Level, covering product overview, safety, operation, specifications, and warranty information. |
 |
Huepar 503CG/503DG 3 x 360° Self-leveling Cross Line Laser Level User Manual User manual for Huepar 503CG and 503DG 3 x 360° Self-leveling Cross Line Laser Levels. Includes safety, operation, specifications, and maintenance guide from Changzhou Levelsure Optoelectronics Technology Co.,Ltd. |
 |
Huepar 360° Self-leveling Cross Line Laser Level User Manual Thank you for purchasing the Huepar 360° Self-leveling Cross Line Laser Level. This user manual provides comprehensive instructions on operation, safety, specifications, and warranty for models 702CG, 703CG, 703DG, and 704CG. Read thoroughly before use to ensure proper functionality and safety. |
Ask a question about this manual
Ask about setup, troubleshooting, compatibility, parts, safety, or missing instructions. Manuals+ will review the question and use this page’s manual context to help answer it.