1. Introduction
The Jebao SOW-4 Aquarium Wavemaker is engineered to create natural wave patterns and optimal water circulation within your aquarium, essential for the health and well-being of aquatic life. This manual provides comprehensive instructions for the safe and efficient operation, installation, and maintenance of your wavemaker.
2. Safety Information
Important Safety Instructions:
- For indoor use only. Do not use this product outdoors or in wet conditions outside of the aquarium.
- Always unplug the wavemaker from the power outlet before performing any maintenance, installation, or handling the unit.
- Ensure your hands are dry before plugging in or unplugging the power adapter.
- Do not operate the wavemaker if the power cord or plug is damaged.
- Keep all electrical connections and the controller dry. Avoid splashing water onto the controller.
- The magnetic mount is very strong. Exercise caution during installation to avoid pinching fingers or damaging the aquarium glass.
- This appliance is not intended for use by persons (including children) with reduced physical, sensory or mental capabilities, or lack of experience and knowledge, unless they have been given supervision or instruction concerning use of the appliance by a person responsible for their safety.
3. Package Contents
Verify that all components are present in your package:
- Jebao SOW-4 Water Pump (Wavemaker)
- Wired Controller
- AC Adapter
- Magnet Mount

Figure 3.1: Complete Jebao SOW-4 Wavemaker kit, showing the pump, controller, and power adapter.
4. Setup Instructions
- Prepare the Aquarium: Ensure your aquarium is clean and filled with water to the desired level.
- Mount the Wavemaker:
- Place the wavemaker pump (wet side) inside the aquarium, submerging it completely.
- Align the external magnet (dry side) on the outside of the aquarium glass, directly opposite the internal pump. The strong magnetic force will secure the pump in place.
- Position the wavemaker to achieve optimal water flow for your tank. Avoid directing flow directly at sand beds to prevent sandstorms.
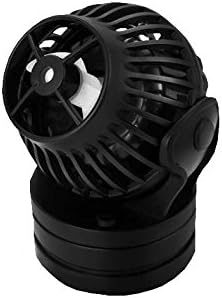
Figure 4.1: Close-up view of the Jebao SOW-4 Wavemaker pump unit.
- Connect the Controller: Plug the wavemaker pump's cable into the designated port on the wired controller.
- Connect Power: Plug the AC adapter into the controller, then plug the AC adapter into a suitable power outlet. Ensure a drip loop is formed with the power cord to prevent water from traveling along the cord to the outlet.
5. Operating Instructions
The Jebao SOW-4 Wavemaker offers various modes and adjustable settings for customized water flow.
5.1 Controller Overview
The controller features a dial for power/speed adjustment, and buttons for mode selection and feed mode activation. LED indicators display the current speed and mode.
5.2 Adjusting Flow Rate
The wavemaker has 8 different flow rates. Use the dial on the controller to increase or decrease the pump's output. Turn clockwise to increase flow, counter-clockwise to decrease.
5.3 Operating Modes
The SOW-4 supports various wave patterns and constant flow modes. Refer to the controller's specific button labels for cycling through available modes (e.g., W1, W2, Else, H, C modes). Each mode simulates different natural water movements.
5.4 One-Touch Feed Mode
Press the 'Feed' button on the controller to activate the feed mode. This will temporarily slow down or stop the pump for a period of approximately 10 minutes, allowing fish to feed without food being immediately dispersed by the current. The pump will automatically resume its previous operation after the 10-minute period.
5.5 Master/Slave Wireless Mode
For larger aquariums or more complex flow patterns, two or more SOW wavemakers can be synchronized using the Master/Slave wireless mode. Designate one controller as the 'Master' and others as 'Slave' units. The Slave units will mimic the Master's settings, creating coordinated water movement. Consult the controller's specific instructions for pairing procedures.
6. Maintenance
Regular maintenance ensures optimal performance and longevity of your wavemaker.
- Cleaning the Impeller: Periodically remove the pump from the aquarium and disassemble the impeller housing. Clean the impeller and its chamber of any debris, algae, or calcium buildup. A soft brush and warm water can be used. For stubborn calcium deposits, a mild vinegar solution may be used, followed by thorough rinsing.
- Checking Connections: Ensure all cable connections are secure and free from corrosion.
- Power Off During Maintenance: Always unplug the unit from the power source before performing any cleaning or maintenance.
7. Troubleshooting
| Problem | Possible Cause | Solution |
|---|---|---|
| Wavemaker not running | No power; Loose connection; Impeller jammed. | Check power outlet; Ensure all cables are securely connected; Clean impeller and housing. |
| Reduced flow | Dirty impeller; Obstruction in pump; Incorrect mode/speed setting. | Clean impeller; Remove any debris; Adjust speed setting on controller. |
| Excessive noise/vibration | Impeller not seated correctly; Debris in pump; Pump not securely mounted. | Re-seat impeller; Clean pump thoroughly; Re-position and secure magnet mount. |
| Controller not responding | Power issue; Controller malfunction. | Check power supply; Unplug and re-plug the controller; If problem persists, contact customer support. |
8. Specifications
| Feature | Detail |
|---|---|
| Model Name | SOW-4 |
| Item Model Number | SOW-4 |
| Brand Name | Jebao |
| Item Weight | 1.3 Pounds |
| Item Dimensions (LxWxH) | 6 x 5.3 x 2.8 inches |
| Item Package Dimensions (LxWxH) | 6.1 x 5.31 x 2.83 inches |
| Color | Black |
| Included Components | Water pump, controller, AC adapter |
| Specific Uses for Product | Indoor |
9. Warranty and Support
This Jebao SOW-4 Wavemaker comes with a 180-day warranty from the date of purchase. This warranty covers manufacturing defects under normal use.
For technical support, warranty claims, or any questions not covered in this manual, please contact your retailer or the manufacturer directly. Please have your model number and purchase date available when contacting support.


