1. Introduction
This user manual provides detailed instructions for the installation, operation, and maintenance of your JOOAN 8CH 1080P Security Camera System. Please read this manual thoroughly before setting up and using the system to ensure proper functionality and safety.
2. Product Overview
The JOOAN 8CH 1080P Security Camera System is a comprehensive surveillance solution designed for both indoor and outdoor use, offering high-definition video recording and remote access capabilities.
2.1. Key Components
- 8-Channel H.265+ DVR (Digital Video Recorder)
- 4 x HD 2MP Weatherproof CCTV Surveillance Cameras
- 1TB Hard Disk Drive (pre-installed)
- Power Adapters
- Video/Power Cables
- USB Mouse
- User Manual
- Warning Sticker

Figure 2.1: Complete contents of the JOOAN Security Camera System package.
2.2. Main Features
- Expandable 8-Channel System: The DVR supports up to 8 cameras, allowing for future expansion with additional add-on cameras.
- Full 1080P HD Video: Delivers crystal clear clarity for superior image quality.
- H.265+ Video Compression: Efficiently saves storage space, allowing for longer recording times on the included 1TB HDD.
- IP66 Weatherproof Cameras: Designed for both indoor and outdoor use, protected against rain, wind, and snow.
- Good Night Vision: Industrial-grade 36pcs IR-cut LEDs provide clear black and white images up to 100ft in total darkness.
- Motion Detection & Alerts: Receive mobile notifications when motion is detected, with customizable detection zones.
- Remote Access: View live feeds and recordings from anywhere using the free Danale APP on mobile devices (iOS and Android) or PC software.

Figure 2.2: The JOOAN 8CH 1080P Security Camera System, featuring the DVR and four cameras.

Figure 2.3: Illustration of the IP66 weatherproof rating, showing the camera's resilience to various weather conditions.

Figure 2.4: The H.265+ Hybrid DVR, supporting multiple channel types for flexible camera integration.
3. Setup Guide
3.1. Initial Setup and Connections
Follow these steps to set up your security camera system:
- Unpack Components: Carefully remove all items from the packaging.
- Connect Cameras: Connect each camera to the DVR using the provided video/power cables. Ensure secure connections.
- Connect DVR to Monitor: Use a VGA or HDMI cable (not included) to connect the DVR to a monitor or TV.
- Connect USB Mouse: Plug the USB mouse into an available USB port on the DVR.
- Connect Power: Connect the power adapter to the DVR and plug it into a power outlet. Connect power adapters to cameras if they require separate power.
- Power On: The system will power on automatically.
Video 3.1: Watch the "Operation Video for JOOAN System" for a visual guide on unboxing and initial connections (0:09 - 0:21).
3.2. Network Configuration for Remote Access
To access your camera system remotely from your smartphone or computer, network configuration is required. The system supports both quick remote access via QR code and traditional network setup.
Method 1: Quick Remote Access (Mobile App)
This method uses the Danale APP and QR code scanning for easy setup:
- Ensure your DVR is connected to your router via an Ethernet cable.
- Download the free Danale APP from your mobile device's app store (available for iOS and Android).
- Open the app and select the option to add a new device.
- Scan the QR code displayed on your DVR's monitor. This will automatically add the device to your app.
- Once added, you can view live feeds from your cameras.

Figure 3.1: Scan the QR code to download the app and enable remote viewing on your phone or computer.
Video 3.2: Quick Remote Access by Cellphone (Method 1) - See video from 0:32 - 0:55 for detailed steps.
Method 2: Normal Remote Access (Manual Network Setup)
For advanced users or specific network configurations, you can manually set up network parameters:
- Access the DVR's main menu (right-click with the mouse).
- Navigate to the 'Network' settings.
- Configure IP Address, Subnet Mask, Gateway, and DNS settings as required by your network. Ensure DHCP is enabled or set static IP.
- Note the Media Port and HTTP Port for remote access.
Video 3.3: Normal Remote Access by Cellphone (Method 2) - See video from 0:56 - 1:13 for detailed steps.
Remote Access via PC (CMS/VMS Software)
The system also supports remote viewing and management via PC using CMS (Central Management Software) or VMS (Video Management Software). This allows for a more comprehensive monitoring experience on a larger screen.
Video 3.4: Simple and Safe Remote Access by PC - See video from 1:14 - 1:41 for detailed steps.
4. Operating Instructions
4.1. Live View
After successful setup, the live view of your cameras will be displayed on the connected monitor. You can switch between single-camera view and multi-camera grid view using the DVR's interface.
4.2. Recording Configuration
The DVR supports various recording modes, including continuous recording and motion-triggered recording.
4.2.1. Enabling Recording
To configure recording settings:
- Access the DVR's main menu.
- Navigate to 'Record Conf.' (Record Configuration).
- Select the desired channel or 'All' for all cameras.
- Choose the recording mode (Schedule, Manual, Stop). For continuous recording, set a schedule for 24/7.
- Click 'OK' to save settings.
Video 4.1: Enable Record - See video from 1:58 - 2:15 for detailed steps.
4.2.2. Motion Detection Recording
Motion detection allows the system to record only when movement is detected, saving storage space and making event review easier. You can also enable face detection and human detection to reduce false alerts.
- Access the DVR's main menu.
- Navigate to 'Alarm' settings.
- Select 'Motion Detect' to configure motion detection zones and sensitivity.
- Optionally, enable 'Face detection' or 'Human Detect' for advanced filtering.
- Configure alert actions such as email notifications or mobile app alerts.

Figure 4.1: The system supports Smart AI Motion Detection and Face Detection for enhanced security and reduced false alarms.

Figure 4.2: Motion detection triggers real-time recording and sends alerts to your mobile phone.
Video 4.2: Enable Motion Detection - See video from 2:16 - 2:29 for detailed steps.
4.3. Playback
To review recorded footage:
- Access the DVR's main menu.
- Select 'Playback'.
- Choose the date and time range for the footage you wish to review.
- The system features a friendly playback interface, allowing you to easily navigate through recorded events.

Figure 4.3: The friendly playback interface allows easy searching and viewing of recorded video.
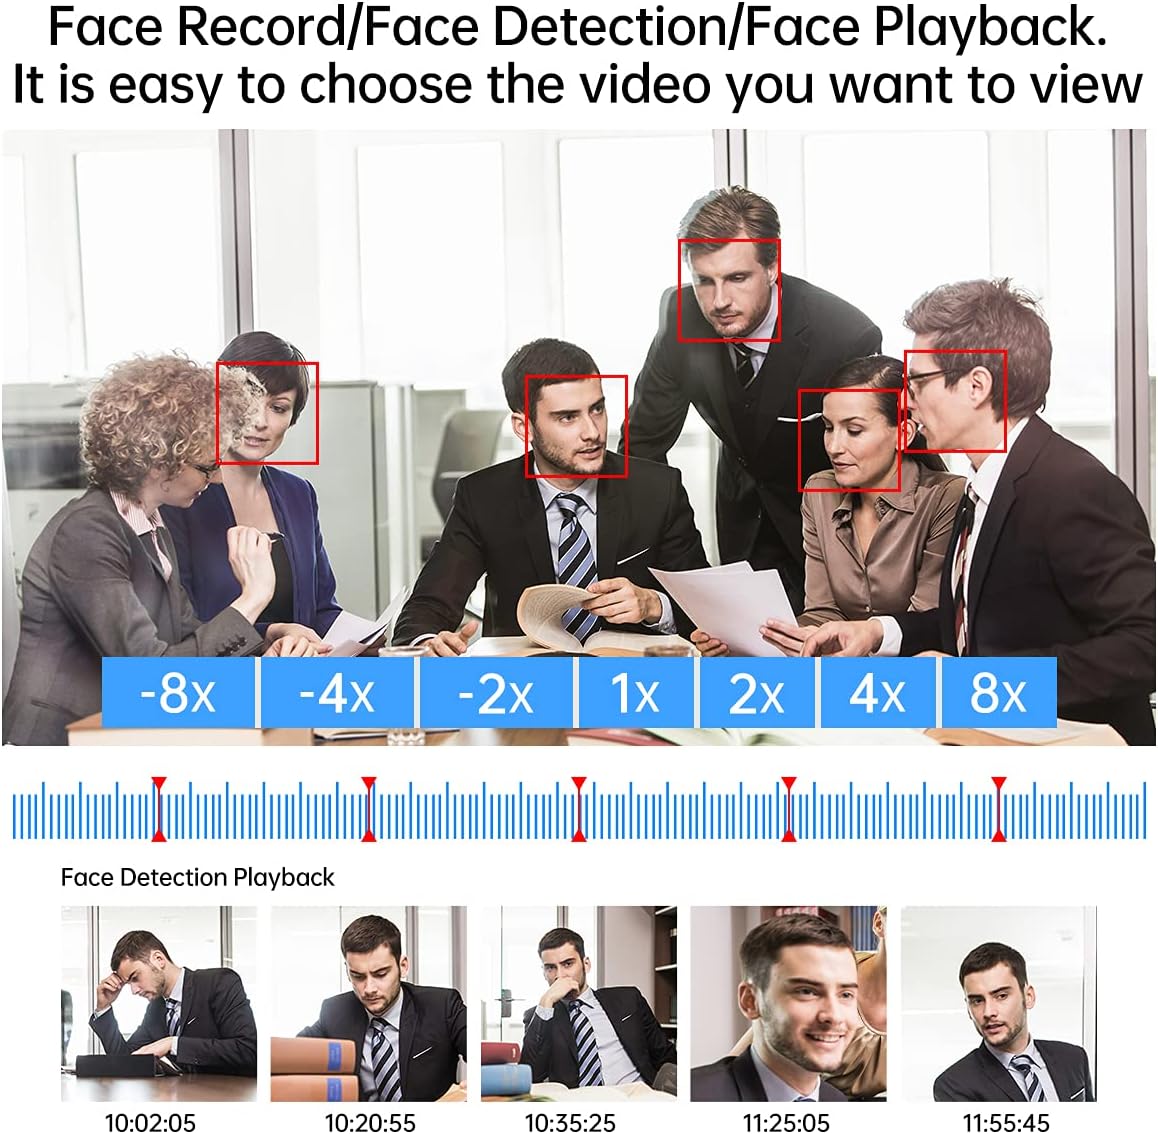
Figure 4.4: Face detection and playback features allow for quick retrieval of specific events.
5. Maintenance
5.1. Hard Drive Management
The 1TB hard drive is pre-installed for 24/7 continuous security protection. The H.265+ compression technology optimizes storage, allowing for extended recording periods.
5.2. Firmware Updates
Periodically check the manufacturer's website for firmware updates to ensure optimal performance and access to new features. Follow the provided instructions for safe firmware upgrades.
5.3. Cleaning
Regularly clean the camera lenses and DVR unit with a soft, dry cloth to prevent dust buildup and maintain clear image quality. Avoid using harsh chemicals or abrasive materials.
6. Troubleshooting
If you encounter any issues with your JOOAN Security Camera System, please refer to the following common troubleshooting tips:
- No Video Output: Check all cable connections (power, video, HDMI/VGA). Ensure the monitor is set to the correct input source.
- No Recording: Verify that the hard drive is properly installed and recognized by the DVR. Check recording schedules and motion detection settings.
- Remote Access Issues: Ensure the DVR is connected to the internet. Verify network settings (IP address, DNS). Check firewall settings on your router. Confirm the mobile app or PC software is updated to the latest version.
- Poor Night Vision: Ensure camera lenses are clean and free from obstructions. Check for strong light sources near the camera that might interfere with IR illumination.
- Frequent Motion Alerts: Adjust motion detection sensitivity and refine detection zones to focus on critical areas and reduce false alarms from environmental factors.
For more complex issues, please contact JOOAN customer support.
7. Specifications
| Feature | Specification |
|---|---|
| Brand | JOOAN |
| Connectivity Technology | Wired |
| Special Feature | Motion Sensor, Night Vision |
| Number of Channels | 8 |
| Memory Storage Capacity | 1 TB |
| Power Source | DC Power (Adapter Included) |
| Item Dimensions L x W x H | 11.81 x 7.09 x 9.84 inches |
| Recommended Uses For Product | Indoor, Outdoor |
| Compatible Devices | Cameras, Personal Computers |
| Signal Format | Analog |
| Low Light Technology | Night Color |
| Night Vision Range | 100 Feet |
| Item Weight | 9.92 pounds |
| Model Number | 01-1004-000005-F |
8. Warranty and Support
JOOAN is committed to providing high-quality products and customer satisfaction. For warranty information, technical support, or any inquiries regarding your security camera system, please refer to the contact information provided in your product packaging or visit the official JOOAN website.
For additional support, you may visit the JOOAN Store on Amazon: JOOAN Store