1. Introduction
Thank you for choosing the ZenStyle 10'x30' Outdoor Canopy Party Tent. This manual provides essential instructions for the safe and correct assembly, operation, and maintenance of your canopy tent. Please read all instructions carefully before beginning assembly and retain this manual for future reference.
This canopy tent is designed for temporary outdoor use, suitable for events such as parties, weddings, commercial gatherings, and backyard activities. It features a durable polyethylene cover, a rust-resistant powder-coated steel framework, and 8 removable sidewalls.
Important Safety Note: This canopy is intended for temporary use. We advise against leaving the canopy up overnight or under adverse weather conditions such as strong winds, heavy rain, or snow. Polyethylene fabric is not fireproof; keep away from all sources of fire.
2. Product Components
Before assembly, verify that all parts listed below are present. Refer to the assembly diagram for visual identification of components.

Figure 2.1: Main Assembly Components Diagram
- NO.1: 4PCS (Long horizontal poles)
- NO.2: 10PCS (Medium horizontal poles)
- NO.3: 16PCS (Short horizontal poles)
- NO.4: 8PCS (Corner connectors)
- NO.5: 8PCS (Leg poles)
- NO.6: 8PCS (Roof support poles)
- NO.7: 4PCS (Ridge poles)
- NO.8: 1PCS (Center ridge connector)
- NO.9: 1PCS (End ridge connector)
- NO.10: 1PCS (Peak connector)
- NO.11: 1PCS (Base plates)
- Fabric Cover: 1PC (Roof cover)
- Sidewalls: 8PCS (Includes 6 windowed panels and 2 zippered doorways)
- Accessories: Ropes and Stakes for stability

Figure 2.2: Removable Sidewalls Overview
3. Setup Instructions
Assembly typically requires at least 2-4 people due to the size of the structure. Choose a flat, solid surface for installation. Do not attempt to set up on uneven ground or during windy conditions.
3.1 Frame Assembly
- Step 1: Assemble the Base Frame. Connect the horizontal poles (NO.1, NO.2, NO.3) using the corner connectors (NO.4) to form the rectangular base of the tent. Ensure all connections are secure.
- Step 2: Attach Leg Poles. Insert the leg poles (NO.5) into the base frame connectors.
- Step 3: Assemble the Roof Frame. Connect the roof support poles (NO.6), ridge poles (NO.7), center ridge connector (NO.8), end ridge connector (NO.9), and peak connector (NO.10) to form the roof structure. Refer to the assembly diagram (Figure 2.1, section 1) for the correct configuration.
- Step 4: Attach Roof Frame to Leg Poles. Carefully lift and attach the assembled roof frame onto the top of the leg poles (NO.5). Ensure all connections are firm.
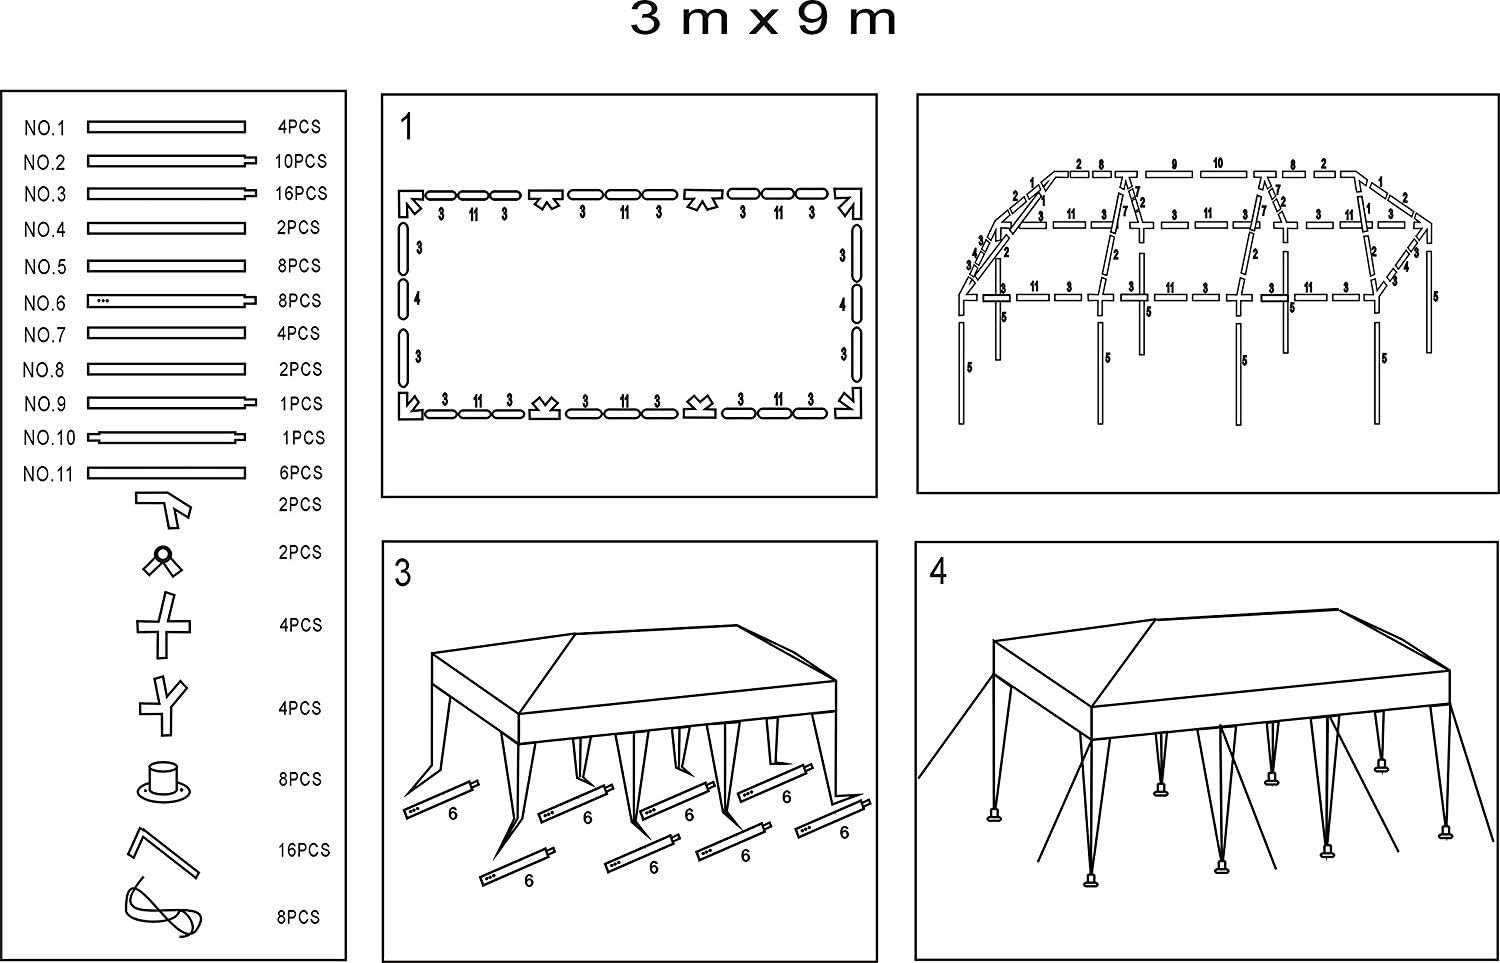
Figure 3.1: Frame Assembly Steps
3.2 Cover and Sidewall Installation
- Step 5: Install the Roof Cover. Carefully drape the polyethylene roof cover over the assembled frame. Ensure it is centered and evenly distributed. Secure the cover to the frame using any integrated fasteners (e.g., Velcro straps).
- Step 6: Attach Sidewalls. Attach the 8 removable sidewalls to the tent frame. The sidewalls typically attach with Velcro or ties. Position the 2 zippered doorways as desired.
- Step 7: Secure with Ropes and Stakes. Use the provided ropes and stakes to anchor the tent securely to the ground. This is crucial for stability, especially in light winds.

Figure 3.2: Fully Assembled Canopy Tent
4. Operating Instructions
4.1 Sidewall Management
The tent includes 8 removable sidewalls, consisting of 6 windowed panels and 2 zippered doorways. These can be attached or removed as needed to adapt to weather conditions or event requirements. The zippered doorways allow for easy entry and exit, while the windowed panels provide light and visibility.
4.2 Weather Considerations
This canopy offers waterproof and UV protection. The durable water-resistant fabric helps keep out rainwater, and the high-quality polyethylene cover blocks approximately 90% of UV rays. However, it is not designed for extreme weather. Always monitor weather forecasts and disassemble the tent if strong winds, heavy rain, or snow are anticipated.

Figure 4.1: Waterproof and UV Protection
5. Maintenance
5.1 Cleaning
- Clean the polyethylene fabric with mild soap and water. Avoid harsh chemicals or abrasive cleaners, which can damage the material.
- Rinse thoroughly and allow all fabric components to dry completely before storage to prevent mold and mildew.
- Wipe down steel framework with a damp cloth as needed.
5.2 Storage
- Disassemble the tent carefully, following the reverse of the assembly instructions.
- Ensure all components (fabric, poles, connectors) are clean and completely dry before packing.
- Store all parts in a cool, dry place, away from direct sunlight and extreme temperatures, to prolong the product's lifespan.
6. Troubleshooting
- Tent Instability: Ensure all frame connections are fully engaged and secure. Always use the provided ropes and stakes to anchor the tent to the ground. For added stability, consider using sandbags or weights on the leg poles (not included).
- Water Accumulation on Roof: Ensure the roof cover is taut and properly centered on the frame to prevent water pooling. Disassemble the tent if heavy rainfall is expected.
- Difficulty with Assembly: Verify that all poles and connectors are correctly oriented according to the assembly diagrams. Ensure you have sufficient assistance (2-4 people recommended) for lifting and securing the frame.
- Damaged Components: Inspect all parts before assembly. If any components are damaged or missing, contact customer support for assistance.
7. Specifications
| Overall Size | 30' (L) x 10' (W) x 8.5' (H) / 9m x 3m x 2.6m |
| Frame Material | Resistant Powder Coated Steel Framework |
| Top Cover Material | 100gm Polyethylene (PE) |
| Sidewalls Material | 90gm Polyethylene (PE) + UV |
| Number of Removable Walls | 8 (6 windowed, 2 zippered) |
| Steel Tube Size | 31x0.55mm / 24x0.45mm / 18x0.45mm |
| Color | White |
| Water Resistance Level | Waterproof |
| UV Protection | Yes |
8. Important Safety Information
- Weather Conditions: This canopy is designed for temporary use. Do not leave it erected overnight or during adverse weather conditions such as strong winds, heavy rain, hail, or snow. Weather damage is not covered by any potential warranty.
- Solid Base: Ensure the canopy is set up on a solid, level base. Avoid sandy beaches or uneven terrain without proper additional anchoring.
- Fire Hazard: The polyethylene fabric is not fireproof. Keep all sources of fire, including open flames, heaters, and barbecues, away from the tent.
- Anchoring: Always use the provided ropes and stakes to strengthen stability. Additional weights (e.g., sandbags) are recommended for enhanced security.
- Assembly: Always assemble with sufficient personnel (2-4 people recommended) to prevent injury and damage to the product.
9. Warranty and Support
For any questions regarding assembly, missing parts, or product performance, please contact ZenStyle customer support. While specific warranty details are not provided in this manual, please retain your purchase receipt for any warranty claims. The manufacturer is not responsible for damages caused by improper use, assembly, or adverse weather conditions.
You can typically find contact information for ZenStyle on their official website or through the retailer where the product was purchased.