Introduction
This manual provides comprehensive instructions for the safe and effective use of your ViviLux 3-in-1 Rechargeable Red Laser Guide. Designed for precision in sewing, quilting, and various crafts, this device offers adjustable laser patterns to enhance accuracy and ease of work. Please read this manual thoroughly before initial use.
Package Contents
Verify that all items listed below are present in your package:
- ViviLux 3-in-1 Rechargeable Red Laser Guide with flexible adjustable arm
- Rechargeable Lithium Polymer battery (pre-installed)
- 3 Interchangeable Laser Heads:
- Dot Laser Head
- Line Laser Head
- Crosshair Laser Head
- USB Charging Cable
- Mounting Hook and Loop Tape (Velcro)
- Laser Alignment Template

Image: All components included in the ViviLux 3-in-1 Rechargeable Red Laser Guide package, including the laser unit, three interchangeable heads, USB charging cable, and alignment template.
Setup
- Charging the Device:
- Connect the provided USB charging cable to the charging port on the ViviLux laser unit.
- Plug the other end of the USB cable into any standard USB charging port (e.g., computer, USB wall adapter - not included).
- Allow approximately 3 hours for a full charge. The device can operate for several hours on a full charge.
- Attaching Laser Heads:
- Select the desired laser head (Dot, Line, or Crosshair). Each head is marked for easy identification.
- Gently screw the chosen head onto the flexible arm of the laser unit. Do not overtighten; hand-tightening is sufficient to secure the head.
- Mounting the Laser Unit:
- The ViviLux laser unit can be mounted using the included hook and loop tape (Velcro).
- Identify a suitable, stable surface on your sewing machine, long arm machine, or craft area where the laser can be positioned without obstructing your work.
- Attach one side of the hook and loop tape to the back of the laser unit and the other side to your chosen mounting surface. Ensure both surfaces are clean and dry for optimal adhesion.
- Alternatively, if your model includes a rare earth magnet, it can be used to attach the unit to metallic surfaces.
- Adjust the flexible arm to direct the laser beam precisely where needed on your fabric or workpiece.
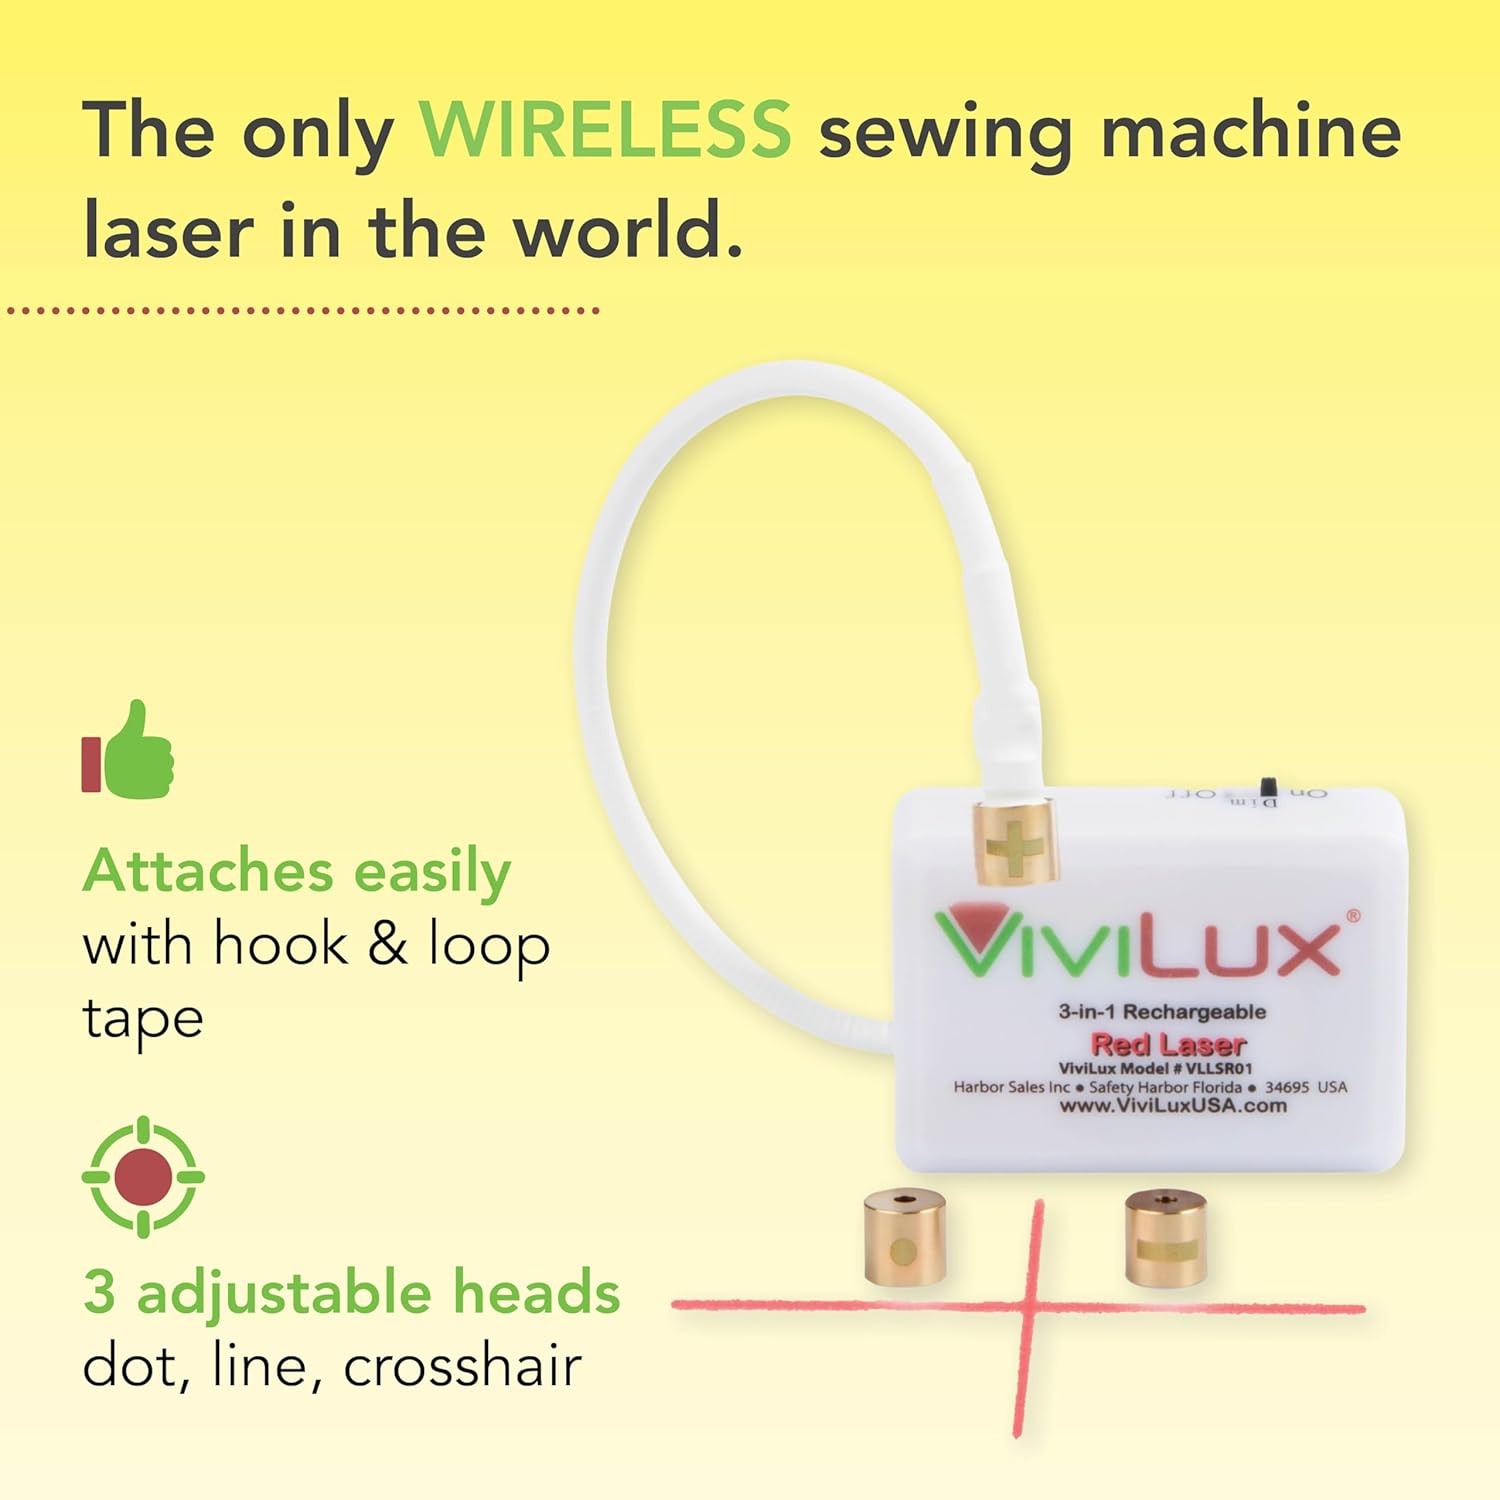
Image: The ViviLux laser unit demonstrating its wireless design and the three interchangeable laser heads (dot, line, crosshair) for various applications.
Operating Instructions
- Powering On/Off:
- Locate the ON/Dim/OFF switch on the laser unit.
- Slide the switch to the 'ON' position to activate the laser.
- Slide to 'Dim' for a lower intensity laser, or 'OFF' to power down.
- Adjusting Laser Position:
- Carefully bend or twist the flexible wand until the laser is pointed exactly where desired on your work surface.
- Use the laser alignment template to set precise seam allowances or guide lines.
- Using Different Laser Patterns:
- Line Laser: Ideal for sewing straight seams, quilting, or creating parallel lines.
- Crosshair Laser: Perfect for centering designs, aligning applique, or precise embroidery placement.
- Dot Laser: Useful for marking specific points, stitch-in-the-ditch quilting, or as a pivot guide.

Image: The ViviLux laser guide mounted on a sewing machine, projecting a clear red line to assist with straight stitching on fabric.

Image: The ViviLux laser guide in use for a crafting project, providing a precise red line for aligning elements on paper.
Maintenance
- Cleaning: Use a soft, dry cloth to clean the laser unit and heads. Do not use abrasive cleaners or solvents.
- Charging: Recharge the battery when the laser light dims or stops functioning. A full charge takes approximately 3 hours.
- Storage: Store the device in a cool, dry place away from direct sunlight and extreme temperatures.
Troubleshooting
- Laser not turning on: Ensure the device is fully charged. Check the ON/Dim/OFF switch is in the correct position.
- Laser beam is dim or inconsistent: The battery may be low. Recharge the device. Ensure the laser head is screwed on correctly and not loose.
- Laser beam is blurry or distorted: Check that the laser head is clean and free from dust or debris. Ensure the head is screwed on properly.
- Mounting issues: If the hook and loop tape is not adhering, ensure surfaces are clean and dry. For magnetic models, ensure the surface is metallic.
Specifications
| Brand | ViviLux |
| Model Number | VLLSR01 |
| Manufacturer | Harbor Sales |
| Item Weight | 2 ounces |
| Product Dimensions | 1.5 x 0.75 x 2 inches |
| Battery Type | 1 Lithium Polymer (included) |
| Laser Beam Color | Red |
| Laser Output | Under 5mW |
Warranty and Support
The ViviLux 3-in-1 Rechargeable Red Laser Guide comes with a manufacturer's 2-year warranty. For warranty claims, repair, or replacement, please contact the manufacturer, Harbor Sales, directly. Refer to the contact information provided in the product packaging or visit the official ViviLux website for support.
For additional instructions and ideas, visit www.ViviLuxUSA.com.
Product Overview Video
Video: An overview of the features of the ViviLux Red Laser Guide, demonstrating its components and functionality.


