1. Product Overview
The Enginetech Engine Rebuild Overhaul Kit provides a comprehensive set of components designed to restore the performance and longevity of your engine. This kit is specifically engineered for 2006-2011 Honda Accord and Element vehicles equipped with the 2.4L DOHC K24 K24A8 VTEC engine. All components are manufactured to high-quality standards, ensuring reliability and durability for your engine overhaul project.
This kit includes essential parts such as a full gasket set, pistons with coated skirts, premium piston rings, rod bearings, main bearings, an upper and lower timing set (without sprockets), an oil pump, thrust washer, and valve stem seals. Available sizes for piston rings, rod bearings, and main bearings include standard (STD), 0.010 inch (010), and 0.020 inch (020) oversized options to accommodate various engine wear conditions.

Figure 1: Overview of the Enginetech Engine Rebuild Overhaul Kit components. This image displays the various parts included in the kit, such as pistons, bearings, gaskets, timing chain, and oil pump, neatly arranged for inspection.
2. Safety Information
Engine rebuilding requires specialized knowledge, tools, and adherence to safety protocols. Failure to follow proper procedures can result in serious injury or damage to the engine and vehicle. Always consult a professional service manual for your specific vehicle model before beginning any work.
- Wear appropriate personal protective equipment (PPE), including safety glasses, gloves, and protective clothing.
- Ensure the vehicle is securely supported on jack stands or a lift before working underneath it.
- Disconnect the vehicle's battery before starting work to prevent electrical hazards.
- Work in a well-ventilated area to avoid inhaling harmful fumes.
- Keep all tools and parts organized to prevent accidents and ensure correct reassembly.
- Dispose of fluids and old parts responsibly according to local regulations.
3. Parts List
This Enginetech Engine Rebuild Overhaul Kit includes the following components. Please verify all parts are present and undamaged upon receipt.
3.1 Full Gasket Set with MLS Head Gaskets
A complete set of gaskets required for engine reassembly, including Multi-Layer Steel (MLS) head gaskets for enhanced sealing and durability.

Figure 2: Full Gasket Set (HO2.4HS-D). This image displays various engine gaskets, including the head gasket, intake manifold gasket, exhaust manifold gasket, and other seals necessary for a complete engine rebuild.
3.2 Dish-Top Pistons with Coated Skirts
Pistons designed with a dish-top configuration and coated skirts to reduce friction and improve wear resistance. Available in standard and oversized options.

Figure 3: Dish-Top Pistons (P4834(4)). This image shows two views of a piston, highlighting its dish-top design and the coated skirt for reduced friction and enhanced durability.
3.3 Premium Piston Rings
A complete set of piston rings (compression and oil control) for all cylinders, designed for optimal sealing and oil control. Available in standard and oversized options.
3.4 Rod Bearings
Connecting rod bearings, crucial for smooth crankshaft rotation. Available in standard, 0.010, and 0.020 inch oversized options.

Figure 4: Rod Bearings (BB1013). This image displays a set of connecting rod bearings, essential components for the crankshaft and connecting rod assembly.
3.5 Main Bearings
Main crankshaft bearings, supporting the crankshaft within the engine block. Available in standard, 0.010, and 0.020 inch oversized options.

Figure 5: Main Bearings (BC1518). This image shows a set of main crankshaft bearings, which support the crankshaft within the engine block.
3.6 Upper & Lower Timing Set (without Sprockets)
Components for the engine's timing system, including chains and guides, but excluding sprockets. Ensures precise valve timing.
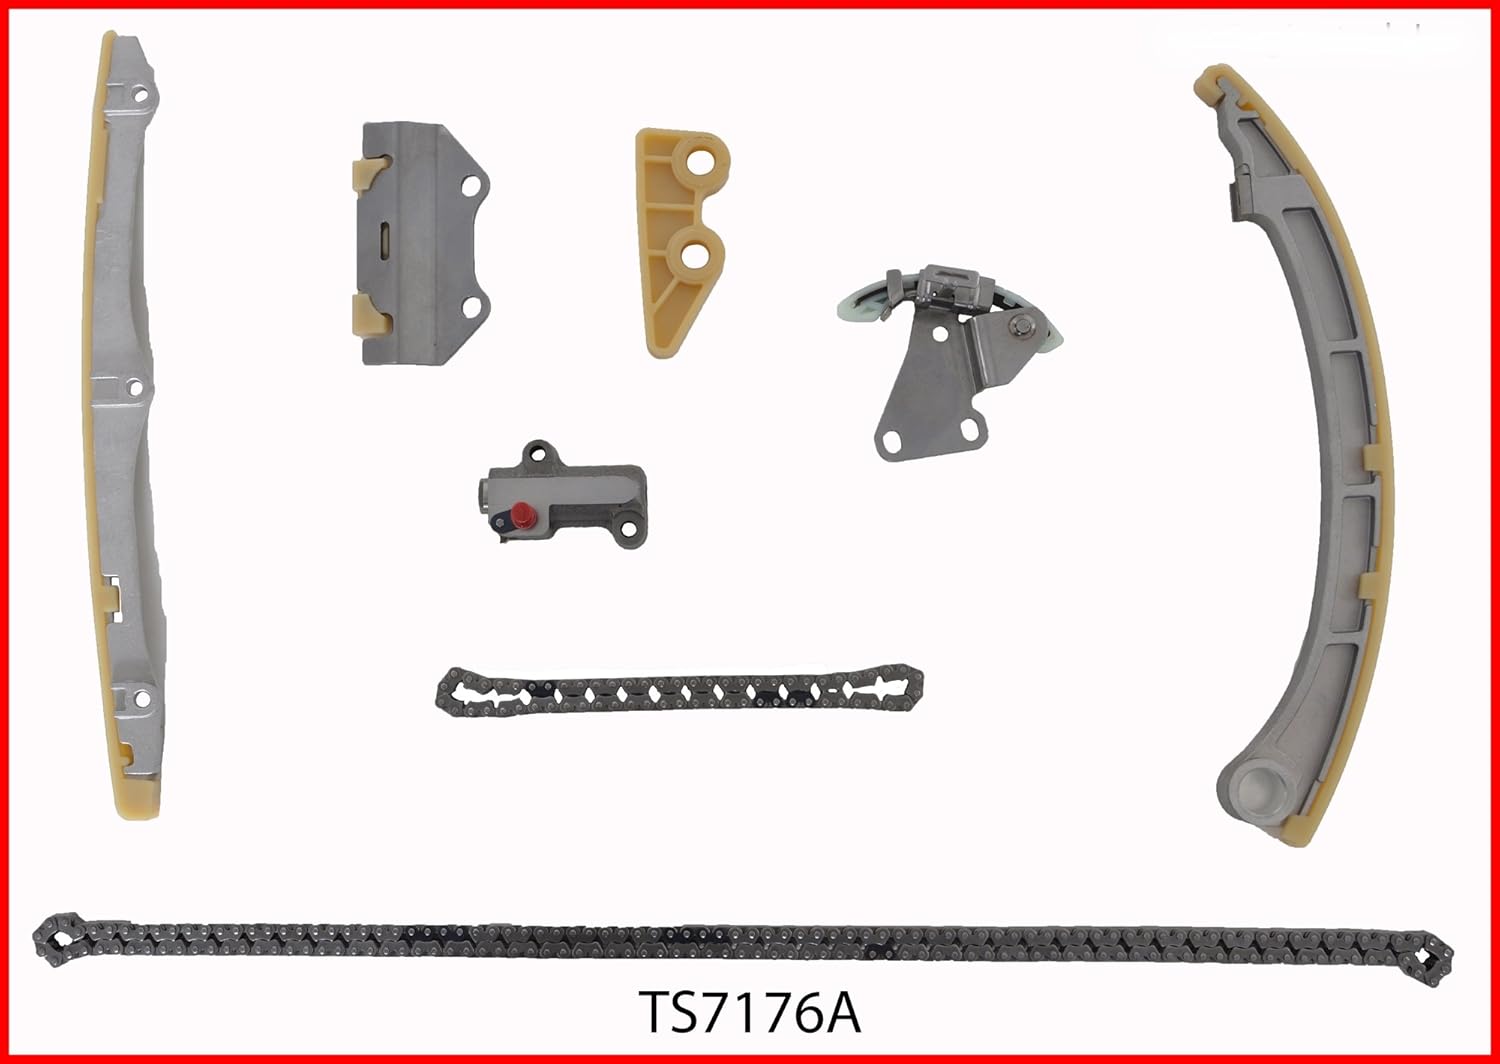
Figure 6: Upper & Lower Timing Set (TS7176A). This image displays the timing chains, guides, and tensioners, which are critical for maintaining engine timing.
3.7 Oil Pump
A new oil pump to ensure proper lubrication throughout the engine after the rebuild.

Figure 7: Oil Pump (EPK162). This image shows the engine oil pump, a vital component for circulating oil and lubricating engine parts.
3.8 Thrust Washer
A thrust washer to control crankshaft end play.
3.9 Valve Stem Seals
Seals for the valve stems to prevent oil leakage into the combustion chambers.

Figure 8: Valve Stem Seals (HO2.4CS-A). This image displays various engine seals, including valve stem seals, which prevent oil from entering the combustion chamber.
4. Setup and Preparation
Before beginning the engine rebuild process, thorough preparation is essential for a successful outcome.
- Consult Service Manual: Obtain the official service manual for your 2006-2011 Honda Accord or Element (2.4L DOHC K24 K24A8 VTEC engine). This manual will provide specific torque specifications, assembly sequences, and critical measurements.
- Engine Removal and Disassembly: Carefully remove the engine from the vehicle and disassemble it according to the service manual's instructions. Keep all removed parts organized and labeled.
- Component Inspection and Machining: Thoroughly inspect all engine components (block, crankshaft, connecting rods, cylinder head) for wear, cracks, or damage. It is highly recommended to have the engine block and cylinder head professionally machined (e.g., cylinder honing, deck surfacing) to ensure proper sealing and clearances.
- Cleaning: Clean all engine components meticulously. Remove all old gasket material, carbon deposits, and oil residue. Ensure all oil passages and bolt holes are clear.
- Measure Clearances: Before final assembly, measure all critical clearances, including piston-to-bore clearance, piston ring end gap, rod bearing clearance, and main bearing clearance. Select appropriate bearing and ring sizes (STD, 010, 020) based on these measurements and the machining performed.
- Organize Parts: Lay out all new kit components and cleaned original parts in an organized manner to facilitate smooth assembly.
5. Installation Instructions
The following is a general guide for installing the components of your Enginetech Engine Rebuild Overhaul Kit. Always refer to your vehicle's specific service manual for detailed, step-by-step instructions, torque specifications, and critical procedures.
- Crankshaft and Main Bearings: Install the main bearings into the engine block and main caps. Lubricate thoroughly with engine assembly lube. Carefully place the crankshaft into the block, ensuring proper alignment. Install main caps and torque to specifications in the correct sequence. Verify crankshaft rotation is smooth.
- Pistons, Rods, and Rod Bearings: Assemble the piston rings onto the pistons, paying attention to orientation and gap placement. Install rod bearings into connecting rods and caps. Lubricate bearings and piston skirts. Carefully install piston and connecting rod assemblies into the cylinders, ensuring correct orientation relative to the engine block. Connect rod caps and torque to specifications.
- Oil Pump Installation: Install the new oil pump (EPK162) onto the engine block, ensuring all gaskets and seals are correctly seated. Torque mounting bolts to specifications.
- Timing Set Installation: Install the upper and lower timing chains, guides, and tensioners (TS7176A) according to the service manual. Ensure all timing marks are correctly aligned to prevent engine damage.
- Cylinder Head and Gaskets: Install the valve stem seals (HO2.4CS-A) onto the valve guides. Place the MLS head gasket (HO2.4HS-D) onto the engine block, ensuring correct orientation. Carefully lower the cylinder head onto the block. Install head bolts and torque them in the specified sequence and stages.
- Remaining Gaskets and Components: Install all remaining gaskets (e.g., intake manifold, exhaust manifold, valve cover) and engine components (e.g., water pump, alternator, starter) as per the service manual.
- Engine Reinstallation: Reinstall the rebuilt engine into the vehicle, connecting all hoses, wiring, and accessories.
- Fluid Fill and Initial Startup: Fill the engine with the recommended engine oil and coolant. Perform an initial startup procedure as outlined in the service manual, paying close attention to oil pressure and any unusual noises.
- Break-in Procedure: Follow the recommended engine break-in procedure to ensure proper seating of piston rings and bearings.
6. Maintenance
Proper maintenance after an engine rebuild is critical for its longevity and performance.
- Oil Changes: Perform the first oil change after the initial break-in period (typically 500-1000 miles) to remove any assembly lubricants and wear particles. Subsequently, adhere to the vehicle manufacturer's recommended oil change intervals using high-quality engine oil.
- Coolant System: Regularly check coolant levels and condition. Flush and replace coolant according to the manufacturer's schedule.
- Filter Replacement: Replace oil, air, and fuel filters at recommended intervals.
- Regular Inspections: Periodically inspect for leaks, unusual noises, or performance changes. Address any issues promptly.
7. Troubleshooting
If you encounter issues after installing the engine rebuild kit, consider the following general troubleshooting steps. For specific diagnostic procedures, consult your vehicle's service manual or a qualified mechanic.
| Symptom | Possible Cause | Action |
|---|---|---|
| Low Oil Pressure | Incorrect oil pump installation, clogged oil passages, incorrect bearing clearances, low oil level. | Check oil level. Verify oil pump installation and function. Re-check bearing clearances. |
| Engine Overheating | Improper coolant fill/air in system, faulty thermostat, restricted radiator, incorrect timing. | Bleed cooling system. Check thermostat. Verify timing. |
| Excessive Smoke from Exhaust | Incorrect piston ring installation, damaged valve stem seals, incorrect cylinder honing. | Diagnose smoke color (blue for oil, black for fuel, white for coolant). Re-check ring gaps and orientation. Inspect valve stem seals. |
| Unusual Engine Noises | Incorrect bearing clearances, loose components, improper timing chain tension. | Identify source of noise. Re-check torque specifications. Inspect timing components. |
8. Specifications
- Product Model: R-RCHO2.4A8
- Application: 2006-2011 Honda Accord / Element 2.4L DOHC K24 K24A8 VTEC
- Piston Ring Sizes: Standard (STD), 0.020 inch (020)
- Rod Bearing Sizes: Standard (STD), 0.010 inch (010), 0.020 inch (020)
- Main Bearing Sizes: Standard (STD), 0.010 inch (010), 0.020 inch (020)
- Manufacturer: Enginetech
- Approximate Shipping Weight: 1 pound (Note: Actual weight of all components may vary)
Note: Specific torque values and detailed dimensions are provided in the official Honda service manual for your vehicle.
9. Warranty and Support
Enginetech products are manufactured to high-quality standards. For specific warranty information regarding this Engine Rebuild Overhaul Kit, please refer to the documentation included with your purchase or contact Enginetech customer service directly.
If you have questions regarding the components of this kit or require assistance, please contact your authorized Enginetech dealer or customer support. When contacting support, please have your product model number (R-RCHO2.4A8) and purchase details readily available.
For technical assistance related to engine assembly procedures, it is recommended to consult a certified automotive technician or refer to the official Honda service manual for your specific vehicle model.