1. Important Safety Information
Please read all instructions carefully before using this appliance and retain them for future reference. Failure to follow these instructions may result in electric shock, fire, or serious injury.
- Electrical Safety: Ensure the voltage indicated on the appliance corresponds to your local mains voltage before connecting. Do not operate the heater with a damaged cord or plug.
- Placement: Always place the heater on a firm, level surface. Maintain a safe distance from walls, furniture, curtains, and other flammable materials. Never cover the heater.
- Overheating Protection: This appliance is equipped with a double safety protection system that includes protection against overheating and accidental tipping. If the heater overheats or tips over, it will automatically shut off.
- Children and Vulnerable Persons: This appliance can be used by children aged 8 years and above and persons with reduced physical, sensory or mental capabilities or lack of experience and knowledge if they have been given supervision or instruction concerning use of the appliance in a safe way and understand the hazards involved. Children shall not play with the appliance. Cleaning and user maintenance shall not be made by children without supervision.
- Moisture: Do not use this heater in the immediate surroundings of a bath, a shower or a swimming pool. Do not immerse the appliance in water or any other liquid.
- Unattended Operation: Do not leave the heater unattended while in use. Always unplug the appliance when not in use.
2. Product Overview
The Rowenta Intensium oil-filled radiator BU2620F0 is designed to provide efficient and silent heating for rooms up to 25 square meters. It features 9 heating fins, three power settings including an Eco mode, and an adjustable thermostat for personalized comfort. Its robust design includes integrated safety features and portability for ease of use.

Image 1: Front view of the Rowenta Intensium Oil-Filled Radiator BU2620F0, showcasing its white finish, control panel, and 9 heating fins.
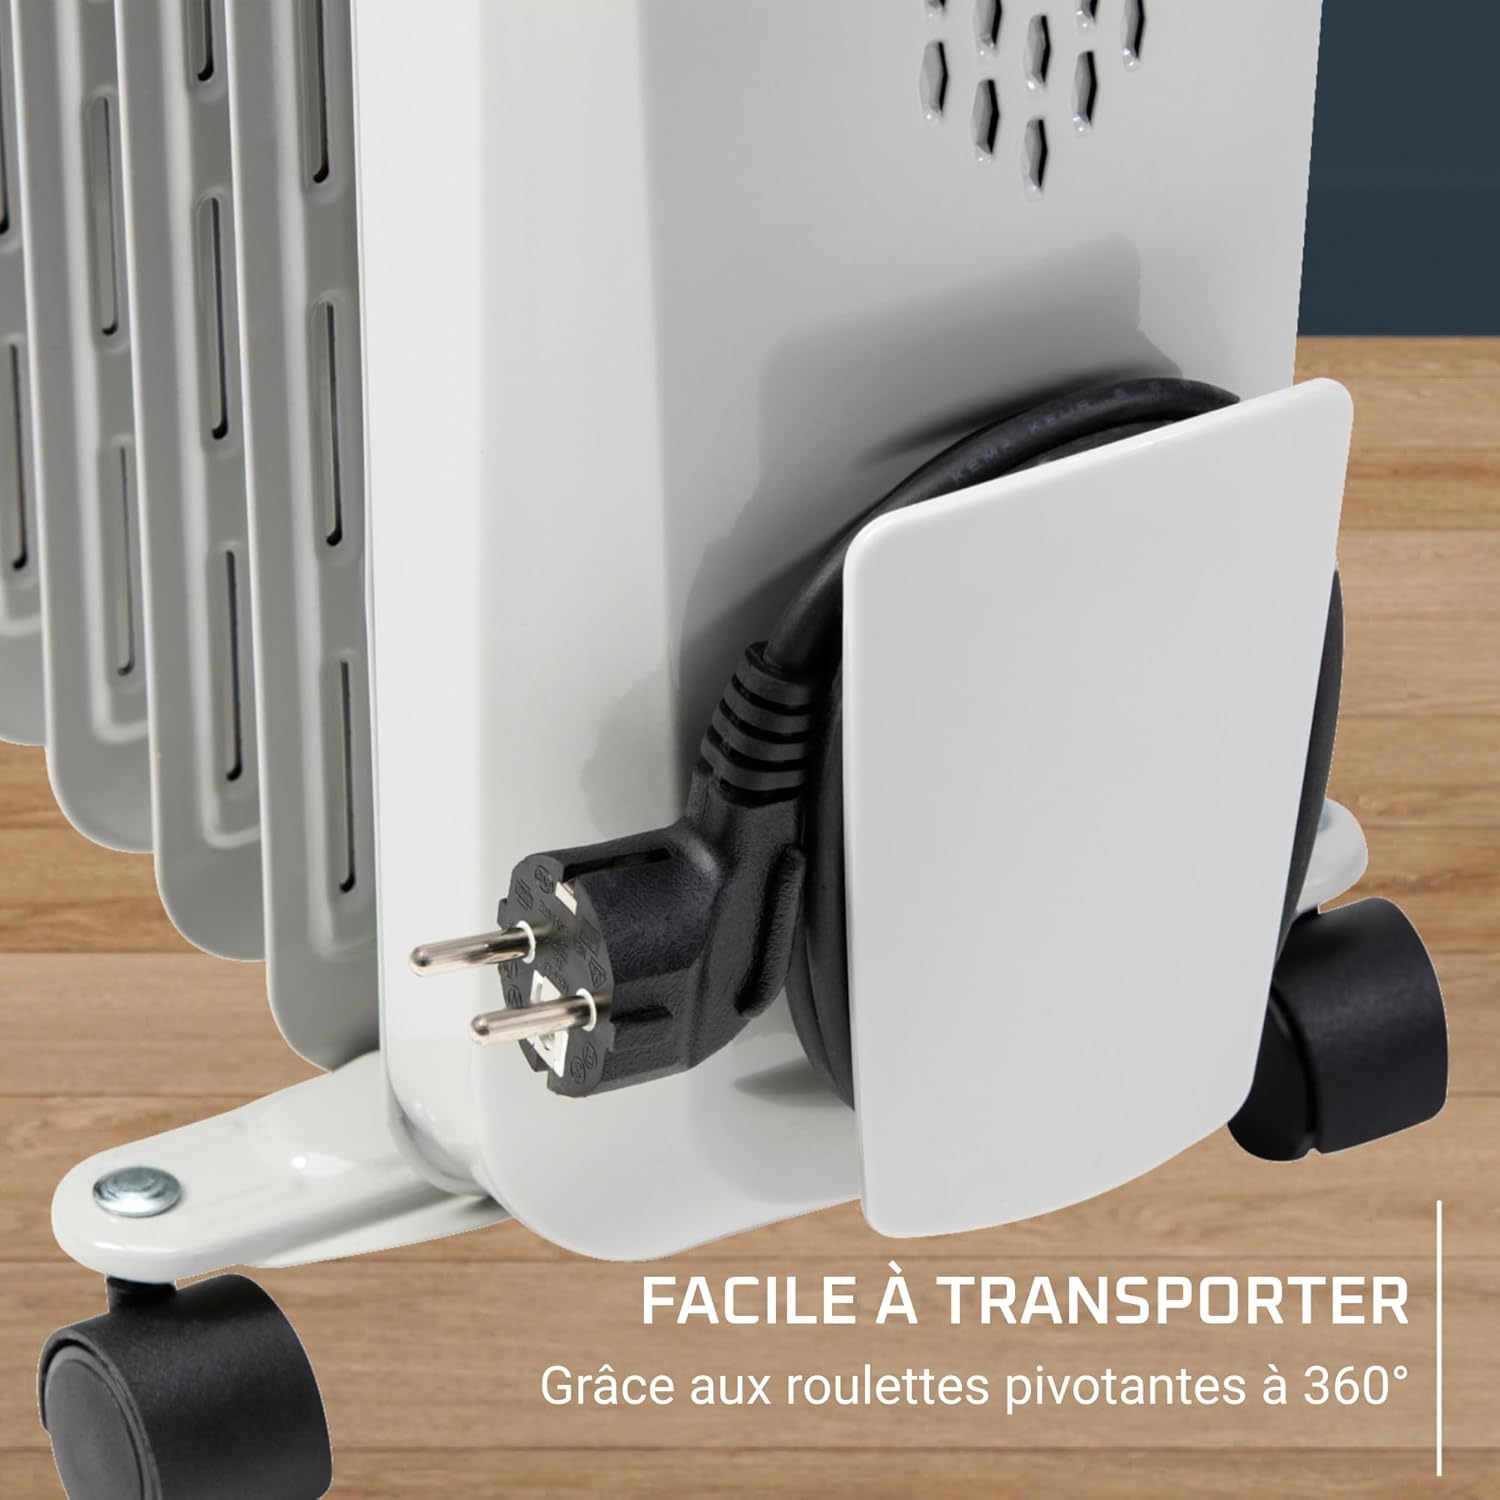
Image 2: The Rowenta Intensium Oil-Filled Radiator positioned in a modern living room next to a sofa, illustrating its compact size and ability to blend into home environments while providing wide heat emission.
3. Setup and Assembly
Your Rowenta Intensium radiator comes with wheels for easy portability. Follow these steps to attach them securely:
- Carefully unpack the radiator and all components.
- Lay the radiator on its side on a soft, flat surface to avoid scratching.
- Locate the U-shaped brackets and the wheels.
- Insert the U-shaped brackets into the designated slots at the bottom of the radiator, near each end.
- Attach the wheels to the U-shaped brackets using the provided butterfly screws. Ensure the screws are tightened firmly to prevent any instability. Note: Some users have reported issues with butterfly screws not tightening properly. Ensure they are fully engaged and secure. If you encounter difficulty, contact customer support.
- Once all wheels are securely attached, carefully return the radiator to an upright position.

Image 3: A close-up view of one of the 360° rotating wheels attached to the base of the radiator, showing the U-shaped bracket and the butterfly screw mechanism for assembly.
4. Operating Instructions
The Rowenta Intensium radiator offers simple controls for effective heating.
Control Panel
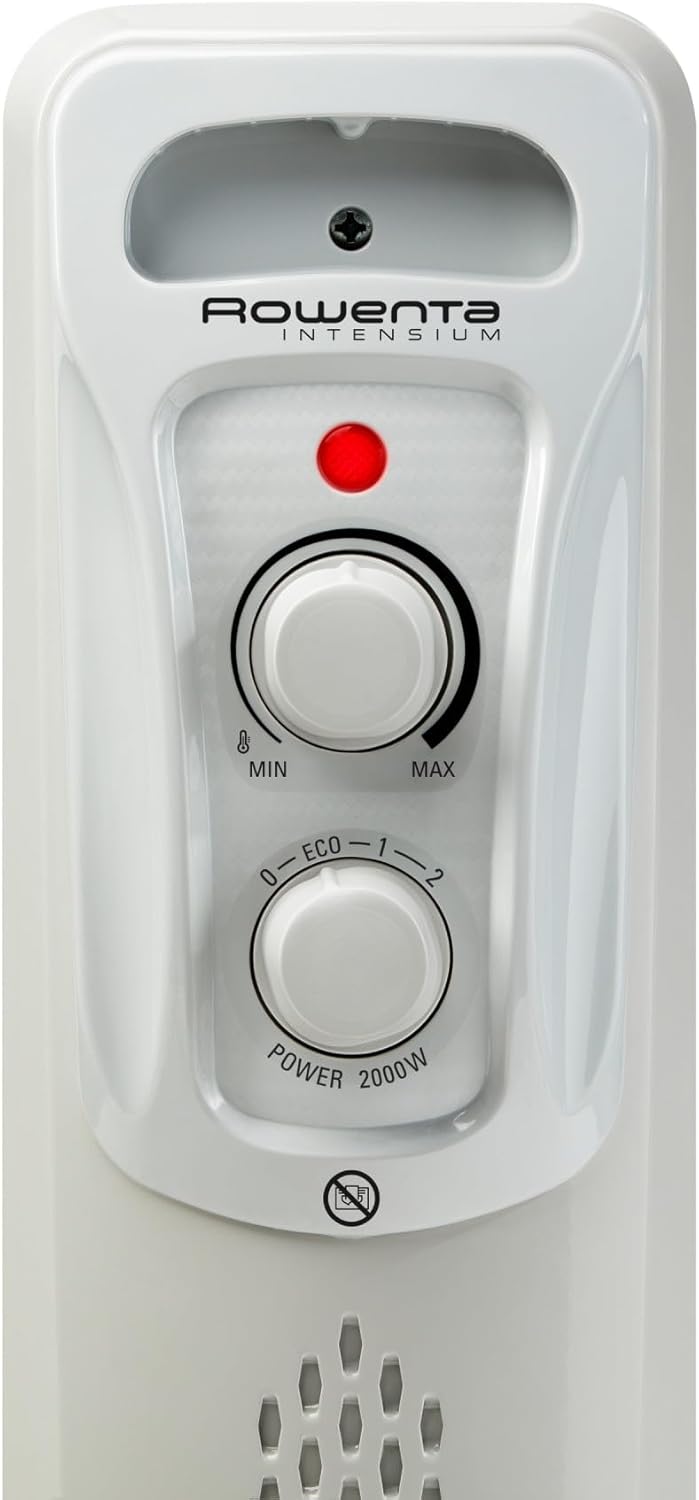
Image 4: Detailed view of the control panel on the Rowenta Intensium radiator, featuring the power indicator light, the thermostat dial (MIN to MAX), and the power selection dial (0-ECO-1-2).
The control panel consists of two main dials and a power indicator light:
- Thermostat Dial (Top): Adjusts the desired room temperature from minimum (MIN) to maximum (MAX).
- Power Selection Dial (Bottom): Selects the heating mode.
- Power Indicator Light (Red): Illuminates when the heater is actively heating.
Power Settings
Turn the Power Selection Dial to choose one of the three available settings:
- 0 (Off): Turns the heater off.
- ECO Mode: Provides energy-saving heating, ideal for maintaining a comfortable temperature with lower power consumption.
- Setting 1: Standard heating mode for general use.
- Setting 2 (2000W): Turbo mode for ultra-fast temperature rise and maximum heat output up to 2000 Watts.
Adjusting the Thermostat
To set your desired temperature:
- Turn the Power Selection Dial to your desired power setting (ECO, 1, or 2).
- Turn the Thermostat Dial clockwise to the MAX position.
- Once the room reaches your desired temperature, slowly turn the Thermostat Dial counter-clockwise until the power indicator light turns off. The heater will now maintain this temperature, cycling on and off as needed.
Silent Operation
The Rowenta Intensium radiator operates at an ultra-silent level (below 35 dB), making it suitable for use in bedrooms, offices, or any space where quiet is preferred.
5. Care and Maintenance
Proper care ensures the longevity and efficient operation of your radiator.
Cleaning
- Always unplug the heater and allow it to cool completely before cleaning.
- Wipe the exterior surfaces with a soft, damp cloth. Do not use abrasive cleaners or solvents.
- Ensure no water enters the interior of the appliance.
Storage
When not in use, store the heater in a cool, dry place. The integrated cable storage compartment helps keep the power cord tidy.
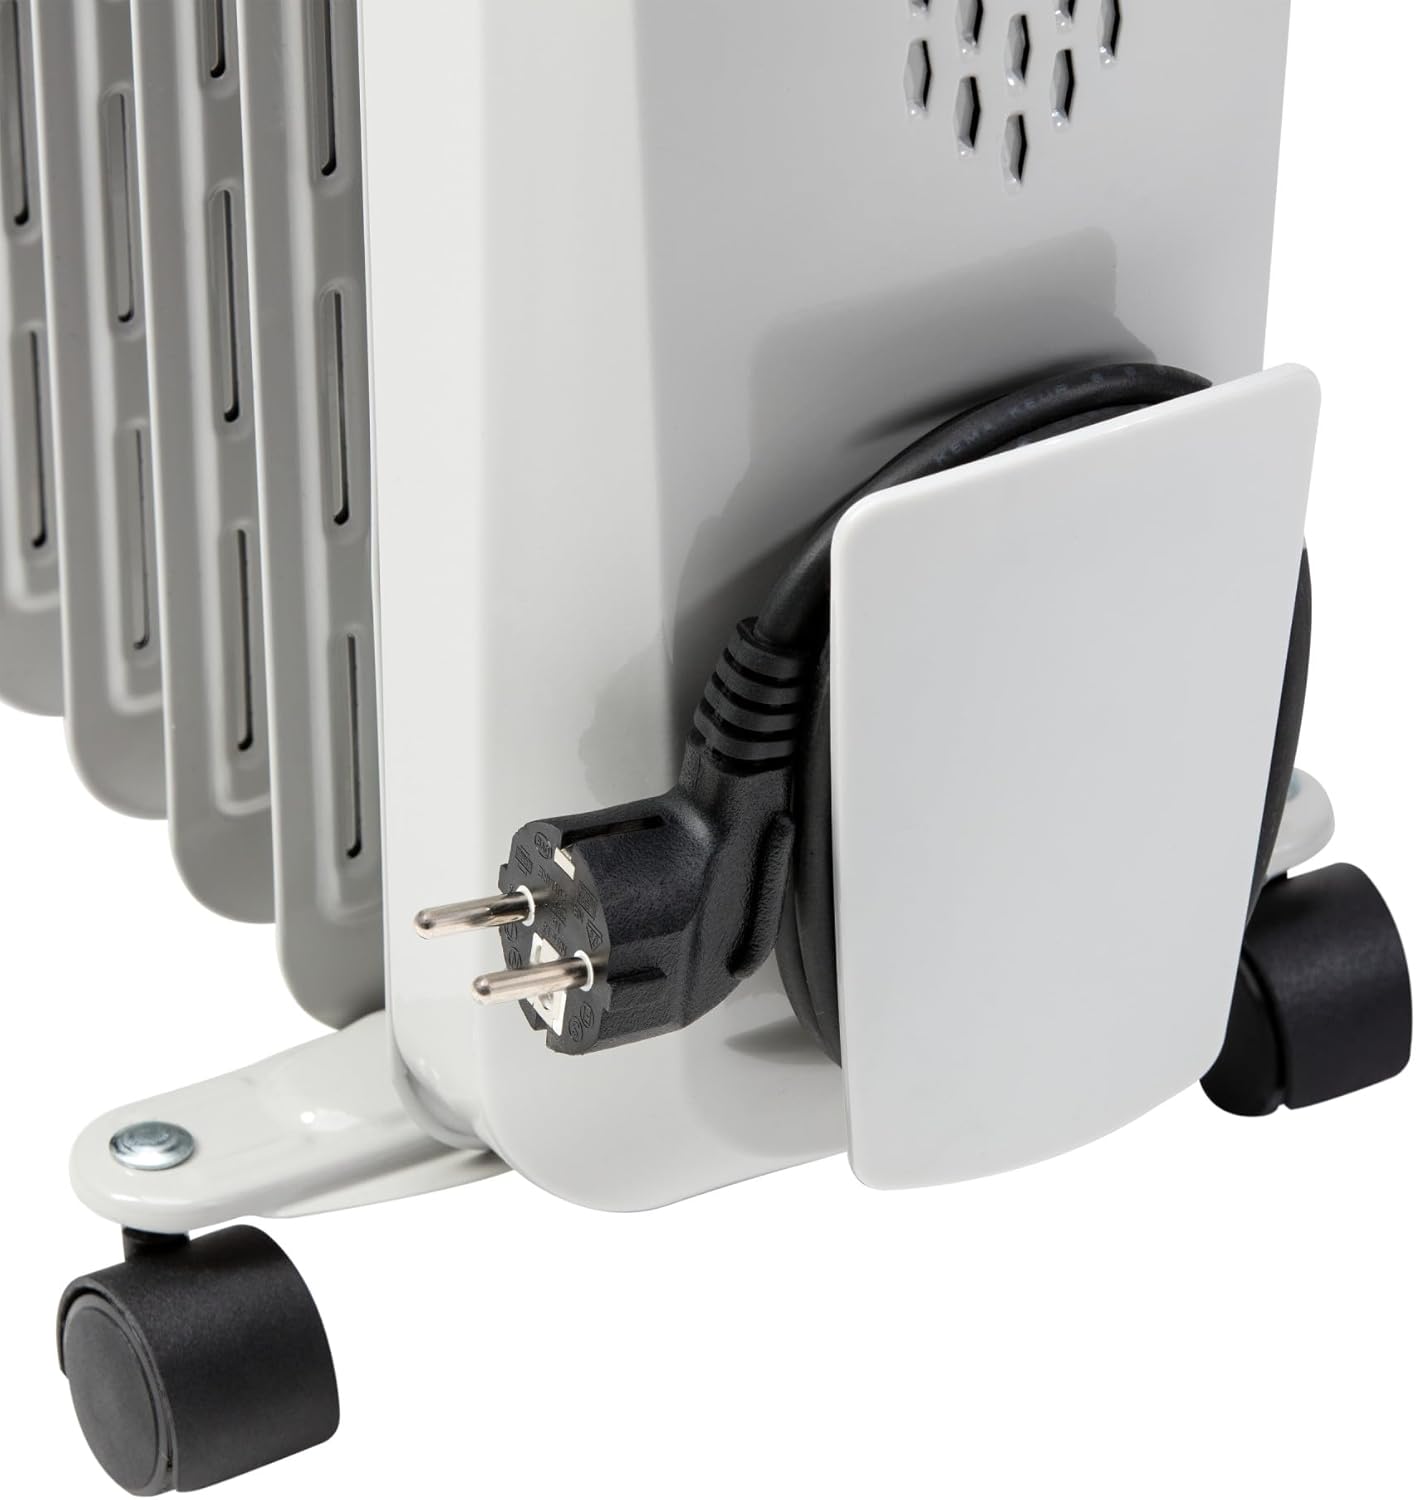
Image 5: A close-up of the integrated cable storage compartment on the side of the radiator, showing the power cord neatly wrapped and secured, highlighting the appliance's clever storage solution.
6. Troubleshooting
If you encounter issues with your Rowenta Intensium radiator, refer to the following common problems and solutions:
| Problem | Possible Cause | Solution |
|---|---|---|
| Heater does not turn on. | No power supply; Power dial set to '0'; Thermostat set too low. | Check power outlet and plug. Ensure power dial is on 'ECO', '1', or '2'. Turn thermostat dial to a higher setting. |
| Heater is on but not emitting heat. | Thermostat set too low; Overheat protection activated. | Increase thermostat setting. Unplug the heater, let it cool for 30 minutes, then plug it back in. Ensure it is not covered. |
| Insufficient heating for the room. | Power setting too low; Room size exceeds heater capacity; Poor insulation. | Select a higher power setting (e.g., '2'). Ensure the room size is within the recommended 25m² limit. Check for drafts. |
| Heater is unstable or wheels are loose. | Wheels not securely attached. | Refer to Section 3: Setup and Assembly. Ensure all butterfly screws for the wheels are tightened firmly. If issues persist, contact customer support. |
| Unusual odors or smoke. | First use (normal); Dust accumulation; Foreign object inside. | A slight odor on first use is normal. If persistent or strong, unplug immediately. Clean the heater. Do not attempt to open the appliance. |
If the problem persists after attempting these solutions, please contact Rowenta customer support.
7. Specifications
| Feature | Detail |
|---|---|
| Brand | Rowenta |
| Model Number | BU2620F0 |
| Color | Light Grey |
| Power | 2000 Watts |
| Voltage | 230 Volts |
| Number of Power Settings | 3 (Eco, 1, 2) |
| Features | Silent Operation, Adjustable Thermostat, Anti-tilt Safety, Overheat Protection, 360° Rotating Wheels, Cable Storage |
| Item Weight | 10 Kilograms |
| Product Dimensions (L x W x H) | 25D x 45W x 64H centimeters |
| Heating Method | Convection |
| Recommended Room Size | Up to 25 m² |
8. Warranty and Support
Rowenta is committed to providing quality products and support.
Repairability
Rowenta commits to keeping spare parts available for the majority of its products for 15 years after purchase, at a fair price. This commitment reflects the brand's dedication to product longevity and sustainability.

Image 6: Logo indicating Rowenta's commitment to 15-year repairability, featuring a screwdriver icon and the text "RÉPARABLE 15 ANS AU JUSTE PRIX" (Repairable 15 Years at a Fair Price).
Customer Support
For further assistance, warranty claims, or to inquire about spare parts, please visit the official Rowenta website or contact their customer service department. Contact details can typically be found on the product packaging or the brand's official website.