AMIKO HEVC265
AMIKO HD8265+ Combo S2 & T2/C HEVC265 HDTV Digital Satellite Receiver User Manual
Model: HD8265+
1. Introduction
The AMIKO HD8265+ is a versatile Full HD digital combo receiver, serving as the successor to the AMIKO 8260+. It integrates both DVB-S2 (satellite) and DVB-C/T2 (cable/terrestrial) tuners, offering comprehensive reception capabilities. Designed for high-definition viewing, this receiver supports HEVC decoding and includes a Conax card reader and a Common Interface (CI) slot, providing excellent functionality and value.

Figure 1: Front view of the AMIKO HD8265+ Digital Satellite Receiver.
2. Package Contents
Please check the box for the following items:
- 1 x AMIKO HD8265+ Receiver
- 1 x Remote Control
- 1 x HDMI Cable
- 1 x Infrared (IR) Sensor
- 1 x Power Cable
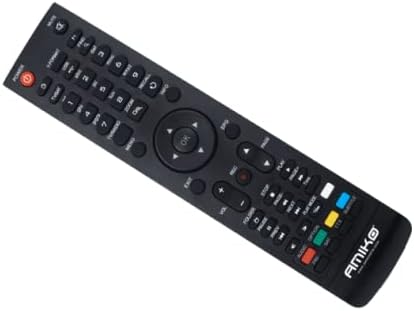
Figure 2: Included Remote Control for the AMIKO HD8265+.
3. Product Features
The AMIKO HD8265+ offers a rich set of features for an enhanced viewing experience:
- Full HD Digital Combo Receiver (DVB-S2 & DVB-C/T2)
- HEVC (H.265) Decoding Support
- Conax Card Reader
- Common Interface (CI) Slot
- 800 MHz Processor
- 256 MB DDR3 RAM
- 2 x USB 2.0 Ports
- Ethernet (RJ45) LAN Port
- USB Wi-Fi Support (Ralink RT5370 compatible)
- Optical S/PDIF Output
- YouTube and RSS Reader / Weather Forecast Functionality
- Optional PVR (Personal Video Recorder) via external storage
- Up to 6000 recordable channels
- Timeshift function
- Fast channel switching (less than 1 second)
- User-friendly On-Screen Display (OSD)
- Electronic Program Guide (EPG)
- Satellite Blind Scan and Fast Scan
- DiSEqC 1.0, 1.1, 1.2, and USALS compatibility
- Full HD output via HDMI 1.4
- Multilingual support
- Software upgrade via USB, network, OTA, RS232
- Low standby power consumption (<0.5 W)
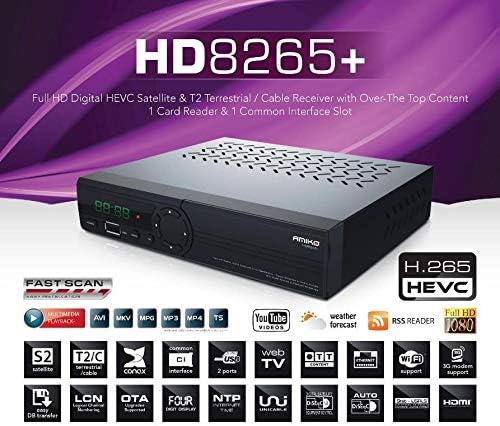
Figure 3: Overview of AMIKO HD8265+ key features.
4. Setup Guide
4.1 Connecting Your Receiver
Before powering on, ensure all connections are made correctly.
- Antenna/Cable Connection: Connect your satellite dish cable to the 'LNB IN' port and your terrestrial/cable antenna to the 'RF IN' port on the rear panel.
- HDMI Connection: Use the provided HDMI cable to connect the 'HD OUT' port on the receiver to an HDMI input on your TV.
- Power Connection: Connect the power cable to the 'DC 12V/1.5A' input on the receiver and then to a power outlet.
- Optional Connections:
- Ethernet: For network features like YouTube or software updates, connect an Ethernet cable to the 'ETHERNET' port.
- USB: For PVR, multimedia playback, or Wi-Fi dongle, insert your USB device into one of the 'USB' ports.
- S/PDIF: For digital audio output, connect an optical cable to the 'S/PDIF' port.
- AV Out: For older TVs, use an AV cable to connect to the 'AV OUT' ports.
- IR IN: If using the external IR sensor, connect it here.

Figure 4: Rear panel connections of the AMIKO HD8265+.
4.2 Initial Power-On and First-Time Installation
After connecting all cables, switch on the receiver. The first-time installation wizard will guide you through the initial setup steps, including language selection, time zone, and antenna/channel scanning.
- Follow the on-screen prompts to select your preferred language.
- Configure your antenna settings (e.g., satellite selection, DiSEqC settings) for DVB-S2 or perform an automatic scan for DVB-C/T2 channels.
- Save the settings once the scan is complete.
5. Operating Instructions
5.1 Basic Operation
Use the remote control to navigate the receiver's functions.
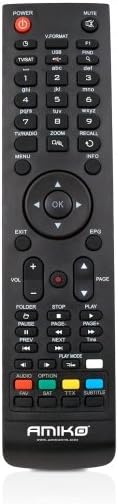
Figure 5: Layout of the AMIKO HD8265+ Remote Control.
- Power Button: Turns the receiver on/off or into standby mode.
- Numeric Buttons (0-9): Directly enter channel numbers.
- CH+/CH-: Change channels sequentially.
- VOL+/VOL-: Adjust volume.
- MENU: Access the main menu for settings and features.
- OK: Confirm selections or display channel list.
- EXIT: Exit current menu or screen.
- EPG: Access the Electronic Program Guide.
- INFO: Display current channel information.
5.2 Menu Navigation
Press the MENU button to access the main menu. Use the directional arrows (Up/Down/Left/Right) to navigate through options and OK to select. EXIT returns to the previous screen.
5.3 Channel Management
From the main menu, you can access options to scan for new channels, edit existing channels (move, delete, lock), and create favorite lists.
5.4 PVR and Multimedia Playback
If an external USB storage device is connected, you can record TV programs (PVR) or play back multimedia files (videos, music, photos) stored on the device. Use the dedicated PVR/media buttons on the remote control (Record, Play, Pause, Stop, Fast Forward, Rewind).
6. Maintenance
6.1 Cleaning
To clean the receiver, use a soft, dry cloth. Do not use liquid or aerosol cleaners, as they may damage the unit.
6.2 Software Updates
Periodically check for software updates to ensure optimal performance and access to new features. Updates can typically be performed via USB, network, or Over-The-Air (OTA) broadcast. Refer to the system settings menu for update options.
7. Troubleshooting
| Problem | Possible Cause | Solution |
|---|---|---|
| No power | Power cable not connected; power outlet faulty. | Ensure power cable is securely connected. Test outlet with another device. |
| No signal / No picture | Antenna/cable not connected; incorrect input on TV; incorrect channel settings. | Check antenna/cable connections. Select correct HDMI input on TV. Perform a channel scan. |
| Remote control not working | Batteries are dead or inserted incorrectly; IR sensor blocked. | Replace batteries. Ensure correct polarity. Remove any obstructions between remote and receiver. |
| Picture frozen or pixelated | Weak signal; software issue. | Check antenna alignment/signal strength. Restart the receiver. Check for software updates. |
8. Technical Specifications
| Feature | Specification |
|---|---|
| Brand | AMIKO |
| Model Number | HEVC265 (HD8265+) |
| Color | Black |
| Tuner Type | DVB-S2, DVB-C/T2 |
| Video Decoding | HEVC (H.265) |
| Processor | 800 MHz |
| RAM | 256 MB DDR3 |
| Card Reader | 1 x Conax |
| Common Interface | 1 x CI Slot |
| USB Ports | 2 x USB 2.0 |
| Connectivity | Ethernet (RJ45), USB Wi-Fi (Ralink RT5370) |
| Audio Output Mode | Stereo, Surround |
| Supported Audio Format | Dolby Digital, DTS, AAC, MP3, PCM |
| HDMI Ports | 1 x HDMI 1.4 |
| Video Resolution | 720x480p/I, 720x576p/I, 1280x720p, 1920x1080i, 1920x1080p |
| Aspect Ratios | 16:9, 4:3 |
| Standby Power Consumption | <0.5 W |
| Dimensions (W x H x D) | 180 x 43 x 155 mm |
| Net Weight | 1.0 kg |
| Compatible Devices | Computer, Television |
| Batteries (Remote) | 2 x AAA (included) |
9. Warranty and Support
For warranty information and technical support, please refer to the documentation provided with your purchase or visit the official AMIKO website. Keep your proof of purchase for warranty claims.
Ask a question about this manual
Ask about setup, troubleshooting, compatibility, parts, safety, or missing instructions. Manuals+ will review the question and use this page’s manual context to help answer it.