1. Introduction
This manual provides comprehensive instructions for the installation, operation, and maintenance of the Braided 1/2 Inch Cable Management Sleeve Protector. This product is designed to organize and protect cables in various environments, including offices, home theaters, and engine bays. It helps prevent cable damage from general wear, abrasion, and pet chewing, ensuring a tidy and safe cable setup.
2. Product Overview
2.1 Key Features
- Expandable Design: The PET braided sleeve can expand up to 200% of its original diameter (1/2 inch) to accommodate various cable gauges.
- Durable Protection: Protects cables from abrasion, cuts, and damage caused by pets (cats, dogs) chewing.
- High Temperature Resistance: Operating temperature range from -103°F to 257°F (-75°C to 125°C), with a melting temperature of 446°F (230°C).
- Safety Certifications: Manufactured with UL, CSA, ROHS, and REACH compliant materials. It is also halogen-free.
- Flame Retardant: Provides good flame retardancy for enhanced safety.
- Adjustable Length: Can be cut to any desired length to suit specific organizational needs.
- Odorless and Non-toxic: Safe for use in various environments, including homes with pets.
2.2 Components
The product package typically includes:
- 1 x 25ft - 1/2 Inch Braided Cable Management Sleeve (Black & Yellow)
- Optional: Heat shrink tubes (may be included for finishing ends)

Image: The 1/2 inch black and yellow braided cable management sleeve, shown with two black heat shrink tubes for finishing.
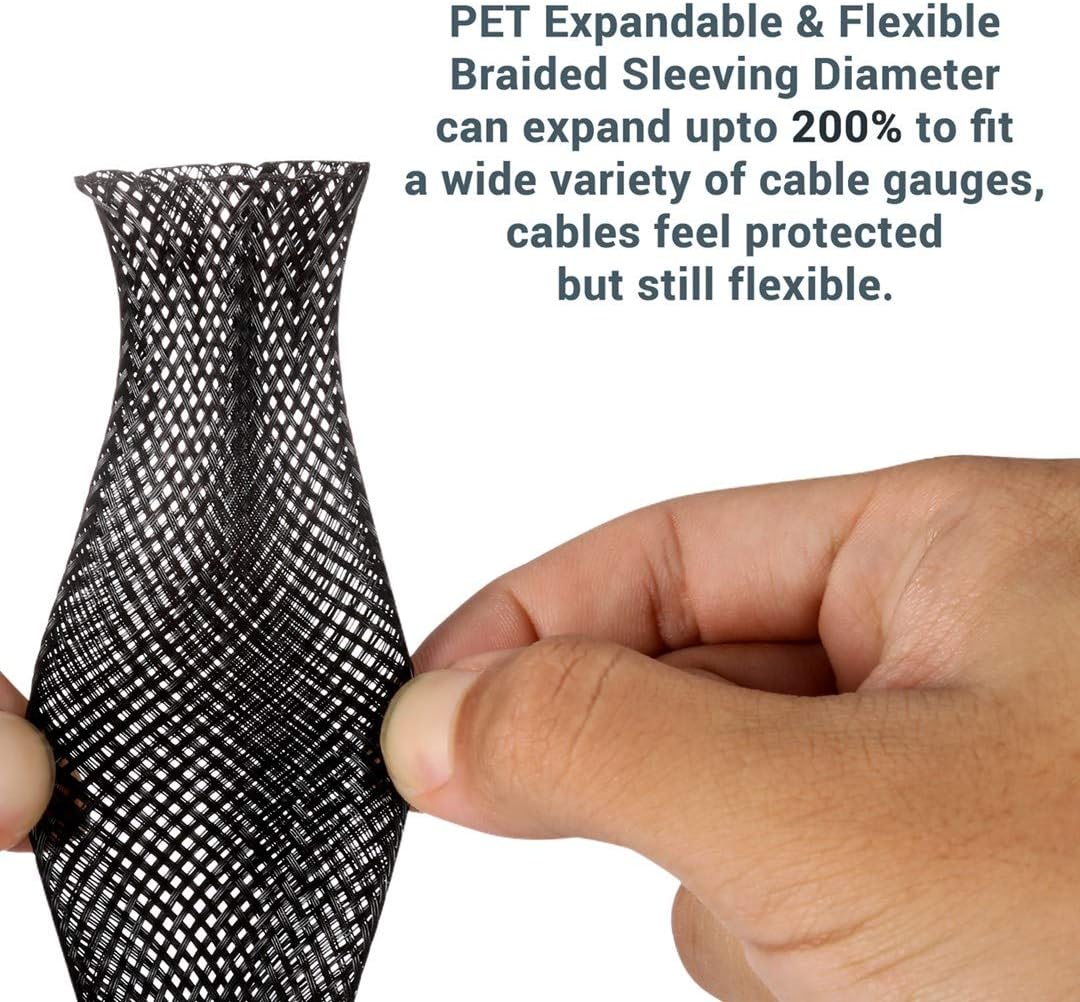
Image: Demonstration of the sleeve's expandability, showing how it can stretch to accommodate larger bundles of cables.
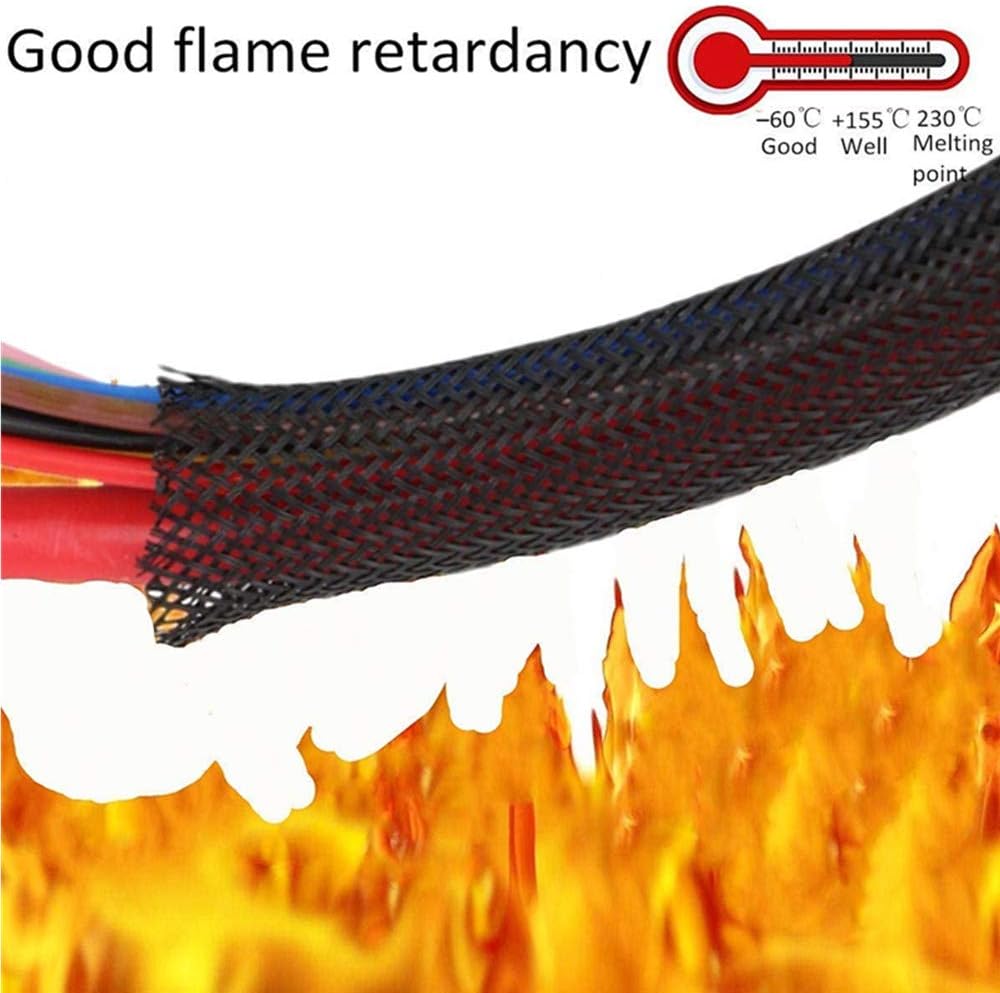
Image: A visual representation highlighting the good flame retardancy property of the cable management sleeve.

Image: This image emphasizes the sleeve's properties as odorless, scent-free, non-toxic, and fire retardant, suggesting its suitability for environments where rodent protection might be a concern, such as engine bays.

Image: Display of various certifications for the braided PET sleeving, including UL, CSA, ROHS, REACH, and a 'Halogen-free' label, indicating compliance with safety and environmental standards.
3. Installation Instructions
Proper installation ensures optimal cable organization and protection. The sleeve can be cut to length and applied using various methods.
3.1 Method 1: Using Heat Shrink Tube and Heat Gun (Recommended for a finished look)
- Insert Wires: Gently push the wires into the end of the sleeve. Do not pull the sleeve over the wires; instead, push the wires through the sleeve.
- Cut Sleeve: Once all wires are inside and the desired length is achieved, cut off any scattered or excess part of the sleeve.
- Install Heat Shrink Tube: Choose a heat shrink tube of appropriate size and slide it over the cut end of the sleeve, covering both the sleeve and the wires.
- Apply Heat: Use a heat gun (recommended temperature: 212°F / 100°C) to evenly heat the heat shrink tube until it shrinks tightly around the sleeve and wires, securing the end and preventing fraying.
3.2 Method 2: Cutting Without Heat Shrink Tube (For quick application or when heat shrink is unavailable)
- Cut with Hot Knife: For best results without heat shrink, cut the sleeve using a hot knife. This method melts the fibers as it cuts, preventing immediate fraying.
- Sear Ends with Lighter: Alternatively, if a hot knife is not available, cut the sleeve with scissors and then carefully sear the cut ends with a lighter. Apply heat briefly and evenly to melt the fibers and prevent fraying. Exercise caution to avoid burning the sleeve or any internal wires.

Image: Visual guide demonstrating two common methods for installing the cable sleeve: one using heat shrink tubing and a heat gun for a secure finish, and another showing how to cut and sear the ends to prevent fraying without heat shrink.

Image: An example of how the braided sleeve can perfectly organize multiple cables into a single, neat bundle.

Image: This image illustrates the sleeve's effectiveness in protecting cables from pet chewing, showing a cat attempting to chew on a sleeved cable.

Image: An example of the cable management sleeve being used to neatly organize and conceal cables behind a wall-mounted television, contributing to a cleaner aesthetic.
4. Operating Instructions
The cable management sleeve is a passive component designed for continuous protection. Once installed, no further 'operation' is required. Ensure that the sleeve is not subjected to excessive tension or sharp bends that could compromise the integrity of the internal cables.
5. Maintenance
The Braided Cable Management Sleeve requires minimal maintenance. Periodically inspect the sleeve for any signs of wear, fraying, or damage, especially in areas prone to movement or abrasion. If significant damage is observed, consider replacing the affected section of the sleeve to maintain optimal protection.
To clean the sleeve, gently wipe it with a damp cloth. Avoid using harsh chemicals or abrasive cleaners, as these may degrade the material.
6. Troubleshooting
- Issue: Sleeve is fraying after cutting.
Solution: Ensure ends are properly sealed. Use a hot knife for cutting or carefully sear the cut ends with a lighter to melt the fibers and prevent fraying. Heat shrink tubing can also be applied for a more durable finish. - Issue: Difficulty inserting cables into the sleeve.
Solution: The sleeve is designed to expand. Gently push the cables into the sleeve rather than pulling the sleeve over the cables. For large bundles, insert a few cables at a time, then gradually add more, working the sleeve along the bundle. - Issue: Sleeve does not fit around a large bundle of cables.
Solution: Verify the total diameter of your cable bundle. While the 1/2 inch sleeve expands up to 200%, exceptionally large bundles may require a larger diameter sleeve.
7. Product Specifications
| Attribute | Detail |
|---|---|
| Product Dimensions | 300"L x 0.5"W (25 feet length, 1/2 inch nominal width) |
| Item Weight | 0.353 ounces |
| Model Number | 4332799181 |
| Brand | Braided |
| Color | Black & Yellow |
| Material | Polyethylene (PET) |
| Style | Protection |
| Operating Temperature | -103°F to 257°F (-75°C to 125°C) |
| Melting Temperature | 446°F (230°C) |
| Certifications | UL, CSA, ROHS, REACH Compliant, Halogen-free |
8. Warranty and Support
The Braided Cable Management Sleeve comes with a warranty offering three months of free returns and exchanges. For any product-related inquiries, support, or to initiate a return/exchange, please contact the seller or refer to your purchase documentation for specific contact details.