1. Product Overview
This Spares2go line and spool is a premium quality, fully compatible replacement part designed for specific Qualcast strimmer/trimmer models. It provides the necessary cutting line for maintaining your garden and lawn edges.
- Line and spool manufactured for Spares2go to fit Qualcast strimmer/trimmer.
- Premium quality, fully compatible replacement/spare part.
- Quantity: 1 unit.

Image 1: Top-down view of the Spares2go line and spool, showing the black plastic housing with blue trimmer line wound around it. The top cap is visible.
2. Compatible Models
This line and spool is compatible with the following Qualcast strimmer/trimmer models:
- GGT3001
- PWR300GTB
- TRY250SGTD
- TRY400HTB
3. Specifications
| Feature | Detail |
|---|---|
| Brand | Spares2go |
| Model Number | 04-BSS-341 |
| Line Width | 1.5 mm |
| Line Length | 2 x 2.5 m (5 meters total) |
| Package Dimensions | 18.5 x 1.2 x 0.3 cm |
| Manufacturer | SPARES2GO |
| Country of Origin | China |
| Discontinued by Manufacturer | No |
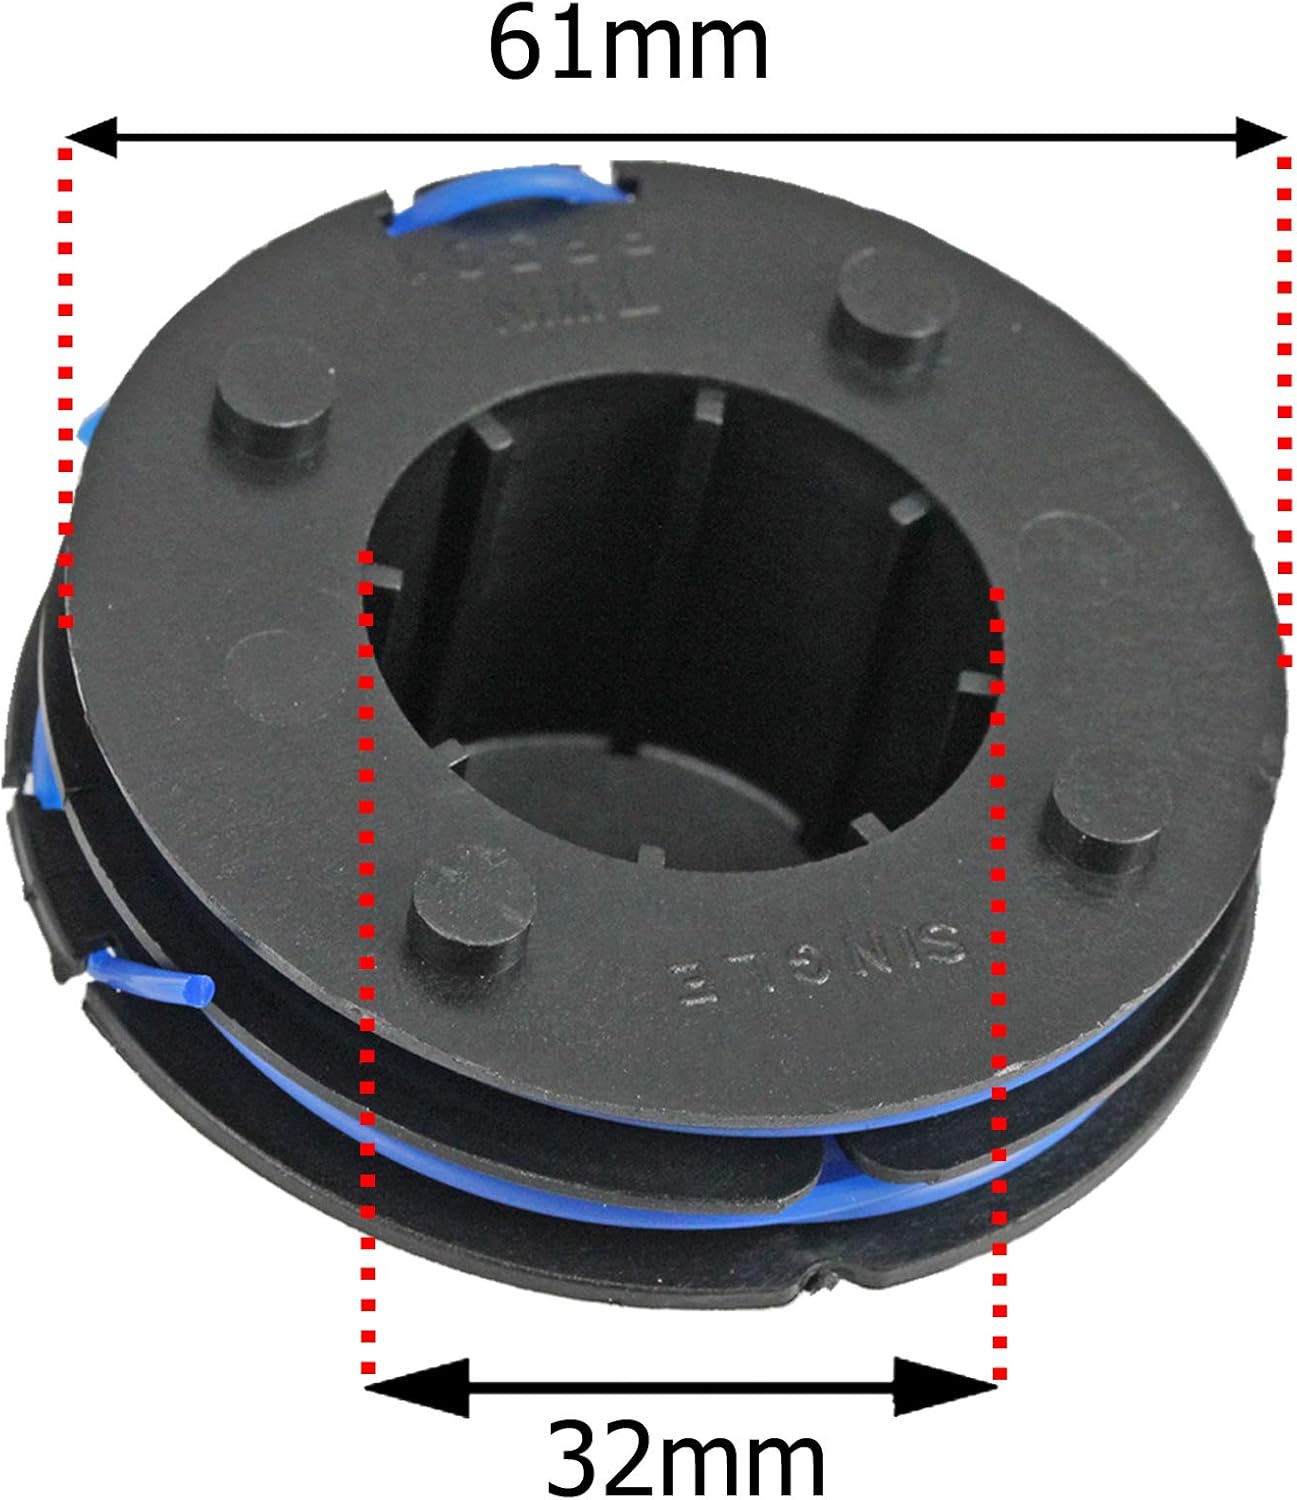
Image 2: Bottom view of the spool with dimensions indicated. The outer diameter is 61mm, and the inner diameter of the central hole is 32mm.

Image 3: Top view of the spool with dimensions indicated. The diameter of the top cap is 35mm, and the overall diameter of the spool base is 63mm.

Image 4: Side view of the spool with height dimensions indicated. The total height of the spool is 35mm, and the height of the top cap is 15mm.
4. Setup and Installation
Replacing the line and spool in your Qualcast strimmer/trimmer typically involves a few steps. Always refer to your specific trimmer's user manual for detailed instructions, as procedures may vary slightly between models. Ensure the trimmer is unplugged or the battery is removed before beginning any maintenance.
General Installation Steps:
- Prepare the Trimmer: Disconnect the trimmer from its power source (unplug from mains or remove battery pack).
- Remove the Spool Cover: Locate the spool cover on the trimmer head. This usually involves pressing tabs or twisting the cover to release it.
- Remove the Old Spool: Carefully lift out the old or empty spool from the trimmer head. Note how the line was fed through any eyelets or guides.
- Install the New Spool: Take your new Spares2go line and spool. Ensure the line is properly wound and secured on the spool. Feed the ends of the trimmer line through the corresponding eyelets or holes on the trimmer head.
- Secure the Spool: Place the new spool into the trimmer head, ensuring it sits correctly and aligns with any internal mechanisms.
- Reattach the Spool Cover: Align the spool cover and snap or twist it back into place until it is securely fastened. Give it a gentle tug to ensure it's locked.
- Trim Excess Line: If the line extends too far, use the trimmer's built-in line cutter (if available) or a pair of scissors to trim it to the appropriate length, typically just past the guard.
- Test Operation: Reconnect the power source and briefly test the trimmer to ensure the line feeds correctly.

Image 5: Angled view of the bottom of the spool, showing the central opening and the winding of the blue trimmer line.
5. Operating Instructions
Once the new line and spool are installed, your trimmer is ready for operation. The line automatically feeds or can be manually advanced depending on your trimmer model. Always wear appropriate personal protective equipment (PPE) including eye protection, gloves, and sturdy footwear when operating a trimmer.
Line Feeding:
- Automatic Feed: Many trimmers feature an automatic line feed system that extends the line as it wears down. This typically happens when the trimmer is stopped and restarted, or by tapping the trimmer head on the ground while operating (bump feed).
- Manual Feed: Some models may require manual advancement of the line by pressing a button or pulling the line out by hand after disengaging the power.
Ensure the line is always at an optimal length for efficient cutting. Too short, and it reduces cutting width; too long, and it can strain the motor.
6. Maintenance
Proper maintenance of your line and spool ensures optimal performance and longevity.
- Storage: Store the line and spool in a cool, dry place away from direct sunlight. Extreme temperatures can affect the line's flexibility and strength.
- Inspection: Periodically inspect the line for fraying, nicks, or excessive wear. Replace the spool if the line is severely damaged or depleted.
- Cleaning: Keep the spool and the trimmer head free from debris, grass clippings, and dirt. This prevents blockages and ensures smooth line feeding.
7. Troubleshooting
If you encounter issues with your trimmer line and spool, consider the following common problems and solutions:
| Problem | Possible Cause | Solution |
|---|---|---|
| Line not feeding | Line tangled or stuck on spool; debris in trimmer head; incorrect spool installation. | Remove spool, untangle line, clean trimmer head, re-install spool correctly. Ensure line is not cross-wound. |
| Line breaks frequently | Old or brittle line; hitting hard surfaces; incorrect line diameter for trimmer. | Replace with fresh line/spool. Avoid hitting concrete, rocks, or fences. Ensure line diameter matches trimmer specifications. |
| Trimmer motor strains | Line too long; incorrect line diameter; cutting too much material at once. | Trim line to appropriate length. Use correct line diameter. Take smaller passes when cutting dense vegetation. |
8. Warranty and Support
This product is a replacement part manufactured by Spares2go. For specific warranty information, please refer to the seller's return policy or contact the seller directly.
- Return Policy: The seller, SPARES-2-GO, offers a 30-day refund/replacement return policy.
- Manufacturer: SPARES2GO
- Seller: SPARES-2-GO (via Amazon.com.be)
- For further assistance or inquiries, please contact the seller through the Amazon platform.