1. Product Overview
The Philips EasyTouch Plus Standing Garment Steamer GC523/60 is designed for efficient crease removal from various garments. It features a powerful 1600W heating element, five steam settings, and a continuous steam output of up to 32g/min. The double pole design provides stability, and the large water tank ensures extended use. This appliance is suitable for a wide range of fabrics, including delicate and intricately designed clothing.

Image: Philips EasyTouch Plus Standing Garment Steamer GC523/60.

Image: Comparison highlighting the differences between garment steamers and traditional irons.
2. Important Safety Instructions
Please read this instruction manual carefully before using the appliance and save it for future reference. Failure to follow these instructions may result in electric shock, fire, or serious injury.
- Always ensure the voltage indicated on the appliance corresponds to your local mains voltage before connecting.
- Do not immerse the appliance, power cord, or plug in water or any other liquid.
- Keep the appliance and its cord out of reach of children.
- Never direct steam at people or pets, as steam is hot and can cause burns.
- Do not touch the hot steam plate during use.
- Always unplug the appliance before filling or emptying the water tank, and during cleaning or maintenance.
- Use only distilled or demineralized water in the water tank to prevent mineral buildup.
- Do not use the appliance if the plug, power cord, or the appliance itself shows visible damage.
- Place the appliance on a stable, level surface during use.
3. Product Components
The Philips EasyTouch Plus Standing Garment Steamer GC523/60 includes the following components:
- Garment Steamer Unit
- Adjustable Double Pole
- Garment Hanger with Trouser Clips
- Support Accessory (Support Mat)
- Fabric Brush
- Glove for Extra Protection
- Pleat Maker Accessory
- User Manual

Image: Overview of the steamer's main components and features.

Image: The special garment hanger with integrated hook and clips for various clothing types.

Image: Visual representation of the protective glove, fabric brush, pleat-making accessory, and support mat.
4. Setup and First Use
4.1 Assembly
- Insert the adjustable double poles into the main unit until they click into place.
- Attach the garment hanger to the top of the double poles.
- Place the support mat over the hanger if desired for easier steaming.
- Ensure the steam hose is securely connected to the main unit.
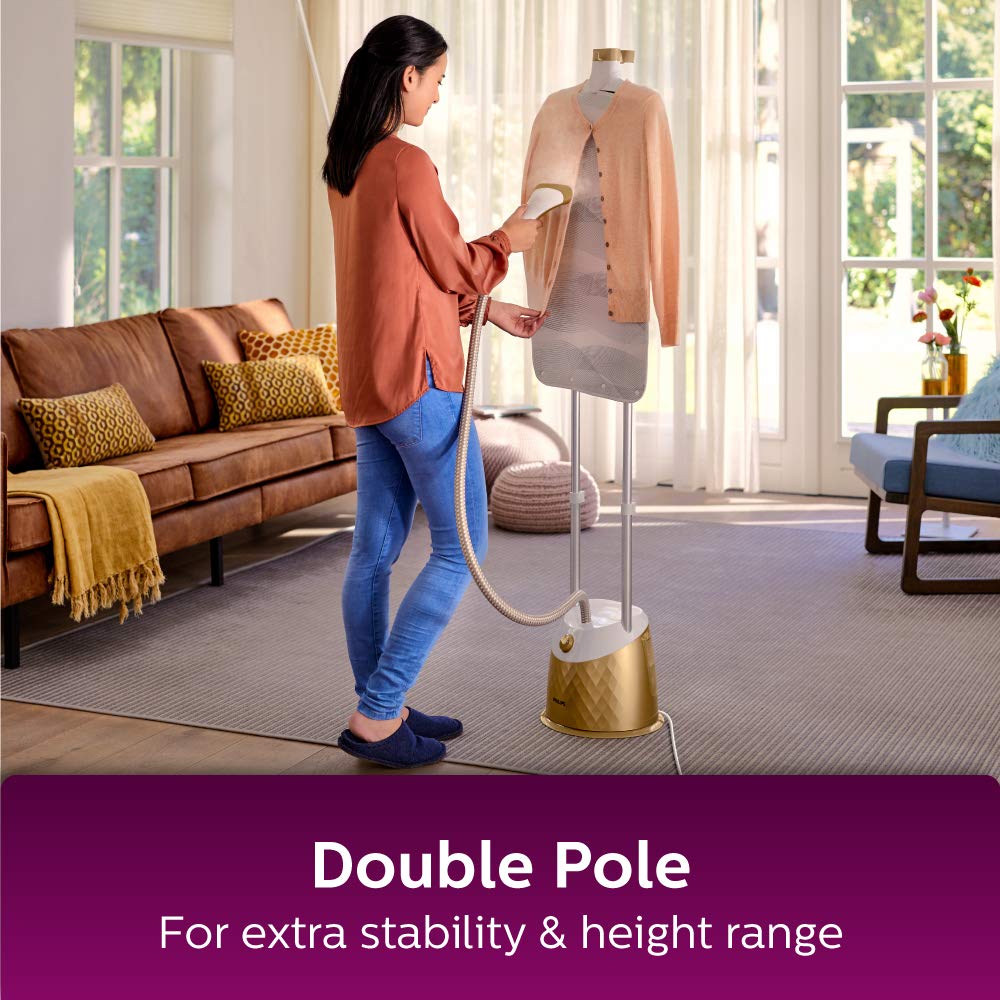
Image: The double pole system provides stability and allows for height adjustment.
4.2 Filling the Water Tank
- Ensure the appliance is unplugged from the power outlet.
- Remove the detachable water tank from the main unit.
- Open the water tank cap and fill it with clean, distilled, or demineralized water up to the MAX level indicator. Do not overfill.
- Close the cap securely and reinsert the water tank into the main unit.

Image: The detachable water tank allows for easy refilling.
4.3 First Use
- Plug the appliance into a suitable power outlet.
- Turn the steam setting dial to the desired level (start with a lower setting for delicate fabrics).
- Wait for less than 1 minute for the water to heat up and steam to be ready. The indicator light will show when ready.
- Before steaming garments, direct the steam head away from clothing and people to release any initial condensation.
5. Operating Instructions
5.1 Selecting Steam Settings
The steamer offers 5 steam settings to accommodate different fabric types. Rotate the dial on the main unit to select the appropriate steam level:
- Lower settings: Suitable for delicate fabrics like silk, chiffon, and synthetics.
- Higher settings: Ideal for thicker fabrics such as cotton, linen, and denim, or for stubborn creases.

Image: The steam setting dial allows selection of 5 different steam levels.
5.2 Steaming Garments
Follow these steps for effective garment steaming:
- Hang your garment on the provided hanger. For best results, ensure the garment hangs freely.
- Hold the steam head close to the fabric, but do not press it directly against the material unless using the fabric brush.
- Gently stretch the fabric with your free hand while moving the steam head up and down over the creases.
- For thicker fabrics or stubborn wrinkles, use the fabric brush attachment to help penetrate the steam deeper into the fibers.
- Use the pleat maker accessory for creating crisp pleats.
- Always wear the protective glove provided, especially when steaming delicate areas or adjusting garments.

Image: Demonstrating the use of the garment steamer on clothing.

Image: The steamer delivers a continuous steam output of 32g/min for effective de-wrinkling.

Image: The large steam plate covers more area, reducing the number of strokes required.

Image: The steamer is safe for use on a variety of ironable clothes, including ethnic, formal, and designer wear.

Image: Simplified steps for using the garment steamer.
6. Care and Maintenance
6.1 Descaling (De-Calc)
Regular descaling is essential to prolong the lifetime of your steamer and maintain optimal performance. The appliance features an easy de-calc function:
- Ensure the appliance is unplugged and has cooled down completely.
- Remove the water tank.
- Locate the 'Calc Clean' knob or lever on the base of the unit.
- Turn the knob to the 'Calc Clean' position (refer to the diagram on the unit).
- Place a basin or container under the de-calc opening to collect the water and scale.
- Allow all water to drain out. Shake the unit gently to dislodge any remaining scale.
- Once drained, return the knob to the original position.
- Rinse the water tank and refill with fresh distilled water before next use.

Image: The de-calc feature helps remove tough calcium deposits, extending the steamer's life.
6.2 Cleaning and Storage
- After each use, unplug the appliance and allow it to cool down.
- Empty any remaining water from the water tank.
- Wipe the exterior of the appliance with a soft, damp cloth. Do not use abrasive cleaners.
- Store the appliance in a dry, cool place, preferably in its original packaging or a dust-free environment.
7. Troubleshooting
If you encounter any issues with your garment steamer, please refer to the table below for common problems and solutions.
| Problem | Possible Cause | Solution |
|---|---|---|
| No steam or very little steam | Water tank is empty or low. Appliance not heated up. Steam hose is kinked. | Fill the water tank. Wait for the indicator light to show readiness. Straighten the steam hose. |
| Water dripping from steam head | Condensation in the hose. Appliance not fully heated. | Allow the appliance to heat up completely. Direct steam away from garments for a few seconds before use. |
| Appliance not turning on | Not plugged in correctly. Power outlet issue. | Check power connection. Try a different power outlet. |
| Steam output is weak or inconsistent | Mineral buildup (scale). Water tank not properly inserted. | Perform a de-calc procedure. Ensure the water tank is securely in place. |
8. Technical Specifications
- Model: GC523/60
- Power: 1600 Watts
- Voltage: 240 Volts
- Steam Output: Up to 32 g/min
- Water Tank Capacity: 1600 Milliliters
- Product Dimensions: 35L x 34.5W x 41.5H Centimeters
- Item Weight: 32 Grams (Note: This weight seems incorrect for the full unit, likely refers to a component. Refer to packaging for accurate total weight.)
- Steam Settings: 5
9. Warranty and Customer Support
The Philips EasyTouch Plus Standing Garment Steamer GC523/60 comes with a 2-year warranty from the date of purchase. Please retain your proof of purchase for warranty claims.
For further assistance, troubleshooting not covered in this manual, or warranty service, please contact Philips customer support through their official website or the contact information provided with your product packaging.


