Introduction
This manual provides detailed instructions for the installation, operation, and maintenance of your SmallRig Wooden Side Handle (Model 2093-SR). Designed for camera rigs, this versatile handle enhances stability and provides multiple mounting options for accessories.
Key Features
- Wide Compatibility: Compatible with camera cages featuring two 1/4"-20 threaded holes spaced 18mm / 0.7in apart. Supports a maximum load of up to 15kg / 33lb.
- Ergonomic Wooden Design: Crafted from premium wood over an integrated aluminum alloy core, offering natural warmth, high strength, and a comfortable grip.
- Adjustable Height: Features a vertical adjustment range of 36mm / 1.42in for optimal grip positioning based on camera size. Includes a built-in magnetic hex wrench for easy adjustments.
- Left/Right Hand Versatility: The handle can be easily switched for left or right-hand use by reorienting the connecting part.
- Multiple Mounting Points: Equipped with two 1/4"-20 threaded holes, one 1/4"-20 locating hole, and a cold shoe interface for expanding accessories like microphones, flashes, magic arms, and monitor mounts.
What's in the Box
- Side handle x 1
- Built-in Allen wrench (for adjustments)

Image: The SmallRig Wooden Side Handle and its included Allen wrench, displayed next to a specifications list.
Setup and Installation
1. Attaching the Handle to Your Camera Cage
The SmallRig Wooden Side Handle attaches securely to camera cages with two 1/4"-20 threaded holes spaced 18mm (0.7") apart.
- Align the two 1/4"-20 thumbscrews on the handle's connecting part with the corresponding threaded holes on your camera cage.
- Hand-tighten the thumbscrews until the handle is snug against the cage.
- For a final secure fit, use the built-in magnetic Allen wrench (located at the bottom of the handle) to fully tighten the thumbscrews.
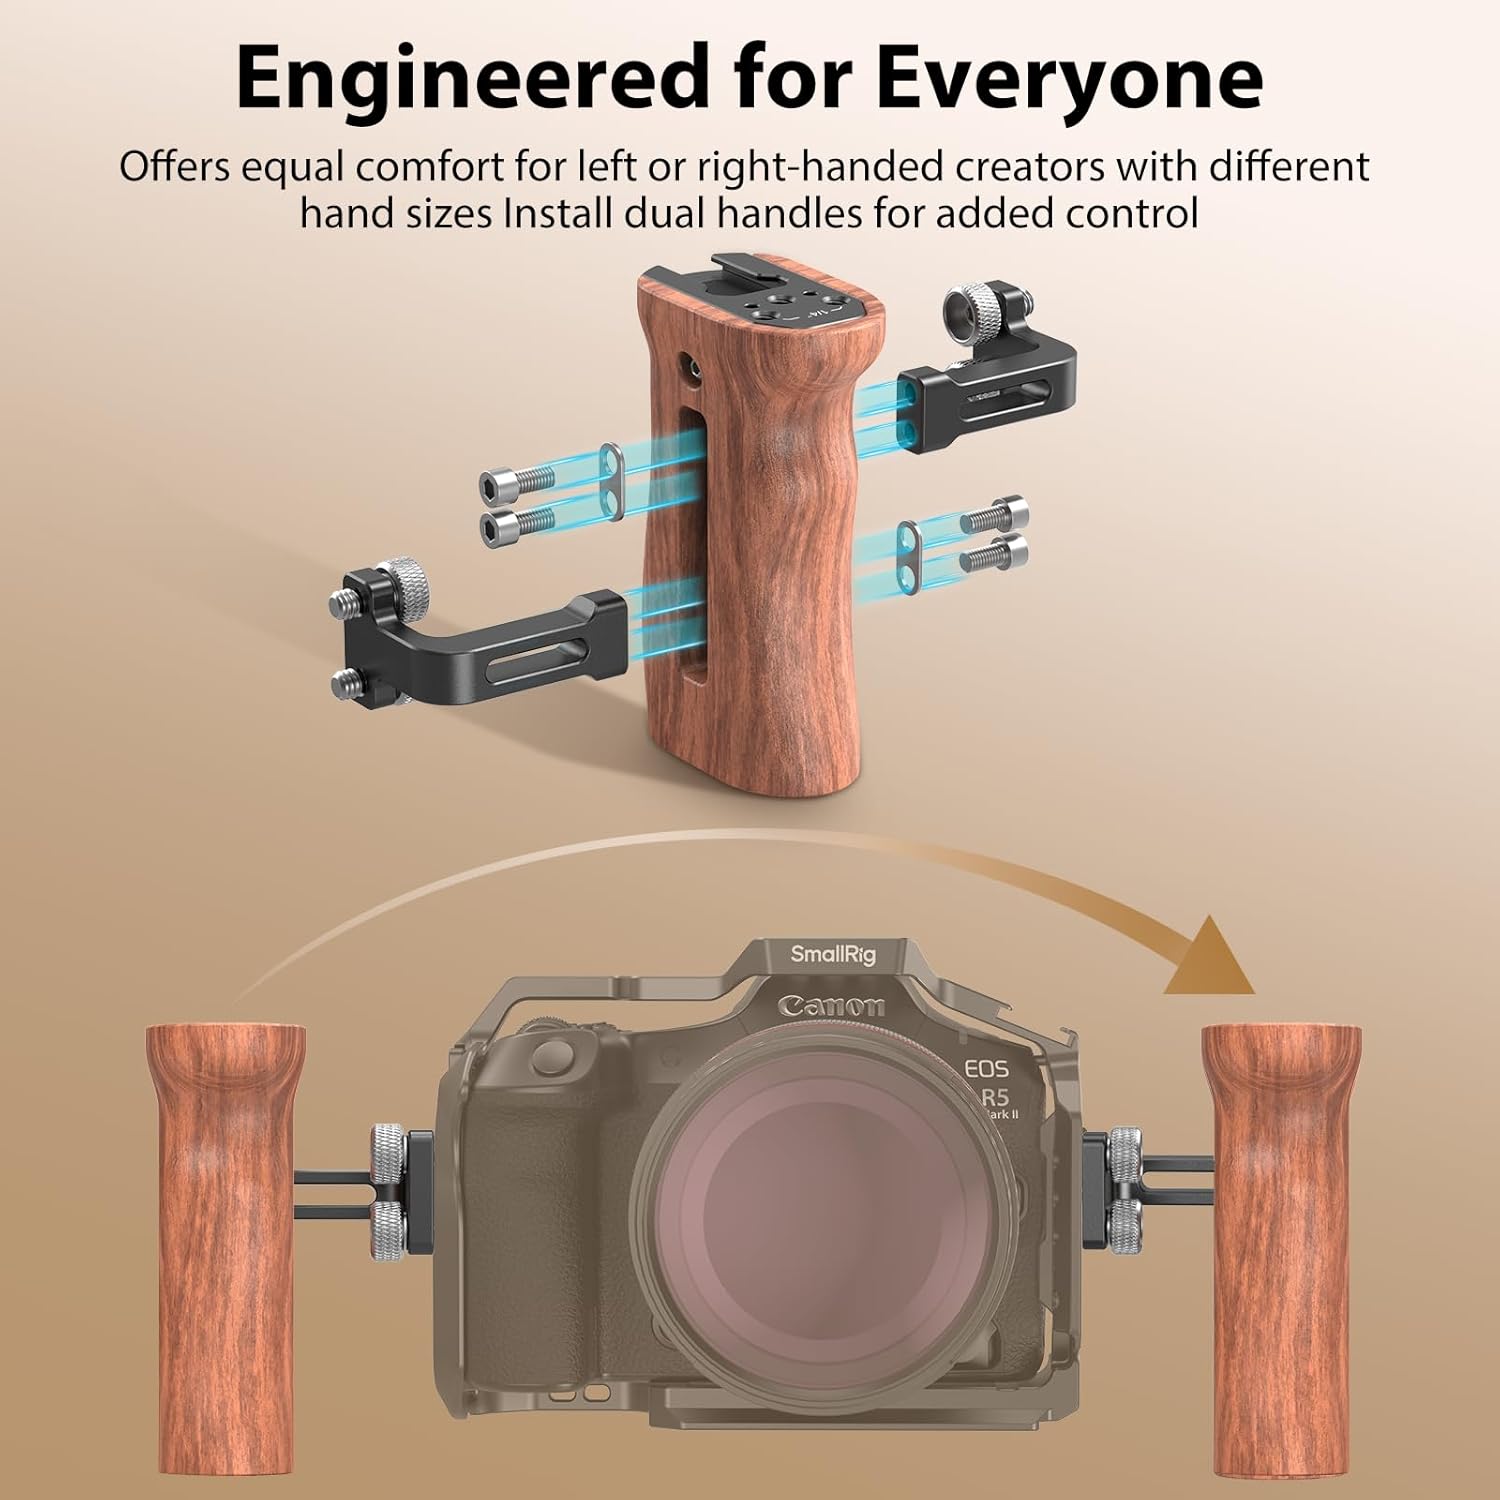
Image: A detailed view of the SmallRig Wooden Side Handle attached to a camera cage using two 1/4"-20 thumbscrews, highlighting the 18mm spacing requirement.

Image: An illustration demonstrating the easy assembly of the handle to a camera cage, showing the thumbscrews and the integrated Allen wrench.
2. Adjusting Handle Height
The handle's vertical position can be adjusted by up to 36mm (1.42in) to suit your camera setup and personal preference.
- Locate the two hex screws on the side of the handle's connecting part.
- Use the built-in Allen wrench to loosen these screws.
- Slide the handle up or down to your desired height.
- Tighten the hex screws firmly with the Allen wrench to secure the handle in place.
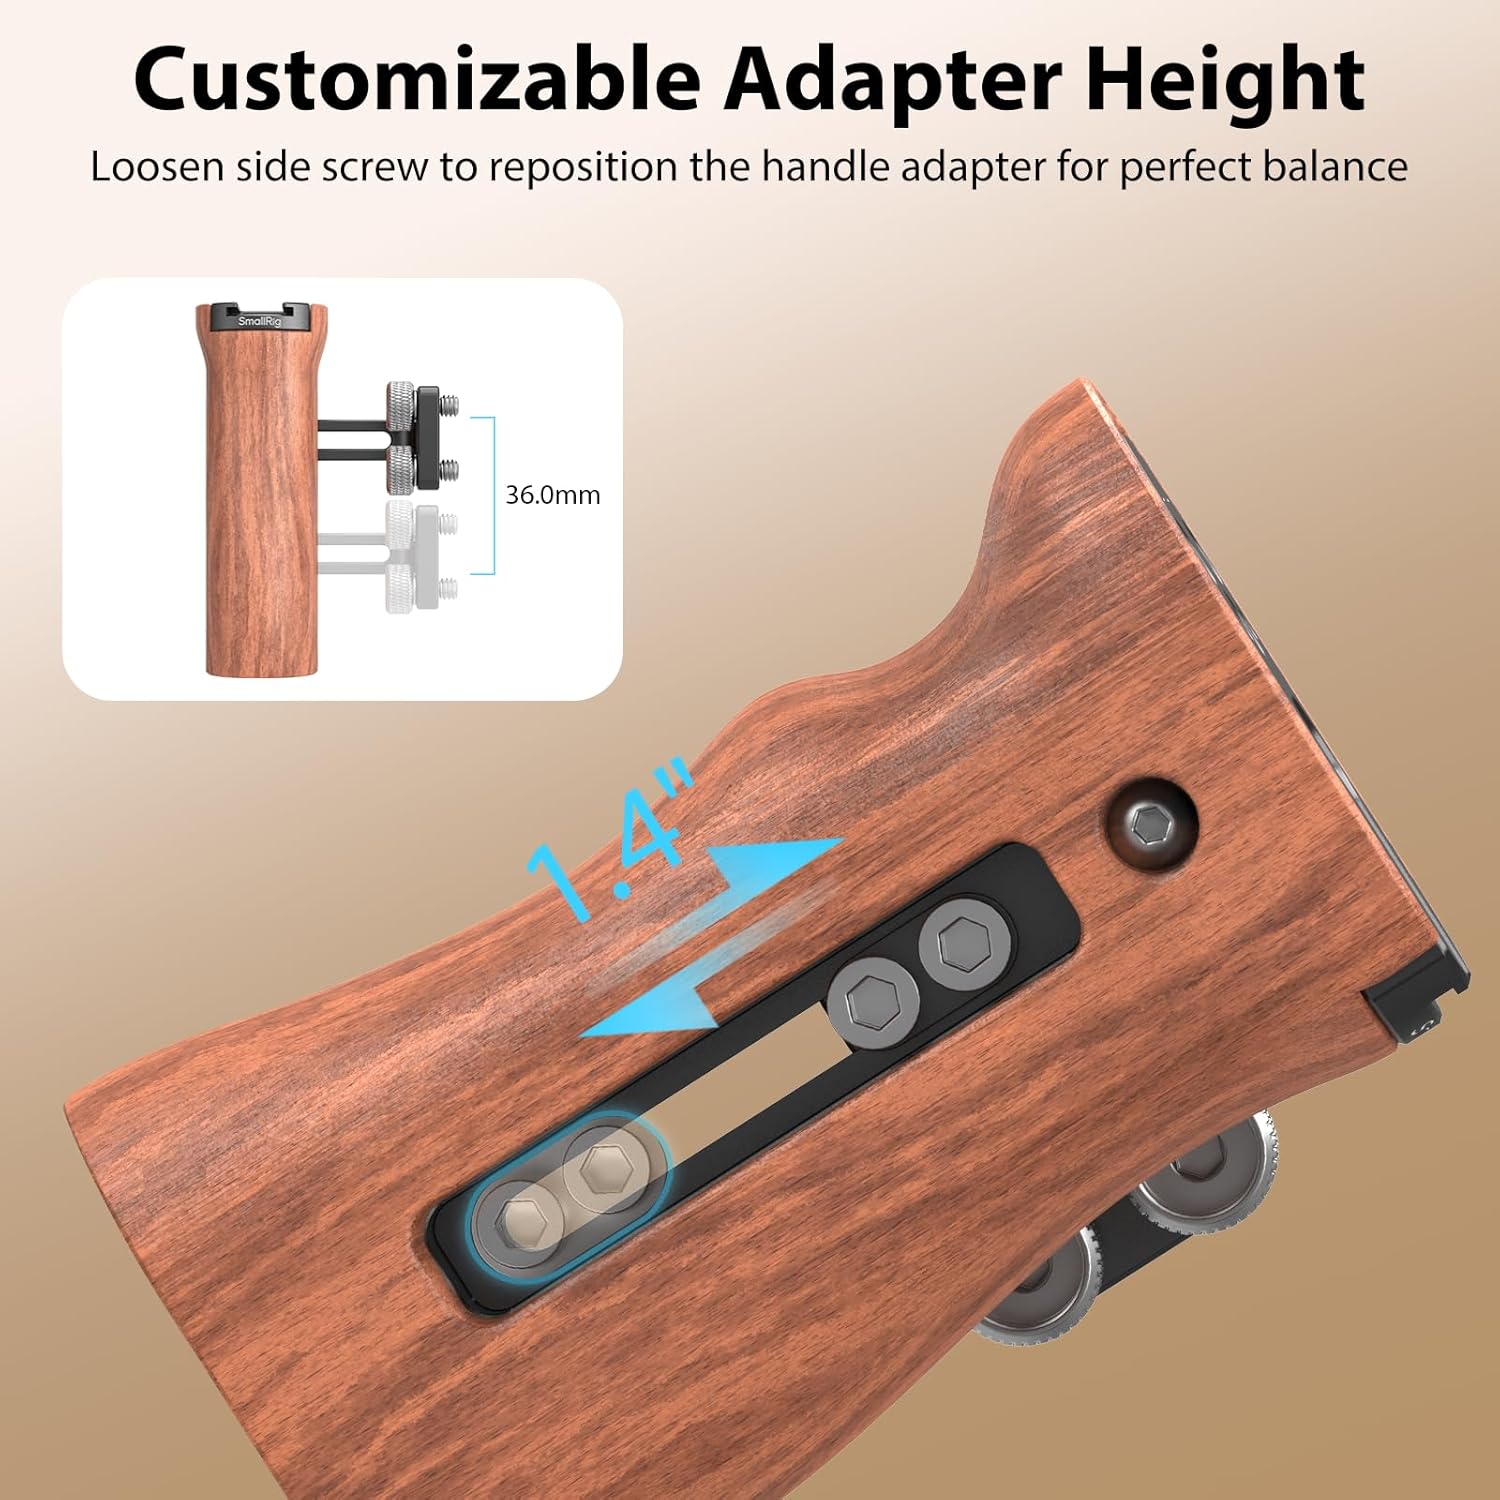
Image: A close-up view illustrating the height adjustment mechanism of the handle, showing the screws that allow vertical repositioning.

Image: An illustration showing how to loosen side screws to reposition the handle adapter for perfect balance, with a diagram indicating the 36mm adjustment range.
3. Switching for Left or Right Hand Use
The handle can be configured for either left or right-hand operation.
- Unscrew the connecting part from the wooden handle using the Allen wrench.
- Flip the connecting part 180 degrees.
- Reattach the connecting part to the wooden handle and tighten the screws.
- Attach the reconfigured handle to your camera cage as described in step 1.

Image: The SmallRig Wooden Side Handle shown attached to a camera rig, demonstrating its use for both left and right-handed operators.

Image: An illustration showing the handle's adaptability for left or right-handed users and how to install dual handles for enhanced control.
Operating Instructions
Once installed, the SmallRig Wooden Side Handle provides a stable and comfortable grip for your camera rig, improving handheld shooting and offering versatile accessory mounting.
1. Enhanced Handheld Stability
Grip the wooden handle firmly to achieve greater stability during handheld video recording or photography. The ergonomic design ensures a comfortable and secure hold, reducing camera shake.

Image: A hand gripping the ergonomic wooden side handle, illustrating its comfortable and secure design for camera operation.

Image: An illustration emphasizing the ergonomic design and natural wood texture of the handle, providing a comfortable grip in any weather.
2. Mounting Accessories
Utilize the various mounting points on the top of the handle to attach additional camera accessories:
- Cold Shoe: Slide in accessories such as microphones, LED lights, or wireless receivers.
- 1/4"-20 Threaded Holes: Attach monitor mounts, magic arms, or other threaded accessories.
- 1/4"-20 Locating Hole: Provides an anti-twist mounting point for compatible accessories.

Image: A top-down view of the handle showing the cold shoe, 1/4"-20 threaded holes, and 1/4"-20 locating hole for accessory attachment.

Image: An illustration detailing the various mounting points on the handle, including the cold shoe, 1/4"-20 threaded holes, and a 1/4"-20 locating hole, with examples of compatible accessories like a monitor mount and video light.

Image: A complete camera rig featuring the SmallRig Wooden Side Handle, a monitor mount, top handle, V-mount battery, and magic arm, demonstrating a fully accessorized setup.
3. Official Product Videos
Watch these official videos from SmallRig for visual guidance on using your side handle:
SmallRig Wooden Handle 2093 (Shoot by Eudurefilms)
Video Description: An official promotional video from SmallRig showcasing the Wooden Handle 2093 in various filmmaking scenarios, highlighting its ergonomic design and versatility.
Maintenance
- Cleaning: Wipe the wooden handle with a soft, dry cloth. For the metal parts, use a slightly damp cloth if necessary, then dry thoroughly. Avoid harsh chemicals or abrasive cleaners.
- Storage: Store the handle in a dry, cool place away from direct sunlight and extreme temperatures to prevent wood warping or cracking.
- Tightness Check: Periodically check all screws and connections to ensure they remain tight. Re-tighten with the Allen wrench as needed.
Troubleshooting
- Handle feels loose: Ensure both 1/4"-20 thumbscrews are fully tightened using the built-in Allen wrench. Check that the handle's connecting part is correctly aligned with the cage's threaded holes.
- Difficulty adjusting height: Loosen the hex screws on the side of the connecting part sufficiently before attempting to slide the handle. Ensure no debris is obstructing the sliding mechanism.
- Accessories not fitting cold shoe/threads: Verify that your accessory has a standard cold shoe mount or 1/4"-20 thread. Ensure no foreign objects are blocking the mounting points.
Specifications
| Brand | SMALLRIG |
| Model Name | 2093-SR |
| Product Dimensions | 2.05"D x 3.03"W x 4.13"H |
| Item Weight | 200 Grams |
| Maximum Weight Recommendation | 15kg / 33lbs |
| Compatible Devices | Camera cages with two 1/4"-20 threaded holes spaced 18mm / 0.7in apart |
| Material(s) | Wood, Aluminum Alloy |
| Built-In Media | Side handle x 1 |
Warranty and Support
For warranty information, technical support, or further inquiries, please visit the official SmallRig website or contact their customer service directly. Keep your purchase receipt for warranty claims.
SmallRig is committed to providing high-quality accessories and support for content creators worldwide.


