1. Introduction
This manual provides essential information for the safe and efficient operation of your FLUKE 124B/JP/S ScopeMeter. Please read this manual thoroughly before using the device and keep it for future reference.
The Fluke 124B/JP/S is a compact ScopeMeter designed for industrial applications, combining the functions of a dual-input digital oscilloscope and a multimeter. It features advanced capabilities like Connect-and-View triggering and IntellaSet technology for simplified measurements.
2. Safety Information
Always follow basic safety precautions when using this product to reduce the risk of fire, electric shock, and personal injury. Keep this manual for future reference.
- Read all instructions carefully before use.
- Do not operate the device if it appears damaged or is not functioning properly.
- Ensure proper ventilation to prevent overheating.
- Use only specified accessories and attachments.
- Refer all servicing to qualified service personnel.
- Observe all local and national safety codes.
3. Product Overview
The FLUKE 124B/JP/S ScopeMeter is a robust and versatile tool for electrical and electronic measurements. It integrates a dual-input digital oscilloscope and a true-RMS digital multimeter into a single handheld device.
Key Features:
- Dual-input digital oscilloscope and multimeter.
- Oscilloscope bandwidth: 40 MHz or 20 MHz.
- 2-channel, 5,000 count true-RMS digital multimeter.
- Connect-and-View™ trigger function for simple, hands-free operation.
- IntellaSet™ technology for intelligent automatic adjustment of measurement values based on the measured signal.
- Long-term recorder function with up to 400M samples and 15G points of data directly recordable to SD card (for 124B and 125B models), allowing up to 14 days of event saving.
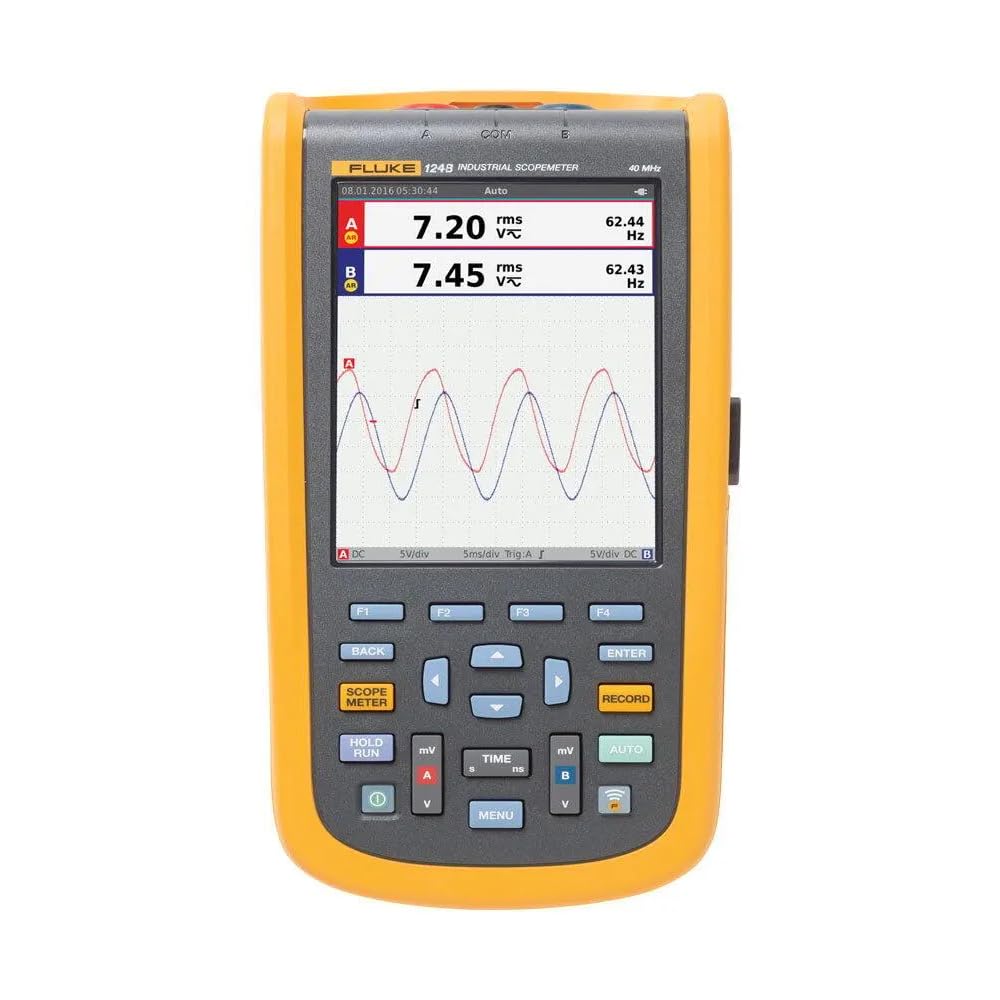
Figure 1: FLUKE 124B/JP/S ScopeMeter with included accessories, including probes, power adapter, and carrying case.
4. Setup
4.1 Unpacking and Inspection
Carefully unpack the ScopeMeter and all accessories. Inspect for any signs of damage. If any items are missing or damaged, contact your supplier immediately.
4.2 Battery Installation and Charging
The device uses a Lithium-Ion battery. Ensure the battery is properly installed. Connect the power adapter to charge the device before first use. A full charge is recommended for optimal battery life.
4.3 Initial Power On
Press and hold the power button until the display illuminates. The device will perform a self-test. Follow any on-screen prompts for initial setup, such as language selection.
5. Operating Instructions
5.1 Basic Measurement Modes
The ScopeMeter offers both oscilloscope and multimeter functionalities. Use the dedicated buttons to switch between modes.

Figure 2: Front view of the FLUKE 124B/JP/S ScopeMeter, showing the display and control buttons.
5.2 Connect-and-View™ Triggering
This feature automatically identifies signal patterns and sets the correct trigger conditions. Simply connect the probes to the circuit, and the device will optimize the display. In Auto mode, it continuously tracks signal changes, providing a stable waveform display without manual adjustments.

Figure 3: The ScopeMeter displaying a complex waveform, demonstrating its measurement capabilities.
5.3 IntellaSet™ Technology
IntellaSet analyzes measured waveforms using a unique algorithm and automatically displays the most appropriate measurement values on the screen. This simplifies waveform analysis and ensures reliable verification of readings.
5.4 Long-Term Recorder Function
The recorder function allows high-speed and long-term waveform capture. It can capture up to 400M samples and record up to 15G points of data directly to an SD card (for 124B and 125B models). This enables saving up to 14 days of event data for later analysis.
5.5 Using the Multimeter
Switch to multimeter mode to perform standard electrical measurements such as voltage, current, resistance, and capacitance. Refer to the on-screen interface for specific measurement selections and ranges.

Figure 4: A technician using the FLUKE 124B/JP/S ScopeMeter to perform measurements on a circuit board.
6. Maintenance
6.1 Cleaning
Wipe the device with a soft, damp cloth. Do not use abrasive cleaners or solvents. Ensure the device is powered off and disconnected from any power source before cleaning.
6.2 Battery Care
To prolong battery life, avoid extreme temperatures and store the device with a partial charge if not used for extended periods. Replace the battery when its capacity significantly diminishes.
6.3 Storage
Store the ScopeMeter and its accessories in a clean, dry environment, away from direct sunlight and extreme temperatures. Use the provided carrying case for protection during transport.
7. Troubleshooting
| Problem | Possible Cause | Solution |
|---|---|---|
| Device does not power on. | Low or depleted battery; power button not pressed correctly. | Charge the battery; ensure the power button is pressed firmly for a few seconds. |
| Unstable waveform display. | Incorrect trigger settings; poor probe connection. | Ensure Connect-and-View is active or adjust trigger levels manually; check probe connections. |
| Inaccurate multimeter readings. | Incorrect measurement mode; faulty probes. | Verify the selected measurement mode; test probes for continuity or replace if damaged. |
| SD card recording issues. | SD card full or corrupted; incorrect file format. | Check SD card capacity; format the SD card (this will erase data); try a different SD card. |
If the problem persists after attempting these solutions, contact customer support.
8. Specifications
| Feature | Detail |
|---|---|
| Manufacturer | FLUKE |
| Part Number | 124B/JP/S |
| Item Weight | 1.4 Kilograms |
| Product Dimensions (LxWxH) | 32 x 25 x 47 cm |
| Batteries | 1 Lithium-Ion battery (included) |
| Measurement Accuracy | Refer to catalog values |
| Included Components | Standard accessories included |
| Battery Type | Lithium-Ion |
| ASIN | B07DRL9T2M |
| First Available Date | January 25, 2019 |
9. Warranty & Support
9.1 Warranty Information
This FLUKE product is covered by a standard manufacturer's warranty. Please refer to the warranty card included with your product or visit the official FLUKE website for detailed warranty terms and conditions.
9.2 Customer Support
For technical assistance, troubleshooting, or service inquiries, please contact FLUKE customer support. Contact details can typically be found on the official FLUKE website or in the product packaging.
Online resources and FAQs may also be available on the FLUKE support portal.