HOUSBAY SPC498
Housbay Digital Alarm Clock User Manual
Model: SPC498
Introduction
Thank you for purchasing the Housbay Digital Alarm Clock. This manual provides detailed instructions on how to set up, operate, and maintain your new alarm clock. Please read this manual thoroughly before use to ensure proper functionality and to maximize your user experience.

Image: The Housbay Digital Alarm Clock positioned on a bedside table, showing its large red LED display and sleek design, indicating its use in a bedroom setting.
Product Overview
Familiarize yourself with the components of your Housbay Digital Alarm Clock:
- Large LED Display: For clear time and alarm indication.
- Snooze Button: Located on top for easy access.
- Control Buttons (Rear): MIN, HOUR, TIME, ALARM, ALARM ON/OFF, DIMMER HI/LOW.
- Dual USB Charging Ports: For charging external devices.
- DC 5V IN Port: For main power connection.
- Battery Compartment: For backup batteries (not included).
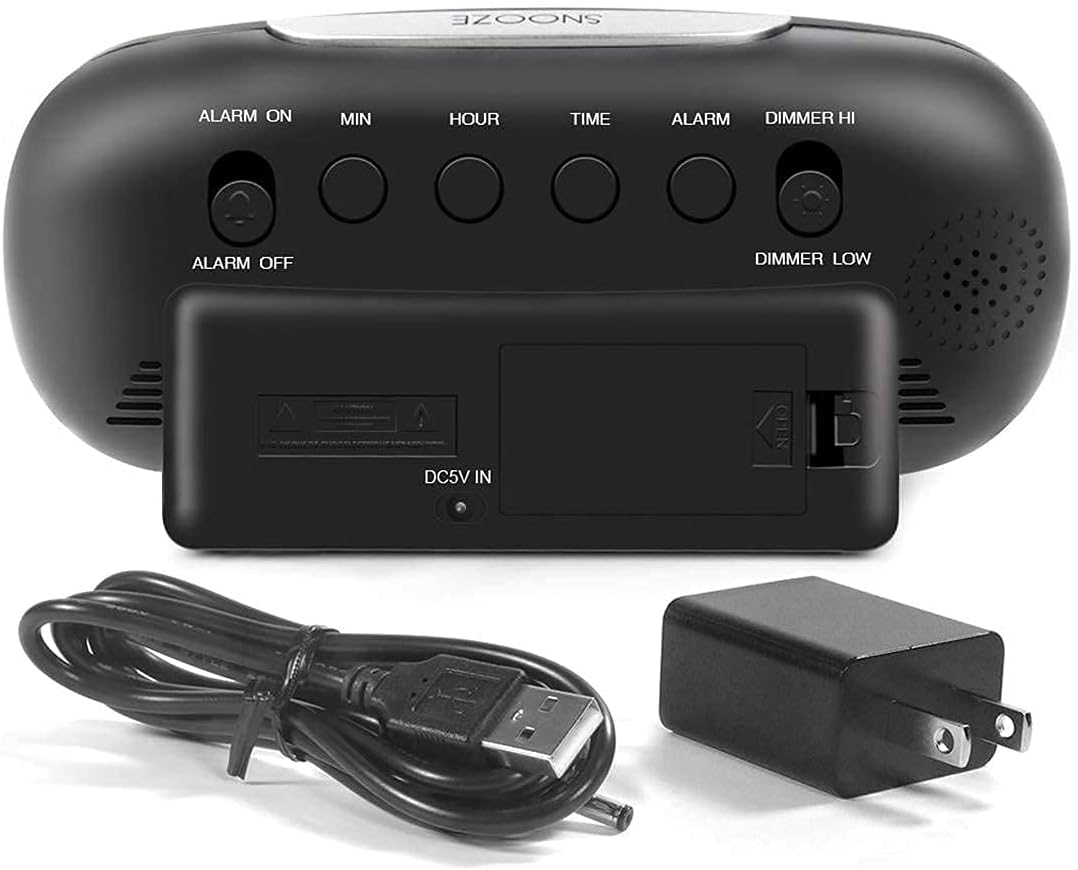
Image: The back panel of the alarm clock, clearly showing the various control buttons for time and alarm settings, the power input, and the battery backup compartment.
Setup
- Power Connection: Connect the provided USB power cable to the DC 5V IN port on the back of the clock and plug the adapter into a standard wall outlet. The display will light up.
- Battery Backup (Optional): For time and alarm settings retention during power outages, insert 2 AAA batteries (not included) into the battery compartment on the back of the clock. Note that batteries only provide backup for settings, not for display illumination or USB charging.
Operating Instructions
Setting the Time
- Press and hold the TIME button on the back of the clock until the hour digits begin to flash.
- Press the HOUR button to adjust the hour. Pay attention to the PM indicator if using 12-hour format.
- Press the MIN button to adjust the minute.
- Press the TIME button again to confirm and exit time setting mode.
Setting the Alarm
- Press and hold the ALARM button on the back of the clock until the alarm hour digits begin to flash.
- Press the HOUR button to adjust the alarm hour.
- Press the MIN button to adjust the alarm minute.
- Press the ALARM button again to confirm and exit alarm setting mode.
- To activate or deactivate the alarm, slide the ALARM ON/OFF switch on the back of the clock. When the alarm is active, an "AL." indicator will appear on the display.
Snooze Function
When the alarm sounds, press the large SNOOZE button located on the top of the clock. The alarm will pause for approximately 9 minutes and then sound again. To turn off the alarm completely, slide the ALARM ON/OFF switch to OFF.

Image: A hand reaching to press the prominent snooze button located on the top surface of the alarm clock, highlighting its ease of use.
Display Dimmer
The clock features a dimmer function to adjust the brightness of the LED display. Slide the DIMMER HI/LOW switch on the back of the clock to select between high brightness and low brightness (50% dim) settings.

Image: A visual comparison demonstrating the two brightness levels of the clock's display: a brighter "HIGH" setting and a softer "LOW (50% DIM)" setting, illustrating the dimmer functionality.
USB Charging Ports
The Housbay Digital Alarm Clock is equipped with dual USB charging ports (5V 2A each) on the front. You can use these ports to conveniently charge your smartphone, tablet, or other USB-powered devices directly from the clock.

Image: The front view of the alarm clock highlighting its two USB charging ports, with text indicating their capability to charge phones and iPads simultaneously.
Maintenance
- Cleaning: Wipe the clock surface with a soft, dry cloth. Do not use abrasive cleaners or solvents.
- Placement: Place the clock on a stable, flat surface away from direct sunlight, heat sources, and excessive moisture.
- Battery Replacement: If using battery backup, replace batteries annually or when the display shows signs of fading during a power outage.
Troubleshooting
| Problem | Possible Cause / Solution |
|---|---|
| Display is blank. |
|
| Alarm does not sound. |
|
| USB ports are not charging devices. |
|
| Time/Alarm settings reset after power outage. |
|
Specifications
- Model: SPC498
- Display Type: Digital LED (Red)
- Power Source: AC Powered (DC 5V input), Battery Backup (2 x AAA, not included)
- USB Output: 2 x 5V/2A
- Dimensions: Approximately 19.05 x 6.35 x 7.62 cm (7.5 x 2.5 x 3 inches)
- Weight: Approximately 322 g (0.71 lbs)
- Special Features: Alarm, Dual USB Charging Ports, Dimmable Display, Easy Snooze

Image: The alarm clock shown alongside a smartphone for scale, with key dimensions like display width (6.5"), digit height (1.8"), and overall height (3") clearly marked.
Warranty and Support
Housbay products are designed for reliability and performance. For warranty information, technical support, or any inquiries regarding your alarm clock, please refer to the contact information provided with your purchase or visit the official Housbay website. Please retain your proof of purchase for warranty claims.
For further assistance, you may contact Housbay customer service through their official channels.
Related Documents - SPC498
 |
HOUSBAY GLOW Digital Alarm Clock User Manual - Setup, Features, and Operation Comprehensive user manual for the HOUSBAY GLOW digital alarm clock. Learn how to set the time, alarms, use the FM radio, nightlight, sleep timer, nap timer, and understand its features and specifications. |
 |
HOUSBAY TS1M User Manual: Setup, Features, and Operation Comprehensive user manual for the HOUSBAY TS1M sound machine with alarm clock. Learn about features, setup, time and alarm settings, sound machine operation, sleep timer, nightlight, and support. |
 |
HOUSBAY KW244 Magnetic Sleep Charger Quick Start Guide A quick start guide for the HOUSBAY KW244 Magnetic Sleep Charger, detailing its features as a wireless charger and sound machine, and providing setup instructions. |
 |
HOUSBAY White Noise Machine User Manual Comprehensive user manual for the HOUSBAY White Noise Machine. Learn how to set up your device, use sound modes, set timers, and utilize the memory function. |
 |
HOUSBAY MINI Smart Alarm Clock User Manual - Wake Up Light, Sound Machine Comprehensive user manual for the HOUSBAY MINI smart alarm clock. Learn how to set time, alarms, wake-up light modes, sound machine, night light, and more. Includes troubleshooting and package contents. |
 |
HOUSBAY TS9 White Noise Machine with Alarm Clock User Manual User manual for the HOUSBAY TS9 White Noise Machine with Alarm Clock, detailing features, setup, operation, and safety precautions. |
Ask a question about this manual
Ask about setup, troubleshooting, compatibility, parts, safety, or missing instructions. Manuals+ will review the question and use this page’s manual context to help answer it.