Introduction
Thank you for choosing the COVVY 8GB Digital Voice Recorder. This compact and versatile device is designed for high-quality audio recording and playback, suitable for various applications such as lectures, meetings, interviews, and personal notes. With 8GB of internal memory, it can store up to 600 hours of recordings or 1600 songs. This manual provides detailed instructions to help you get the most out of your device.
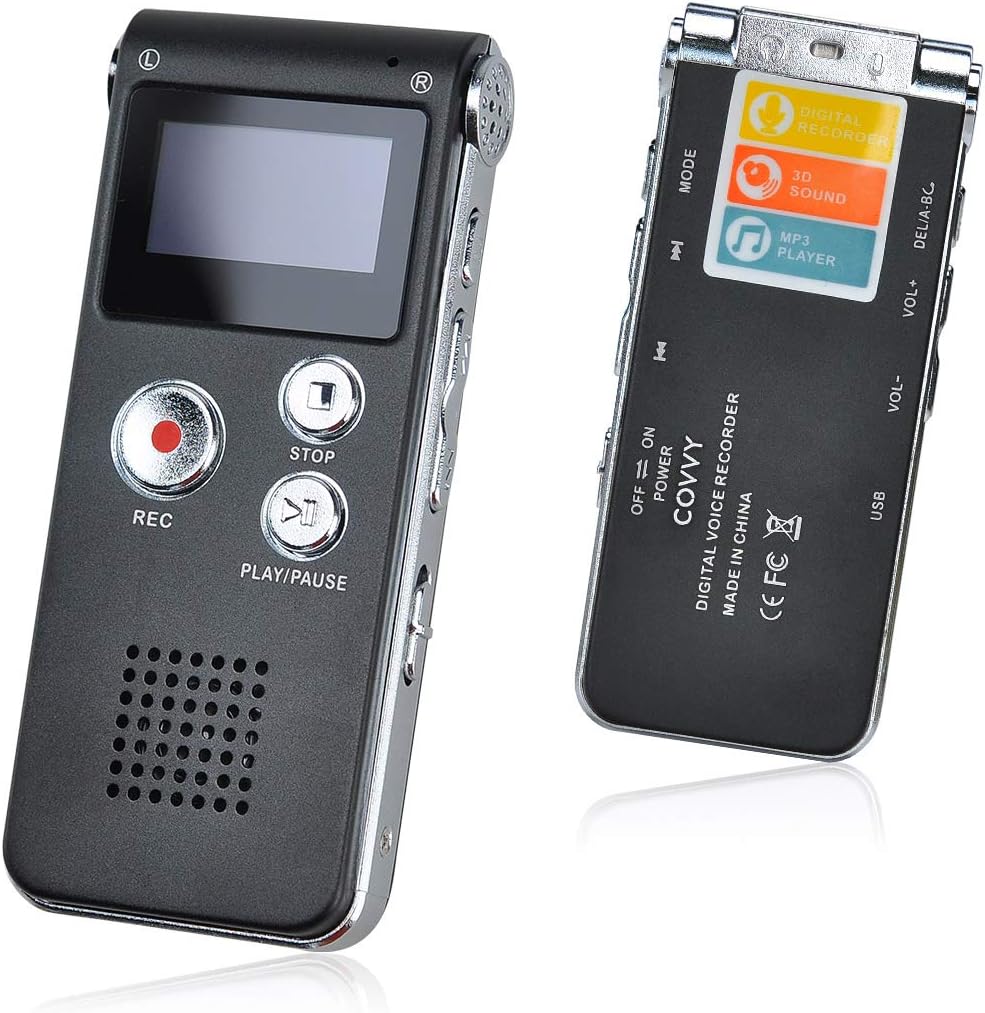
Front view of the COVVY 8GB Digital Voice Recorder, showing the display and main control buttons.
Product Overview
Familiarize yourself with the various parts and controls of your COVVY Digital Voice Recorder.

Detailed diagram illustrating the location and function of each button, port, and component on the COVVY Digital Voice Recorder.
- Left Mic (L) / Right Mic (R): Built-in stereo microphones for capturing audio.
- Screen: LCD display for menu navigation and status information.
- Record Lamp: Indicator light for recording status.
- Record Key (REC): Press to start recording.
- Stop Key (STOP): Press to stop recording or playback.
- Play/Pause Key (PLAY/PAUSE): Press to play or pause audio.
- Speaker: Integrated speaker for audio playback.
- A-B Repeat: Button to set and repeat a specific segment of audio.
- VOL UP / VOL DN: Volume control buttons.
- USB Port: Micro USB port for charging and data transfer.
- Line-in: Audio input port.
- Headset Jack: 3.5mm audio output for headphones.
- Menu Key: Accesses the device menu.
- Previous / Next: Navigation buttons for tracks or menu options.
- Power Switch (ON/OFF): Slide switch to power the device on or off.
Setup
1. Charging the Device
Before first use, fully charge the device.
- Connect the included Micro USB cable to the device's USB port.
- Connect the other end of the USB cable to a computer's USB port or a compatible USB wall adapter (not included).
- The battery indicator on the screen will show charging status. A full charge typically takes about 2 hours.
- Once fully charged, the device can operate for up to 30 hours.
2. Powering On/Off
- To power on, slide the Power Switch to the "ON" position.
- To power off, slide the Power Switch to the "OFF" position.
Operating Instructions
1. Recording Audio
The device supports one-touch recording.
- Ensure the device is powered on.
- Press the Record Key (REC). The record lamp will illuminate, and the screen will display recording status.
- To pause recording, press the Play/Pause Key. Press it again to resume.
- To stop recording, press the Stop Key (STOP). The recording will be automatically saved.

The recorder in active recording mode, showing sound wave visualization on the screen.
2. Playing Back Recordings
- From the main menu, navigate to the "Recordings" or "Files" section using the Previous/Next buttons.
- Select the desired recording and press the Play/Pause Key to start playback.
- During playback:
- Press Play/Pause Key to pause/resume.
- Use VOL UP / VOL DN to adjust volume.
- Use Previous / Next to skip between recordings.
- Press the Stop Key (STOP) to end playback.
3. Voice Activated Recording (VOX)
This feature allows the recorder to start recording automatically when sound is detected and pause when silence occurs, saving memory and battery.
- Press the Menu Key to access settings.
- Navigate to "VOX Mode" or "Voice Control" and select "ON".
- You may be able to adjust the sensitivity level.
- Exit the menu. When you start recording, the device will now operate in voice-activated mode.
4. A-B Repeat Function
Use this function to repeatedly play a specific segment of an audio file.
- During playback, press the A-B Repeat button once to set point A.
- Press the A-B Repeat button again at the desired end point to set point B.
- The device will now repeatedly play the segment between A and B.
- Press the A-B Repeat button a third time to exit the A-B repeat mode.

A-B repeat function is useful for studying or reviewing specific audio segments.
5. Using as an MP3 Player
The device can also function as a portable MP3 player.
- Transfer MP3 files to the device's "MUSIC" folder via a computer.
- From the main menu, navigate to the "Music" section.
- Select a song and press the Play/Pause Key to start playback.
- Connect headphones to the Headset Jack for private listening.

The device can be used to play music files, offering versatility beyond just recording.
6. Setting Time and Date
Setting the correct time and date ensures that your recordings are timestamped accurately.
- Press the Menu Key.
- Navigate to "System Settings" or "Time Settings".
- Adjust the year, month, day, hour, and minute using the Previous/Next and VOL UP/DN buttons.
- Confirm your settings to save.
Maintenance
1. Care and Cleaning
- Keep the device dry. Avoid exposure to moisture or liquids.
- Clean the device with a soft, dry cloth. Do not use harsh chemicals or abrasive cleaners.
- Avoid dropping the device or subjecting it to strong impacts.
- Store the device in a cool, dry place away from direct sunlight and extreme temperatures.
2. Data Management
Transferring files to a computer allows you to back up recordings and free up device memory.
- Connect the device to your computer using the Micro USB cable.
- The device will appear as a removable disk drive on your computer.
- Open the drive to access your recorded files (usually in a folder named "RECORD" or similar) and music files (in "MUSIC").
- Copy files to your computer or delete them from the device as needed.
- Always safely eject the device from your computer before disconnecting the USB cable.

Connecting the recorder to a computer for easy data transfer and file management.
Troubleshooting
| Problem | Possible Cause | Solution |
|---|---|---|
| Device does not power on. | Battery is depleted. | Charge the device for at least 2 hours. |
| Cannot record. | Insufficient memory. | Delete old files or transfer them to a computer to free up space. |
| Poor recording quality. | Microphone too far from source; noisy environment; low battery. | Move closer to the sound source; record in a quieter environment; ensure battery is charged. |
| Device not recognized by computer. | Faulty USB cable; incorrect connection; driver issue. | Try a different USB cable or port; ensure the device is powered on; restart computer. |
| Screen is blank or frozen. | Software glitch; low battery. | Try powering off and on again. If unresponsive, let the battery drain completely and then recharge. |
Specifications
- Brand: COVVY
- Model: BL-033
- Storage Capacity: 8 GB (up to 600 hours recording / 1600 songs)
- Battery Life: Up to 30 hours (recording)
- Charging Time: Approximately 2 hours (via Micro USB)
- Display: LCD
- Compatible Devices: Desktop Computer, MP3 Player
- Interface: USB 1.1, USB 2.0
- Audio Formats Supported: WMA, ASF, WAV, MP3
- Microphone Type: Lavalier (built-in stereo microphones)
- Power Source: Battery powered (Lithium-ion, 1 included)
- Product Dimensions: 1.1 x 3.5 x 8 cm (approx. 0.43 x 1.38 x 3.15 inches)
- Product Weight: 35 grams (approx. 1.23 ounces)
- Headphone Jack: 3.5mm
Warranty and Support
For warranty information or technical support, please refer to the documentation provided with your purchase or contact your retailer. Keep your proof of purchase for any warranty claims.