1. Introduction
This manual provides instructions for the safe and effective operation of the Bosch GLL75-40G Green-Beam Self-Leveling Cross-Line Laser Level. This tool is designed for various alignment and leveling applications, projecting bright green horizontal, vertical, and cross lines.
2. Safety Information
WARNING: Read all safety warnings and instructions. Failure to follow the warnings and instructions may result in serious injury.
2.1 Laser Safety
The Bosch GLL75-40G is a Class II laser product. Do not stare directly into the laser beam. Avoid direct eye exposure to the laser beam. Do not intentionally direct the laser beam at other persons or reflective surfaces. Laser radiation can cause eye injury.
2.2 General Safety
- Keep the work area clean and well-lit.
- Do not operate the laser level in explosive atmospheres, such as in the presence of flammable liquids, gases, or dust.
- Keep children and bystanders away while operating the laser level.
- Store idle laser levels out of the reach of children and do not allow persons unfamiliar with the laser level or these instructions to operate the laser level.
- Use the correct laser level for your application.
3. Package Contents
Verify that all items listed below are included in your package:
- Bosch GLL75-40G Green-Beam Self-Leveling Cross-Line Laser
- Magnetic L Mount
- Green Laser Target Plate
- 3 x AAA Batteries
- Heavy-Duty Pouch

4. Product Overview
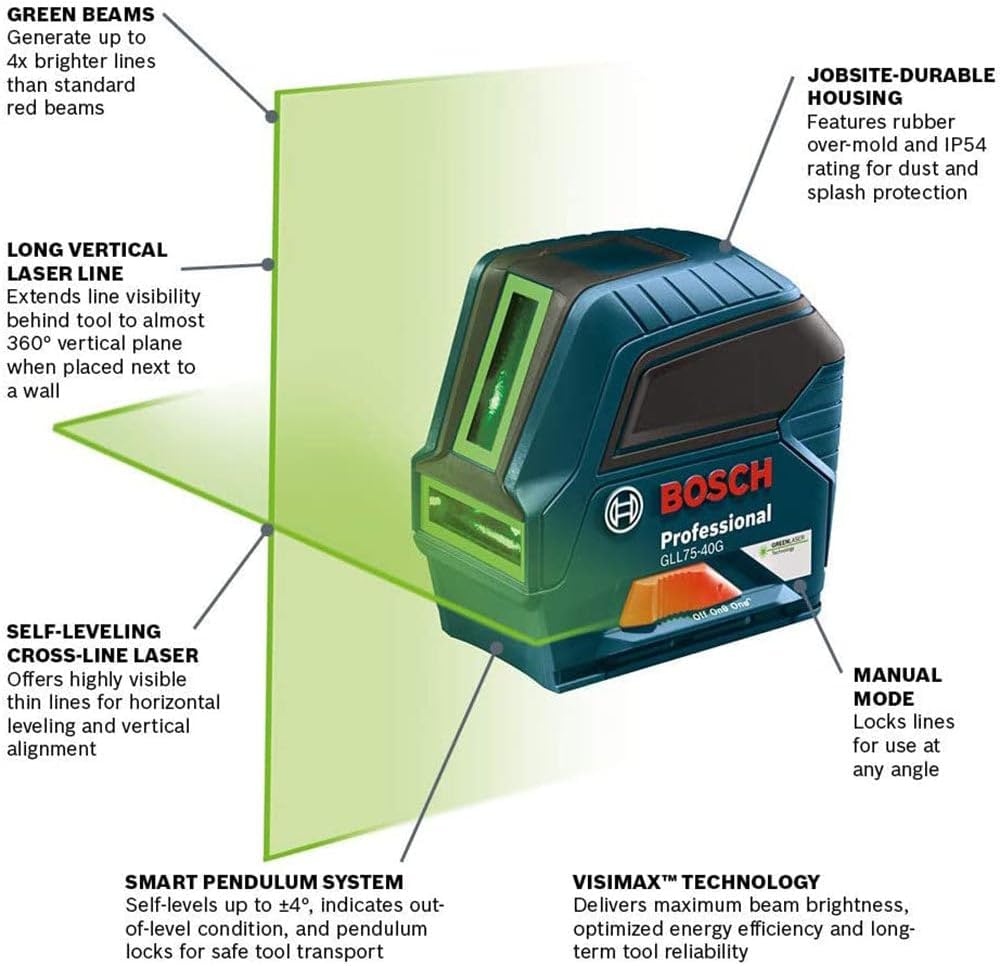
The Bosch GLL75-40G features green-beam technology, providing lines that are up to four times brighter than standard red beams. It offers vertical, horizontal, and cross-line modes for diverse applications. The tool incorporates VisiMax technology for optimized beam brightness and energy efficiency, and a Smart Pendulum System for self-leveling and out-of-level indication.

5. Setup
5.1 Battery Installation
- Locate the battery compartment cover on the back of the unit.
- Open the cover by sliding or unlatching it.
- Insert the three AAA batteries, ensuring correct polarity (+/-) as indicated inside the compartment.
- Close the battery compartment cover securely.
5.2 Mounting the Device
The GLL75-40G can be used freestanding or mounted using the included magnetic L-mount.
- Freestanding: Place the unit on a stable, level surface. The retractable feet on the L-mount can provide additional stability.
- Magnetic L-Mount: Attach the laser level to the L-mount. The L-mount can then be secured to metal surfaces using its magnets or mounted onto a tripod (1/4-inch thread) for precise positioning.
6. Operating Instructions
6.1 Power On/Off and Mode Selection
The GLL75-40G features a simple control panel for operation.
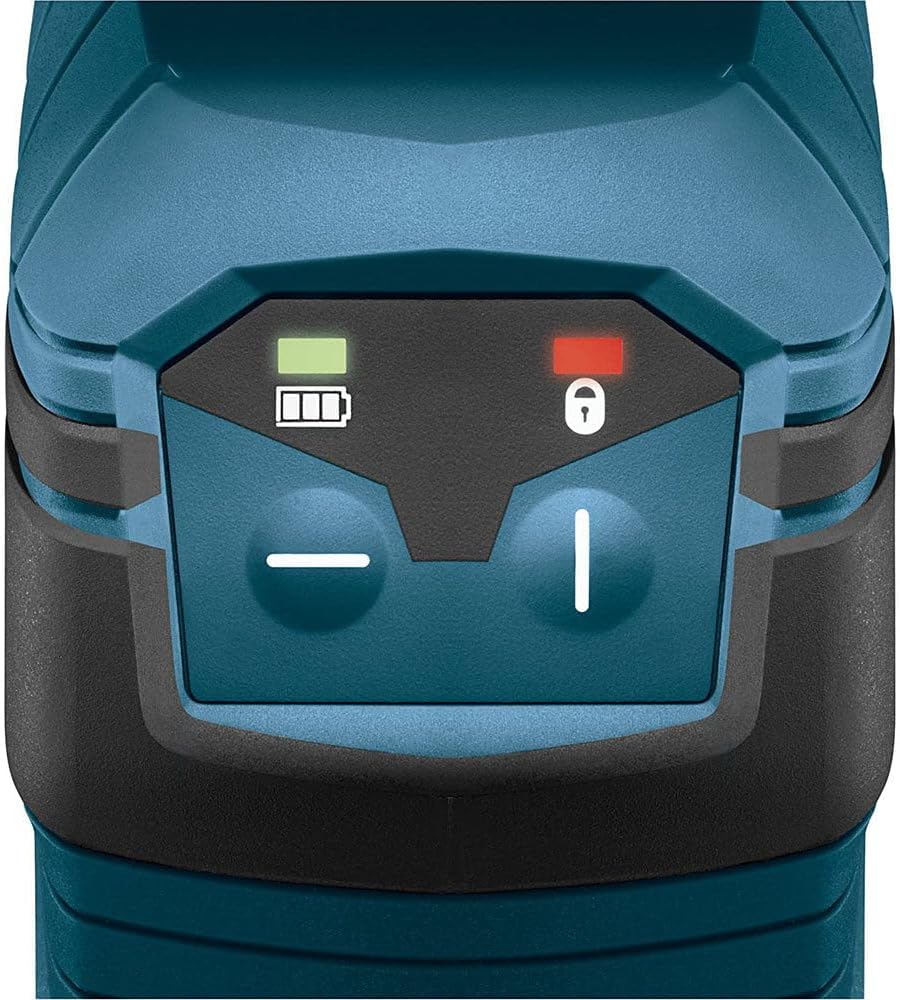

- Power On: Slide the main switch to the 'On' position. The laser will power on in self-leveling mode, projecting a cross-line.
- Mode Selection: Press the line selection button (usually marked with a line icon) to cycle through the available modes: horizontal line, vertical line, and cross-line (both horizontal and vertical).
- Manual Mode: To use the laser at an angle (not self-leveled), slide the main switch to the 'Off' position, then press and hold the line selection button while sliding the switch to 'On'. The pendulum will be locked, and the laser lines will flash slowly to indicate manual mode.
- Power Off: Slide the main switch to the 'Off' position. This also locks the pendulum for secure transport.
6.2 Self-Leveling Function
The Smart Pendulum System automatically self-levels the unit within ±4 degrees. If the unit is placed on a surface that is beyond this range, the laser lines will flash rapidly to indicate an out-of-level condition. Adjust the position of the laser level until the lines stop flashing and become steady.
6.3 Laser Line Projection
The GLL75-40G can project horizontal, vertical, or cross lines. The green beams are highly visible, with a working range up to 75 feet.


Note: No official product videos were available with 'Seller' as creator_type or relevant 'preview' videos to embed in this section based on the provided data.
7. Maintenance
7.1 Cleaning
Keep the laser level clean to ensure optimal performance. Wipe off any dirt or dust with a soft, damp cloth. Do not use harsh cleaning agents or solvents. Regularly clean the laser exit apertures to maintain beam clarity.
7.2 Storage
When not in use, store the laser level in its heavy-duty pouch in a dry, dust-free environment. Remove batteries if the tool will not be used for an extended period to prevent leakage.
8. Troubleshooting
| Problem | Possible Cause | Solution |
|---|---|---|
| Laser lines are dim or not visible. | Low batteries; dirty laser aperture; bright ambient light. | Replace batteries; clean laser aperture; use in lower light conditions or with target plate. |
| Laser lines are flashing rapidly. | Unit is out of self-leveling range. | Place the unit on a more level surface until lines become steady. |
| Laser lines are flashing slowly. | Unit is in manual (locked) mode. | If self-leveling is desired, turn the unit off and then on again without holding the line selection button. |
| Unit does not power on. | Dead or incorrectly installed batteries. | Check battery polarity; replace batteries. |
9. Specifications
- Model: GLL75-40G
- Laser Class: II
- Laser Output: 500-540 nm
- Laser Power: <5 mW
- Accuracy: ±1/8 in. at 33 ft. (±3/8 in. at 75 ft.)
- Working Range: Up to 75 ft.
- Self-Leveling Range: ±4°
- Operation Mode: Automatic (Self-Leveling) / Manual (Locked)
- Power Source: 3 x AAA Alkaline Batteries
- Material: Alloy Steel
- Color: Green
- Product Dimensions: 4.4"L x 2.2"W
- Item Weight: 1.08 Pounds
- IP Rating: IP54 (Dust and Water Protection)
- UPC: 000346629170
10. Warranty and Support
For warranty information, technical support, or service inquiries, please refer to the official Bosch website or contact Bosch customer service directly. Keep your purchase receipt as proof of purchase for warranty claims.
Online Support: www.boschtools.com