1. Introduction
Welcome to the world of miniature crafting with your CUTEROOM Time Apartment DIY Dollhouse Kit. This manual provides detailed instructions to guide you through the assembly process, ensuring a rewarding and enjoyable experience. This kit allows you to construct a beautifully detailed miniature apartment with a swimming pool, complete with furniture and lighting.

Image 1: The completed CUTEROOM Time Apartment Miniature DIY Dollhouse Kit.
2. Safety Information
- This product is suitable for individuals 14 years and up. It contains small parts that may pose a choking hazard for younger children.
- Exercise caution when using sharp tools such as scissors, small knives, and precision tweezers during assembly.
- Ensure proper ventilation when using adhesives.
- Keep batteries out of reach of children.
3. Package Contents
Your CUTEROOM Time Apartment kit includes various high-quality materials such as wood, paper, cloth, and resin pieces, all precisely cut to fit. Please verify all components upon opening the package.
Items Not Included (Required for Assembly):
- Glue (e.g., clear drying craft glue, wood glue)
- Batteries (specific type may vary, typically AA or AAA for lights/music box)
- Auxiliary tools (scissors, small knife, screwdriver, precision tweezers, ruler)
4. Tools Required
To ensure a smooth assembly process, gather the following tools:
- Scissors: For cutting paper, fabric, and other materials.
- Small Knife/Hobby Knife: For precise cuts and trimming.
- Screwdriver: For battery box assembly.
- Precision Tweezers: Essential for handling small parts.
- Ruler: For accurate measurements.
- Adhesive: A good quality, clear-drying craft glue is recommended. Wood glue may also be useful for wooden components.
5. Assembly Instructions
Follow the included English manual with detailed and colored pictures step-by-step. Patience is key for this intricate project. For visual guidance, you can also search for "DIY dollhouse" teaching videos on YouTube.
Video 1: Overview of the CUTEROOM DIY Wooden Dollhouse Kit, showcasing various assembled rooms and features.
General Assembly Tips:
- Organize Parts: Before starting, sort all pieces by type and size. Refer to the parts list in your manual.
- Read Ahead: Always read the next few steps before applying glue or making cuts to understand the overall process.
- Dry Fit: Test fit pieces together before applying glue to ensure they align correctly.
- Apply Glue Sparingly: Use a small amount of glue to avoid excess and messy finishes. Allow sufficient drying time.
Room-Specific Assembly Highlights:
Living Room & Dining Area

Image 2: Miniature living room and dining area.
Assemble the sofa, coffee table, dining table, and chairs according to the manual. Pay attention to fabric application for cushions and tablecloths.
Bedroom

Image 3: Miniature bedroom with bed and decor.
Construct the bed frame and headboard. Carefully place the bedding and decorative elements like the chandelier and wall art. The small slippers are a delicate detail.
Bathroom

Image 4: Miniature bathroom details.
Assemble the bathtub, sink, and toilet. Attach the miniature fixtures and accessories. Ensure waterproof elements for the bathtub are sealed if applicable.
Swimming Pool Area

Image 5: Miniature swimming pool area.
Construct the pool structure and attach the lounge chairs. The pool often involves clear acrylic pieces to simulate water. Ensure any lighting elements for the pool are correctly installed before sealing.
6. Operating Instructions
Lighting System:
The kit includes LED lights to illuminate your miniature apartment. These are typically powered by batteries (not included). Follow the wiring diagrams in your manual carefully to connect the lights. Once connected and batteries are inserted into the battery box, use the switch on the battery box to turn the lights on and off.

Image 6: The dollhouse illuminated at night.
Music Box:
If your kit includes a music box, it will typically be a wind-up mechanism. Locate the winding key, usually on the side or bottom of the dollhouse, and gently turn it clockwise until you feel slight resistance. The music will then play. Do not overwind.
7. Maintenance
- Cleaning: Dust your miniature dollhouse regularly with a soft, dry brush or a gentle air blower. Avoid using wet cloths or harsh cleaning agents.
- Storage: Store the completed dollhouse in a dry, stable environment away from direct sunlight and extreme temperatures to prevent material degradation or fading.
- Battery Replacement: Replace batteries for the lighting system and music box (if applicable) as needed. Ensure correct polarity when inserting new batteries.
8. Troubleshooting
- Missing Pieces: If you discover missing pieces, first double-check all packaging materials. If still missing, contact CUTEROOM customer support with your purchase details.
- Lights Not Working:
- Ensure batteries are correctly installed and not depleted.
- Check all wiring connections for looseness or incorrect attachment.
- Verify the power switch is in the 'ON' position.
- Parts Not Fitting: Minor adjustments may be needed. Gently sand or trim edges if pieces are too tight. Avoid forcing parts, which can cause damage.
- Unclear Instructions: Refer to the detailed pictures in the manual. Online video tutorials (search "DIY dollhouse assembly") can also provide additional visual clarity.
9. Specifications
| Feature | Detail |
|---|---|
| Product Name | Time Apartment |
| Model Number | A066 |
| Product Dimensions | 11.42 x 9.45 x 8.46 inches (29 x 24 x 21.5 cm) |
| Item Weight | 3.08 pounds (1.4 kg) |
| Materials | Wood, Paper, Cloth, Resin, Plastic |
| Recommended Age | 14 years and up |
| Assembly Time | Approximately 2-3 days (depending on individual pace) |
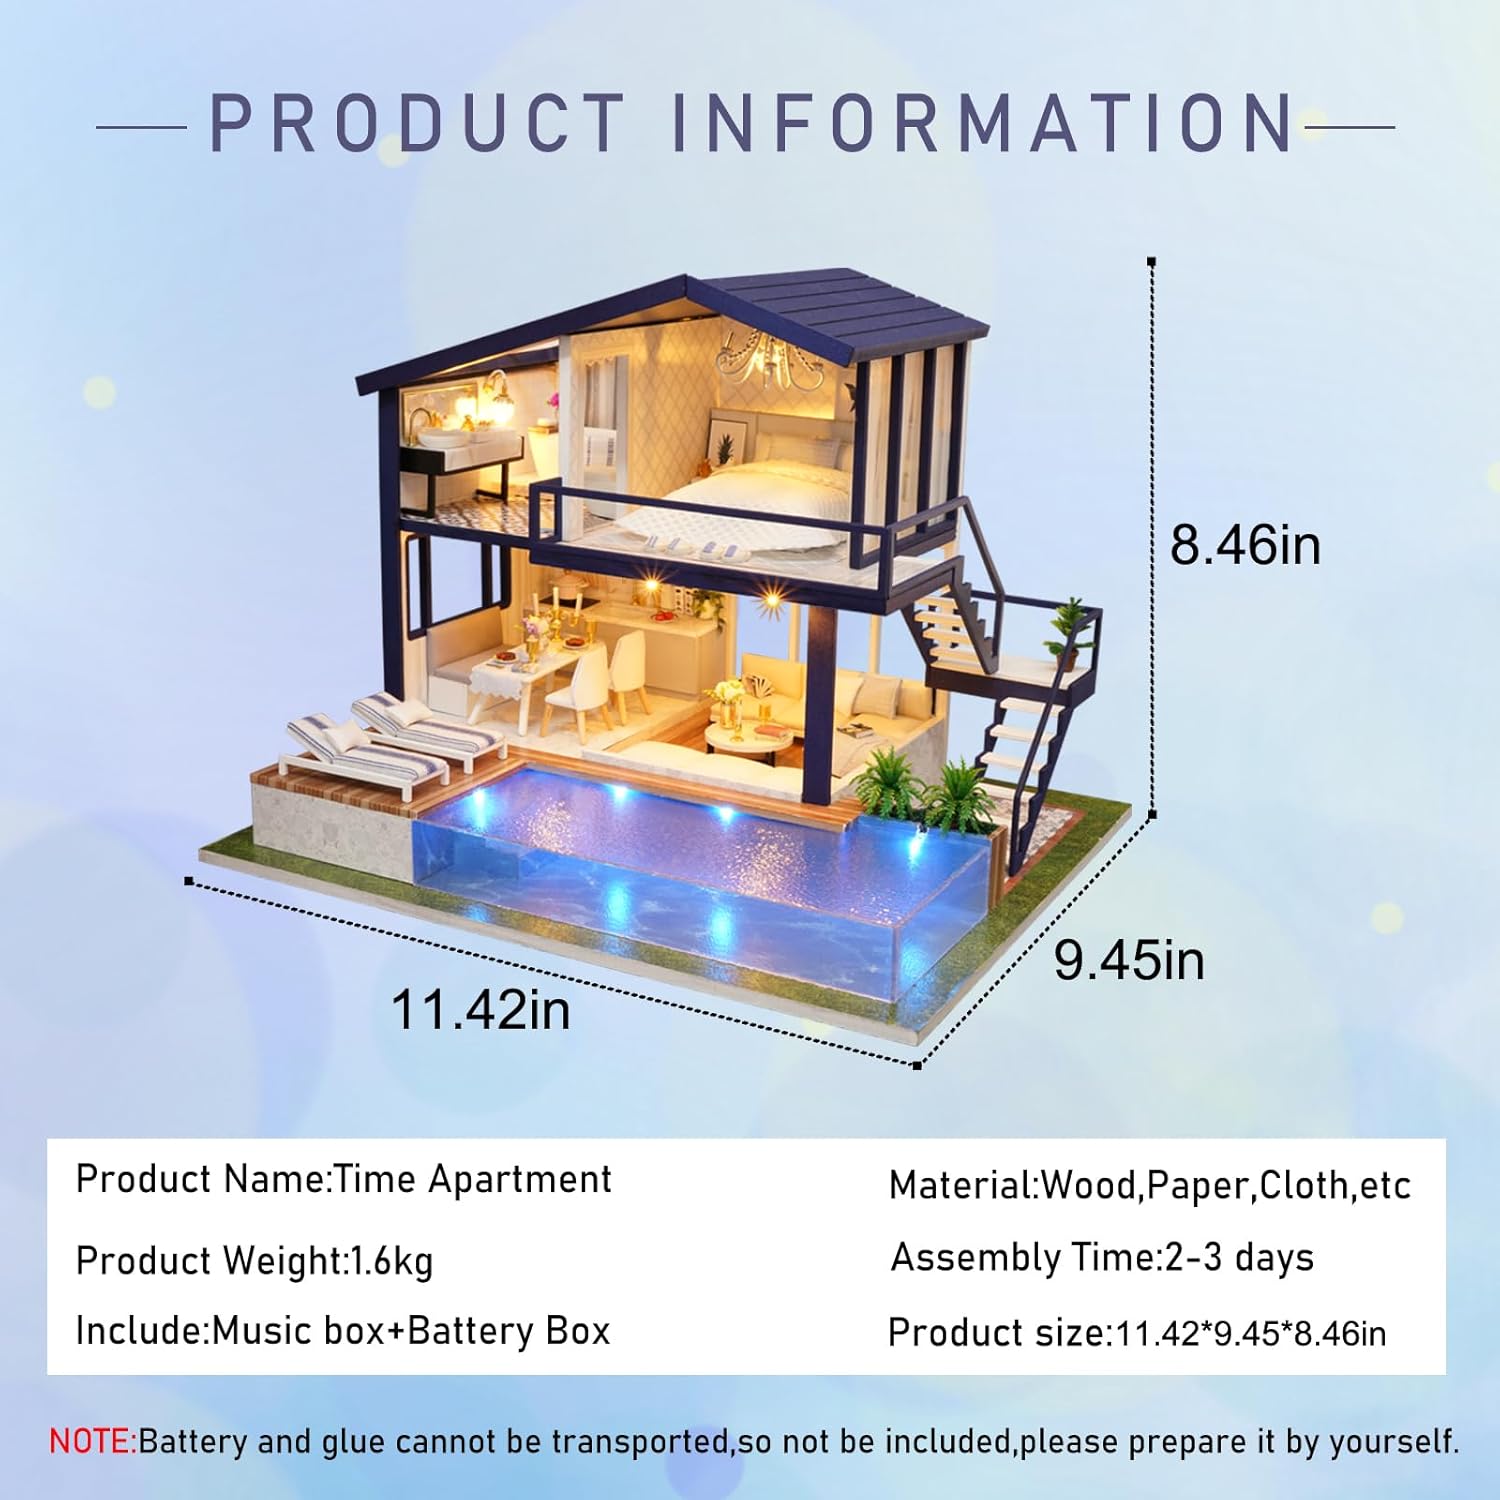
Image 7: Product dimensions and specifications.
10. Warranty and Support
For any questions, concerns, or support regarding your CUTEROOM Time Apartment Miniature DIY Dollhouse Kit, please contact CUTEROOM customer service. While specific warranty details are not provided in this manual, we are committed to ensuring your satisfaction with our products. Please retain your proof of purchase for any inquiries.
You can visit the official CUTEROOM store for more information and contact options: CUTEROOM Store


