
Moooni MOI-SC120CM
Moooni Modern Rectangular Crystal Chandelier Instruction Manual
Model: MOI-SC120CM | Brand: Moooni
1. Introduction
Thank you for choosing the Moooni Modern Rectangular Crystal Chandelier. This elegant lighting fixture is designed to enhance the ambiance of your dining room, kitchen island, living room, bedroom, foyer, or entryway. Crafted with K9 clear crystals and a polished chrome stainless steel base, this chandelier offers both durability and a sophisticated aesthetic. This manual provides comprehensive instructions for safe installation, operation, and maintenance of your new chandelier.

Figure 1.1: Moooni Modern Rectangular Crystal Chandelier (L 47" x W 12" x H 35.5")
2. Safety Information
Please read all instructions carefully before beginning installation. Failure to follow these instructions may result in electrical shock, fire, or other injuries that could be fatal or cause serious damage.
- WARNING: To avoid electric shock, ensure electricity is turned off at the main circuit breaker box before installation.
- All wiring must be in accordance with national and local electrical codes. If you are unsure about wiring, consult a qualified electrician.
- This fixture is designed for Indoor use only.
- Do not exceed the maximum wattage specified for the bulbs (10 x GU10 bulbs, max 40 watts each).
- Wear appropriate safety gear, including gloves and eye protection, during installation.
- Handle crystal components with care to prevent breakage or injury.
3. Package Contents
Verify that all components are present and undamaged before beginning assembly. If any parts are missing or damaged, contact Moooni customer support.
- Chandelier Base (Polished Chrome Stainless Steel)
- Crystal Strands (various lengths)
- Spare Crystals
- Mounting Hardware (screws, wire nuts, mounting bracket)
- Instruction Manual
- Note: GU10 bulbs are not included and must be purchased separately.
4. Installation Guide
Installation of this chandelier requires careful attention to detail and may be time-consuming due to the number of crystal components. It is recommended to have two people for installation.
4.1 Tools Required (Not Included)
- Phillips Head Screwdriver
- Flat Head Screwdriver
- Wire Strippers
- Electrical Tape
- Ladder
- Needle-nose Pliers (highly recommended for crystal attachment)
- GU10 Bulbs (10x, max 40W each)
4.2 Pre-Installation Steps
- Turn off power: Locate the circuit breaker controlling the light fixture and turn off the power. Verify power is off using a voltage tester.
- Unpack components: Carefully remove all parts from the packaging. Keep small parts organized to prevent loss.
- Prepare crystal strands: It is highly recommended to attach the teardrop crystals to their respective strands before mounting the fixture. This can be a lengthy process. Use needle-nose pliers to gently open the small clips on the crystal strands and attach the teardrop crystals.
4.3 Mounting the Fixture Base
- Attach the mounting bracket to the junction box in your ceiling using the provided screws. Ensure it is securely fastened.
- Connect the electrical wires:
- Connect the black wire from the fixture to the black wire from the junction box (Live).
- Connect the white wire from the fixture to the white wire from the junction box (Neutral).
- Connect the ground wire from the fixture to the ground wire from the junction box (Ground).
- Secure all connections with wire nuts and electrical tape.
- Carefully lift the chandelier base and align it with the mounting bracket. Secure the base to the bracket using the provided screws. Ensure the base is flush with the ceiling and stable.
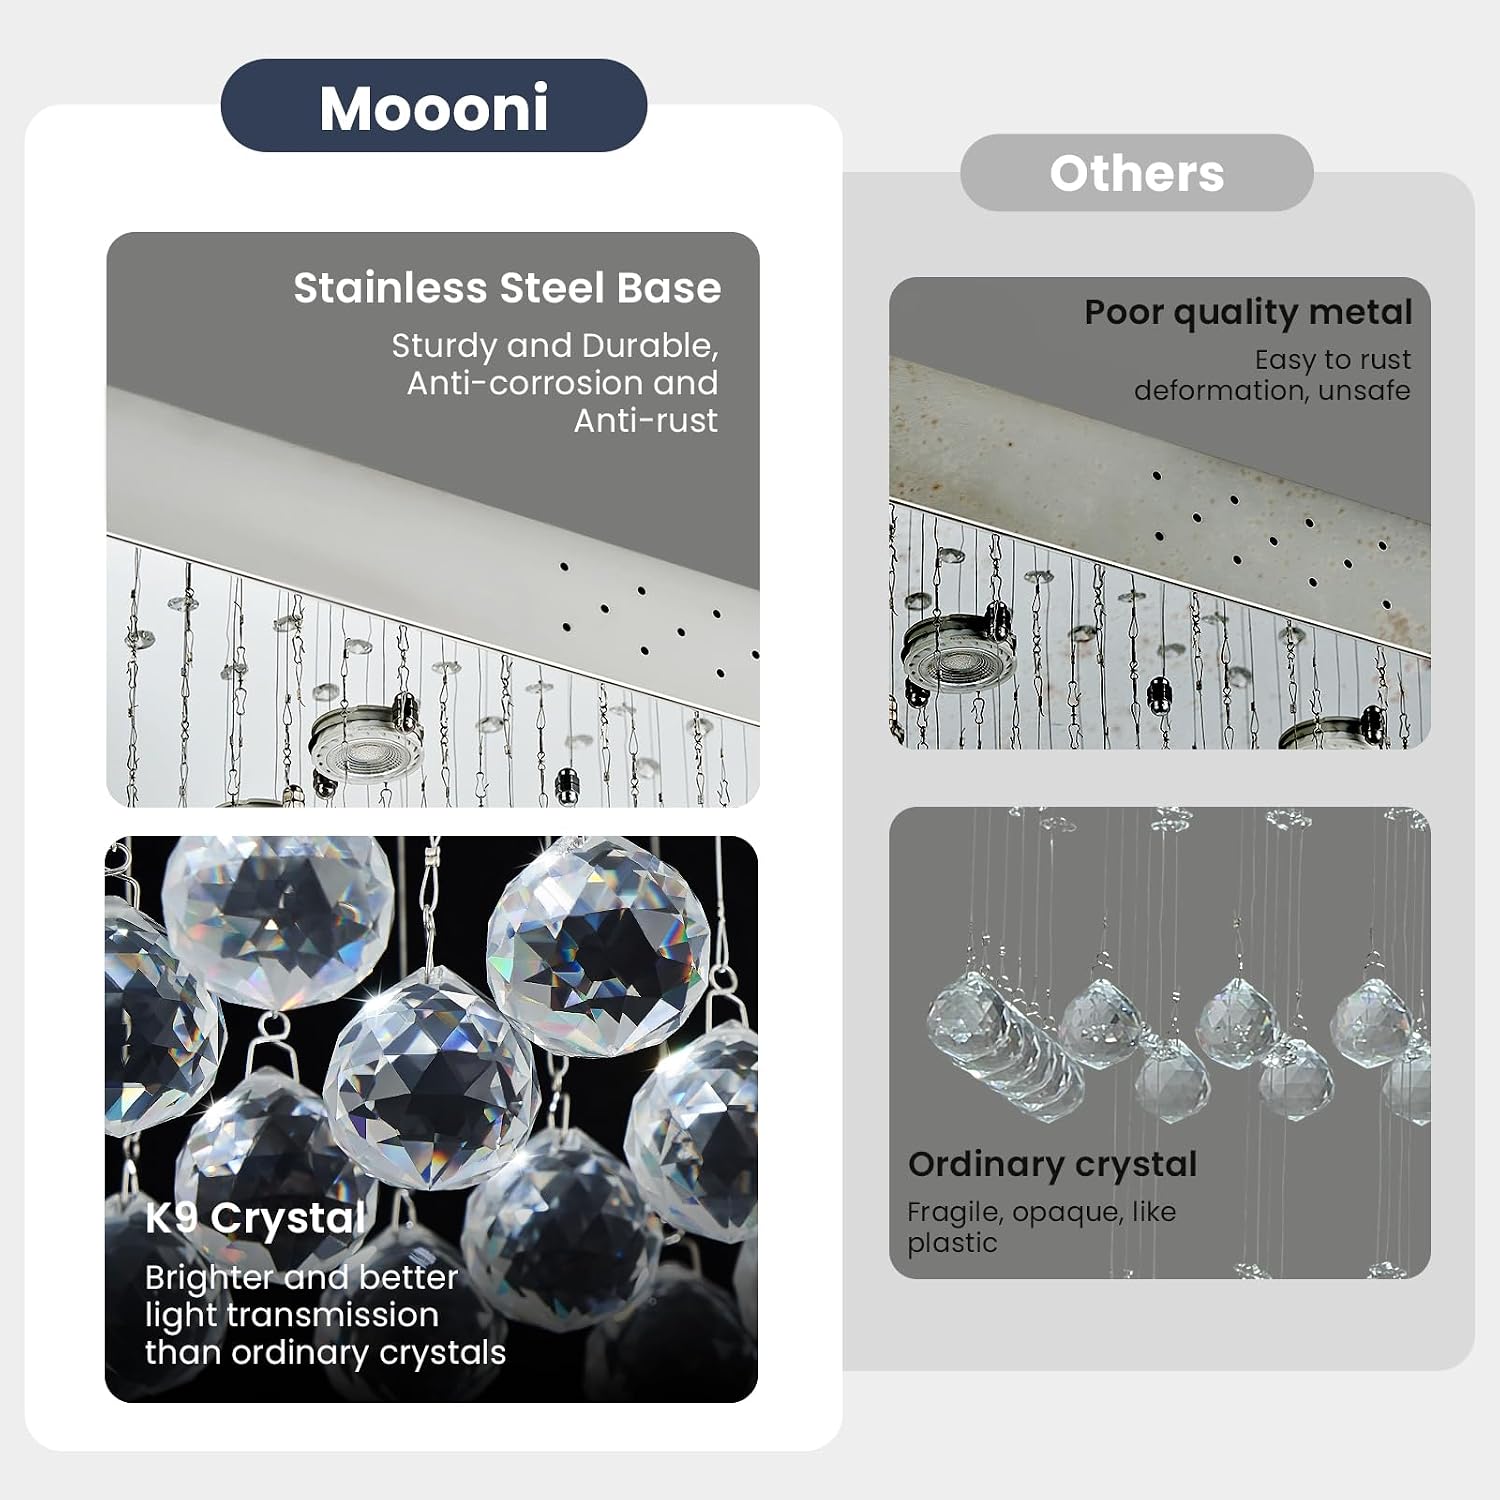
Figure 4.1: Illustration of Stainless Steel Base and K9 Crystal Quality
4.4 Attaching Crystal Strands
This is the most time-consuming part of the installation. Patience is key.
- Identify the different lengths of crystal strands. The manual typically includes a diagram indicating where each length should be hung.
- Starting from one end, carefully hook each crystal strand onto the designated holes in the chandelier base. Ensure the hooks are securely closed to prevent crystals from falling.
- Work systematically, row by row, or section by section, to ensure all crystals are hung correctly and evenly.

Figure 4.2: Chandelier fully installed in a dining room setting

Figure 4.3: Chandelier showcasing its appearance in a modern dining room

Figure 4.4: Chandelier showcasing its appearance in different environments
5. Operating Instructions
Once installed, your Moooni Chandelier is ready for operation.
- Power On: Restore power at the main circuit breaker.
- Light Control: Operate the chandelier using your standard wall switch.
- Dimmable Feature: This fixture is fully dimmable when you install a compatible dimmer switch and use dimmable GU10 bulbs (not included). This allows you to adjust the light intensity to create various moods.
- Color Temperature: The light color (warm, natural, white) depends on the GU10 bulbs you choose.

Figure 5.1: Example of different light color temperatures with dimmable bulbs
Video 5.1: Demonstration of the Luxury Rectangular Crystal Raindrop Chandelier in a dining setting, showcasing its appearance and light output.
6. Care and Maintenance
Proper care will ensure the longevity and brilliance of your chandelier.
- Cleaning: Turn off power before cleaning. Use a soft, dry, lint-free cloth to gently wipe the stainless steel base. For crystals, a soft, damp cloth with a mild glass cleaner can be used, but avoid spraying directly onto electrical components. Dry immediately.
- Bulb Replacement: Ensure power is off. Allow bulbs to cool before replacing. Use only GU10 bulbs, not exceeding 40 watts.
- Avoid Harsh Chemicals: Do not use abrasive cleaners, solvents, or polishing agents as they may damage the finish or crystals.
7. Troubleshooting
If you encounter issues, refer to the following common problems and solutions.
| Problem | Possible Cause | Solution |
|---|---|---|
| Light does not turn on. | No power to the fixture; Loose wiring; Faulty bulb. | Check circuit breaker. Ensure all wire connections are secure. Replace bulb(s). |
| Lights flicker. | Loose bulb; Incompatible dimmer switch; Loose wiring. | Tighten bulbs. Ensure dimmer switch is compatible with LED GU10 bulbs (if using LED). Check wiring connections. |
| Chandelier appears crooked. | Mounting bracket not level; Base not securely attached. | Adjust mounting bracket. Re-secure the fixture base to the ceiling. |
| Crystals falling off. | Hooks not properly closed. | Ensure all crystal hooks are securely closed around the fixture loops. Use needle-nose pliers if necessary. |
8. Product Specifications
| Feature | Detail |
|---|---|
| Brand | Moooni |
| Model Number | MOI-SC120CM |
| Dimensions (L x W x H) | 47" x 11.8" x 35.5" (120 cm x 30 cm x 90 cm) |
| Material | K9 Crystal, Polished Chrome Stainless Steel |
| Light Source Type | GU10 (bulbs not included) |
| Number of Lights | 10 |
| Max Wattage per Bulb | 40 Watts |
| Voltage | 110 Volts |
| Installation Type | Flush Mount |
| Dimmable | Yes (with compatible dimmer switch and dimmable bulbs) |
| Item Weight | 19.62 Pounds |
| UPC | 612520886677 |
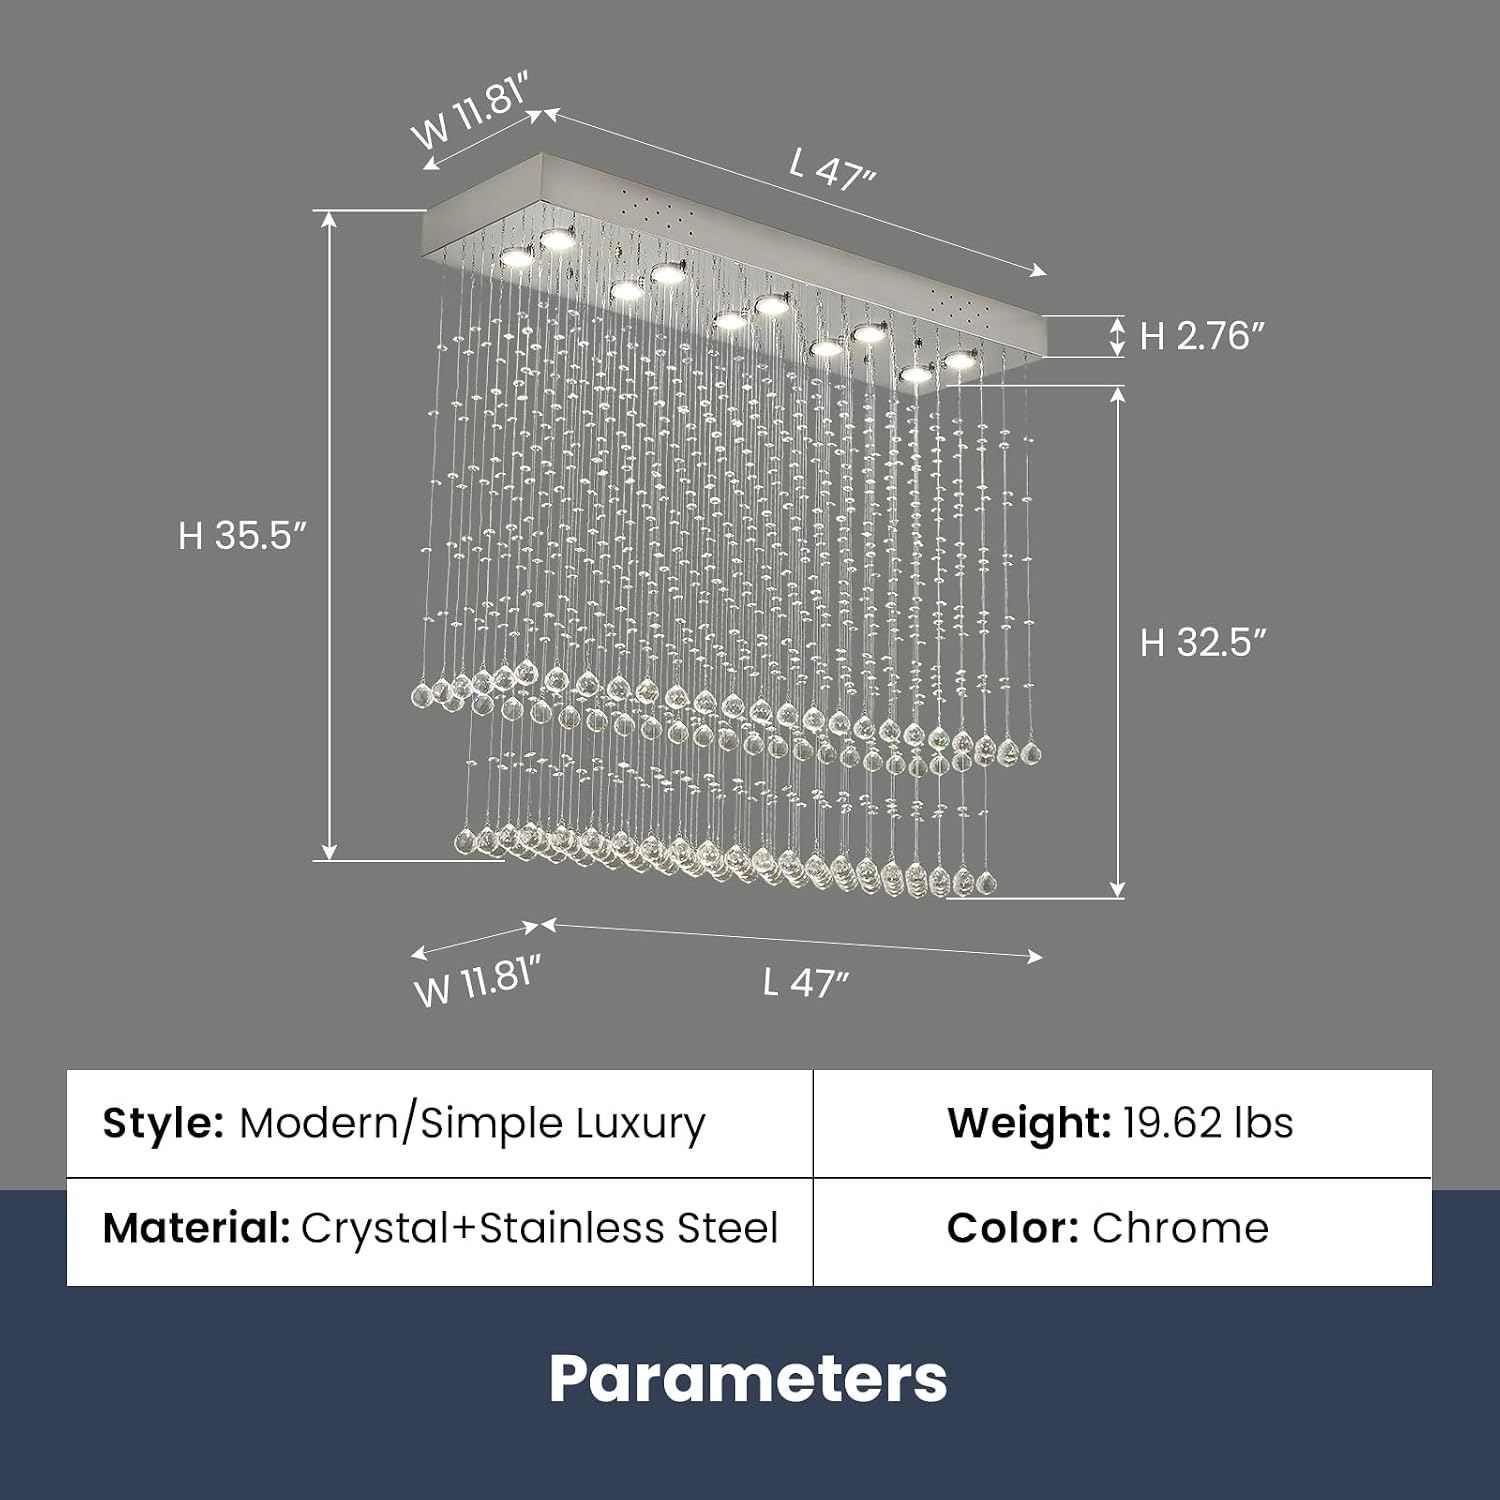
Figure 8.1: Detailed dimensions of the chandelier
9. Warranty and Customer Support
Moooni stands behind the quality of its products. This chandelier comes with a manufacturer-and-seller-combination warranty.
- Damaged Parts: If you receive damaged parts, contact customer support for replacements.
- Technical Assistance: For any technical advice or assistance with installation or operation, please contact Moooni customer support.
- Contact Information: Refer to your purchase documentation or the Moooni official website for the most current customer support contact details.
Ask a question about this manual
Ask about setup, troubleshooting, compatibility, parts, safety, or missing instructions. Manuals+ will review the question and use this page’s manual context to help answer it.