1. Introduction
This manual provides detailed instructions for the assembly, installation, operation, and maintenance of your VIVO STAND-V002K Dual Pneumatic Monitor Mount. This mount is designed to securely hold two computer monitors, offering enhanced ergonomic adjustability and freeing up valuable desk space. Please read these instructions thoroughly before beginning installation to ensure safe and correct usage.
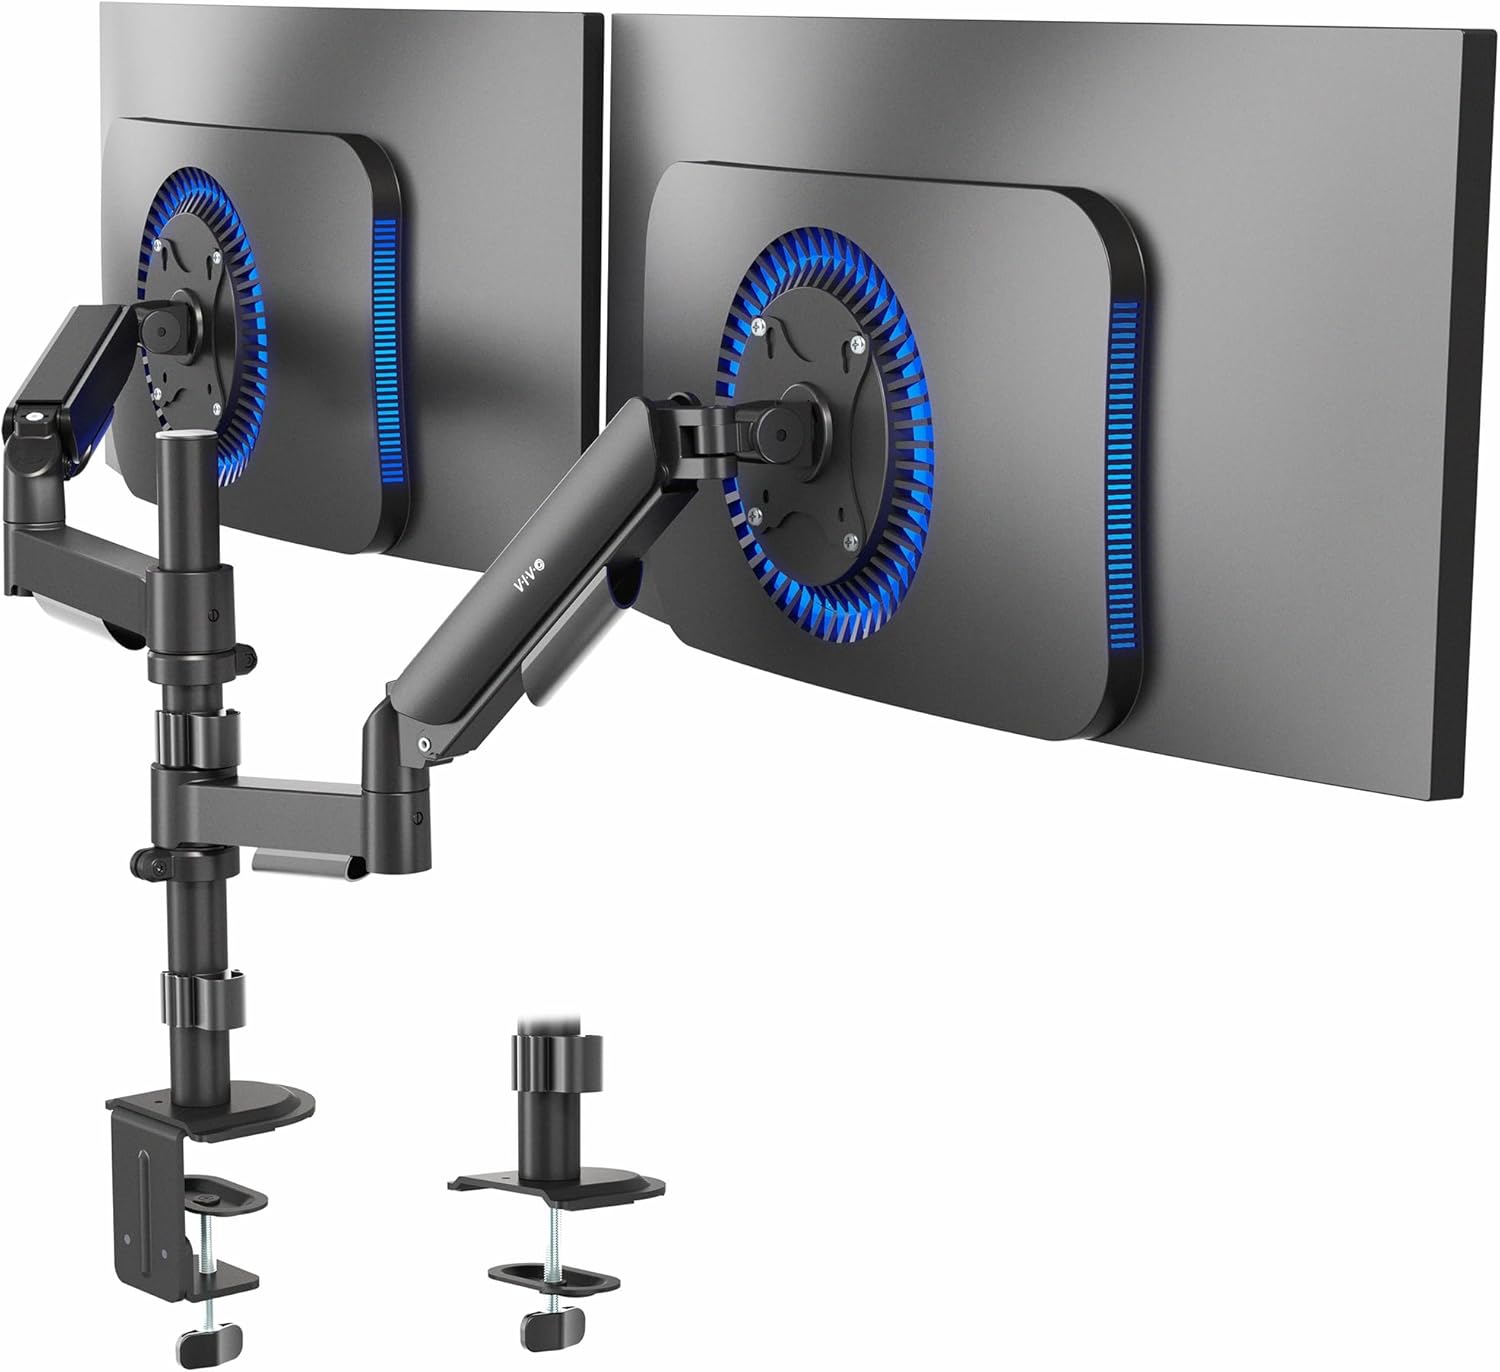
Image 1.1: VIVO STAND-V002K Dual Pneumatic Monitor Mount.
2. Safety Information
WARNING: Failure to understand and follow these instructions may result in serious injury, property damage, or voiding of factory warranty. If you do not understand these instructions or have any doubts about the safety of the installation, please contact a qualified installer.
- Verify that the mounting surface can safely support the combined weight of the equipment and all attached hardware and components.
- Use this product only for its intended purpose as described in this manual. Do not exceed the maximum weight capacity.
- Do not overtighten screws. Overtightening may increase the risk of damage to your equipment.
- This product contains small items that could be a choking hazard if swallowed. Keep children away from packaging and assembly components.
- Always ensure proper gas spring tension adjustment for the weight of your monitors to prevent sudden movement.
3. Package Contents
Please check the package contents against the list below to ensure all components are present and undamaged. If any parts are missing or damaged, contact VIVO customer support.

Video 3.1: Unboxing the VIVO STAND-V002K.
This video demonstrates the unboxing process and shows all components included with the STAND-V002K monitor mount.
Parts List:
- Pole with Base
- Dual Monitor Arm Assembly (2 pneumatic arms)
- C-Clamp Mounting Hardware
- Grommet Mounting Hardware
- VESA Plates (2)
- Cable Management Clips
- Allen Keys (various sizes)
- Monitor Mounting Screws (various sizes)
- Instruction Manual
4. Setup and Installation
The VIVO STAND-V002K offers two installation methods: C-clamp and Grommet. Choose the method that best suits your desk setup.
4.1. C-Clamp Installation
- Prepare the Pole: Install the pole cap onto the top of the pole.
- Attach Clamp Brace: Secure the clamp brace to the bottom of the pole using the provided screws. Apply the soft pad to the clamp brace to protect your desk surface.
- Assemble Clamp: Loosen the bolts and disassemble the clamp. Reassemble the clamp with the pole and clamp brace, ensuring the soft pad is between the clamp and your desk. Tighten the clamp securely to your desktop (up to 3.3 inches thick).
- Slide Arm onto Pole: Slide the cable clip onto the pole first, then slide the dual monitor arm assembly onto the pole. Secure the arm at your desired height using the provided screw and Allen key.
- Attach VESA Plates to Monitors: Attach the VESA plates to the back of your monitors using the appropriate screws. Ensure the VESA pattern (75x75mm or 100x100mm) matches your monitors.
- Attach Monitors to Arm: Carefully slide the monitors (with VESA plates attached) onto the arms. Secure them with the provided thumb screws.
4.2. Grommet Installation (Optional)
If your desk has a grommet hole, you can use this method for a more integrated look.
- Prepare the Pole: Install the pole cap onto the top of the pole.
- Attach Grommet Base: Secure the grommet base to the bottom of the pole.
- Install through Grommet Hole: Insert the pole through the grommet hole in your desk. Secure it from underneath the desk using the provided washer and nut.
- Slide Arm onto Pole: Slide the cable clip onto the pole first, then slide the dual monitor arm assembly onto the pole. Secure the arm at your desired height using the provided screw and Allen key.
- Attach VESA Plates to Monitors: Attach the VESA plates to the back of your monitors using the appropriate screws. Ensure the VESA pattern (75x75mm or 100x100mm) matches your monitors.
- Attach Monitors to Arm: Carefully slide the monitors (with VESA plates attached) onto the arms. Secure them with the provided thumb screws.
Video 4.1: Detailed assembly instructions for the VIVO STAND-V002K monitor mount.
5. Operating Instructions
The VIVO STAND-V002K features pneumatic arms for smooth and flexible monitor positioning.
5.1. Adjusting Gas Spring Tension
The gas springs in the arms counterbalance your monitor's weight. Proper tension adjustment is crucial for smooth movement and stability.
- If the monitor sags or is difficult to raise, turn the adjustment screw (located on the arm) clockwise to increase tension.
- If the monitor floats up or is difficult to lower, turn the adjustment screw counter-clockwise to decrease tension.
- Make small adjustments and test the arm's movement until the monitor stays in place when released.
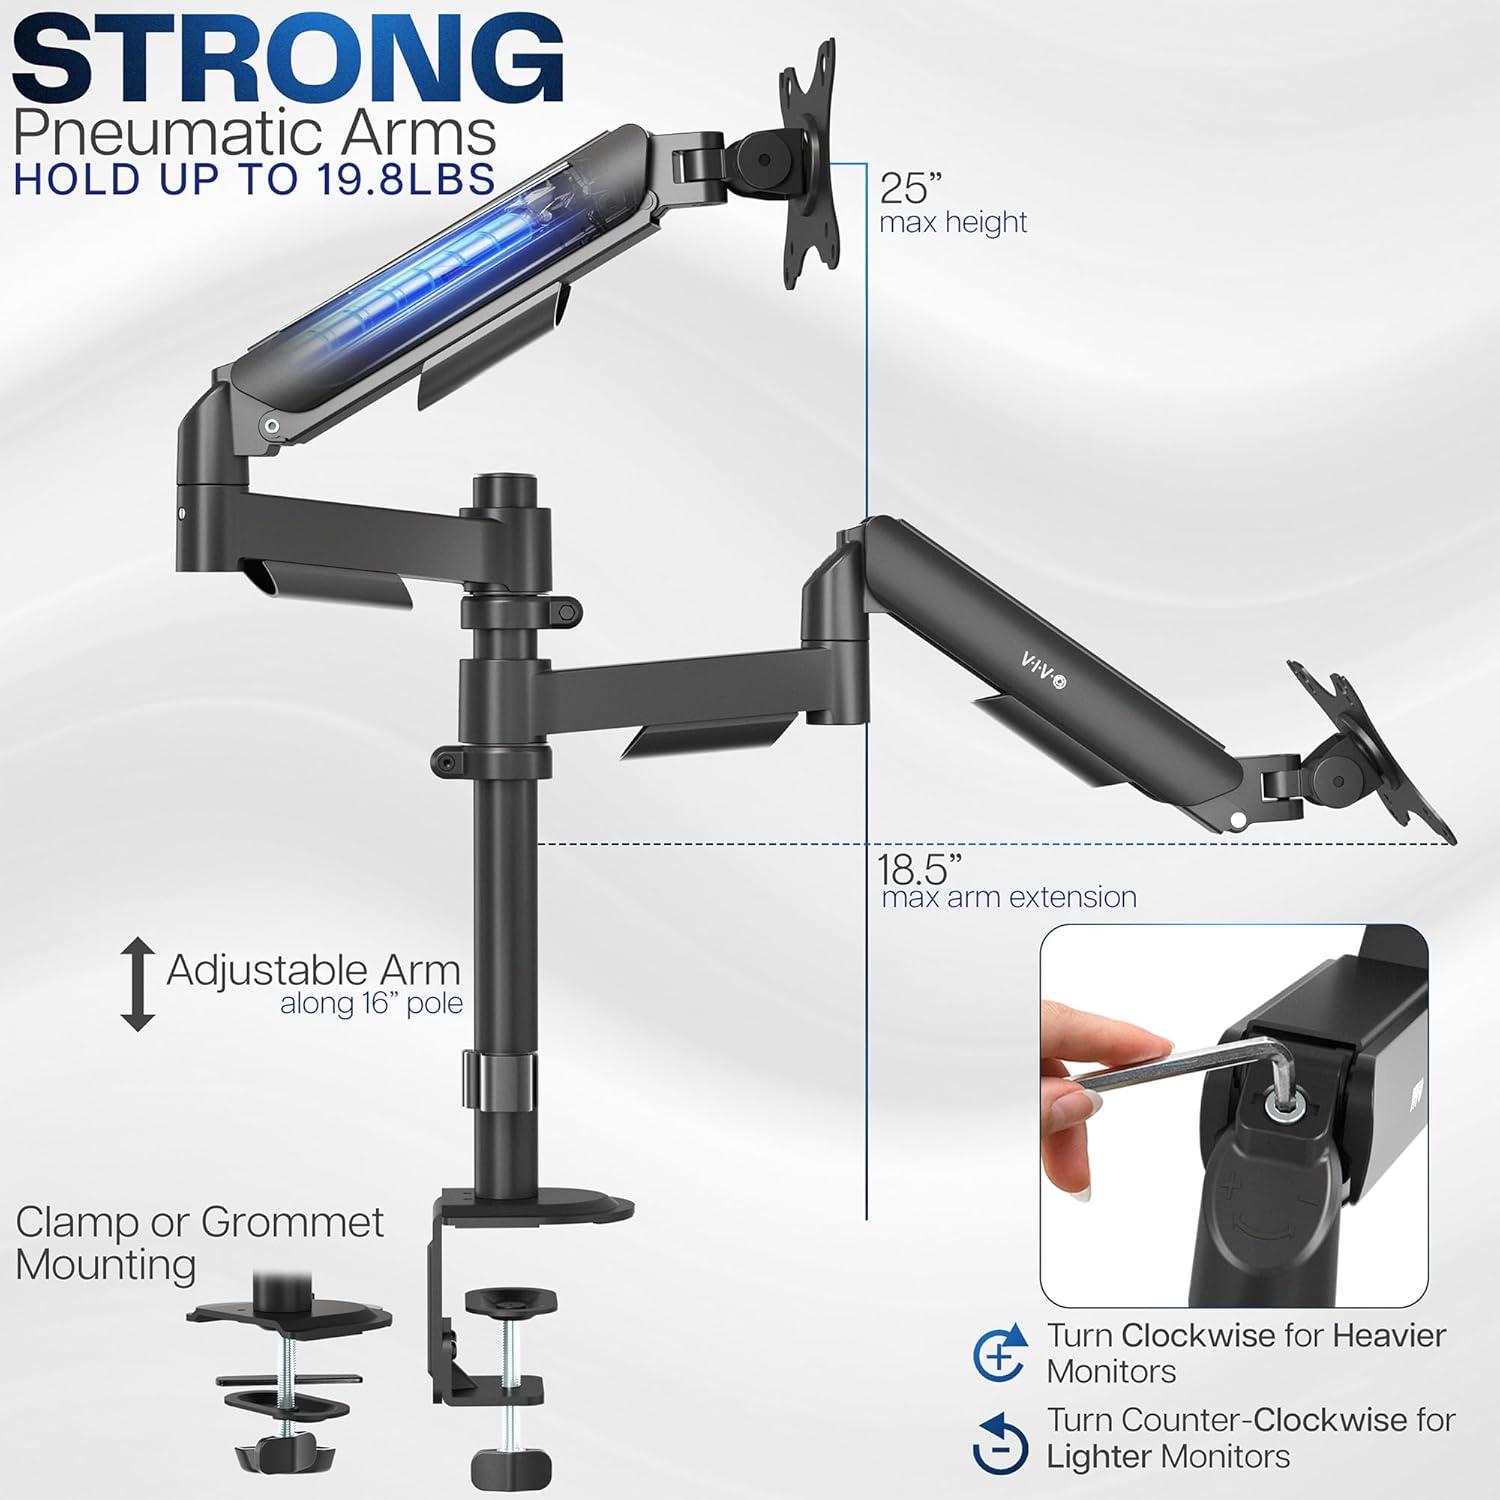
Image 5.1: Gas spring tension adjustment for monitor weight.
5.2. Monitor Positioning
The arms allow for various adjustments to achieve optimal viewing angles:
- Height Adjustment: The arms can be moved up and down along the central pole. Additionally, the pneumatic springs allow for effortless vertical movement of the monitors.
- Tilt: Adjust the monitor screen vertically up or down (±90 degrees) to reduce glare and improve viewing comfort.
- Swivel: Rotate the monitor horizontally (180 degrees) to share your screen with others or change viewing direction.
- Rotation: Rotate the monitor from landscape to portrait orientation (360 degrees) for different tasks.

Image 5.2: Flexible positioning options including tilt, swivel, and rotation.
Video 5.3: Overview of the VIVO STAND-V002K features, including adjustability.
5.3. Cable Management
Utilize the integrated cable management clips on the arms and pole to route and conceal your monitor cables, maintaining a tidy workspace.

Image 5.4: Integrated cable management system.
6. Maintenance
- Regularly check all screws and connections to ensure they are secure. Retighten if necessary.
- Clean the mount with a soft, damp cloth. Avoid abrasive cleaners or solvents that may damage the finish.
- Periodically re-adjust the gas spring tension if you change monitors or notice the arms are not holding position correctly.
7. Troubleshooting
| Problem | Possible Cause | Solution |
|---|---|---|
| Monitor sags or falls. | Gas spring tension is too low for monitor weight. | Increase gas spring tension by turning the adjustment screw clockwise. |
| Monitor floats up or is difficult to push down. | Gas spring tension is too high for monitor weight. | Decrease gas spring tension by turning the adjustment screw counter-clockwise. |
| Monitor is not stable or wobbles. | Mounting clamp is loose or VESA screws are not tight. | Ensure the desk clamp is securely tightened. Check and tighten all VESA mounting screws. |
| Monitors are not level. | Minor variations in monitor weight or arm position. | Adjust the tilt mechanism on the VESA plate or fine-tune arm height. |
8. Specifications
| Feature | Detail |
|---|---|
| Model Number | STAND-V002K |
| Screen Size Compatibility | 17" to 32" (each monitor) |
| Weight Capacity | 4.4 lbs to 19.8 lbs (each monitor) |
| VESA Compatibility | 75x75mm, 100x100mm |
| Mounting Options | Heavy-duty C-clamp (up to 3.3" thick desk), Grommet mount |
| Adjustments | Tilt (±90°), Swivel (180°), Rotation (360°), Height Adjustment (pneumatic) |
| Material | Alloy Steel |
| Product Dimensions | 16.54 x 3.94 x 9.84 inches (packaging) |
9. Warranty and Support
VIVO is committed to providing high-quality products and customer satisfaction. This product is backed by a manufacturer's warranty. For specific warranty details, technical assistance, or to report missing/damaged parts, please contact VIVO customer support. Our US-based support team is available to assist you.
Visit our website for more information: www.vivo-us.com