1. Introduction
This manual provides detailed instructions for the installation, operation, and maintenance of your COOSPIDER JUP-01 Aquarium Filter. This 4-in-1 submersible unit is designed to improve water quality, remove odors, increase oxygen, and facilitate water circulation in freshwater and saltwater aquariums ranging from 40 to 80 gallons.

Image 1.1: The COOSPIDER JUP-01 Aquarium Filter, including the main unit, a spare UV bulb, and two filter sponges.
2. Product Overview
2.1 Key Features
- 4-in-1 Functionality: Integrates filtration, deodorization, oxygenation, and water circulation.
- Water Quality Improvement: Designed to reduce algae, remove odors, and maintain clear water.
- Versatile Use: Suitable for both fresh and saltwater aquariums.
- Tank Capacity: Recommended for 40-80 gallon tanks.
- Included Accessories: Comes with 1 spare UV bulb and 2 filter sponges.
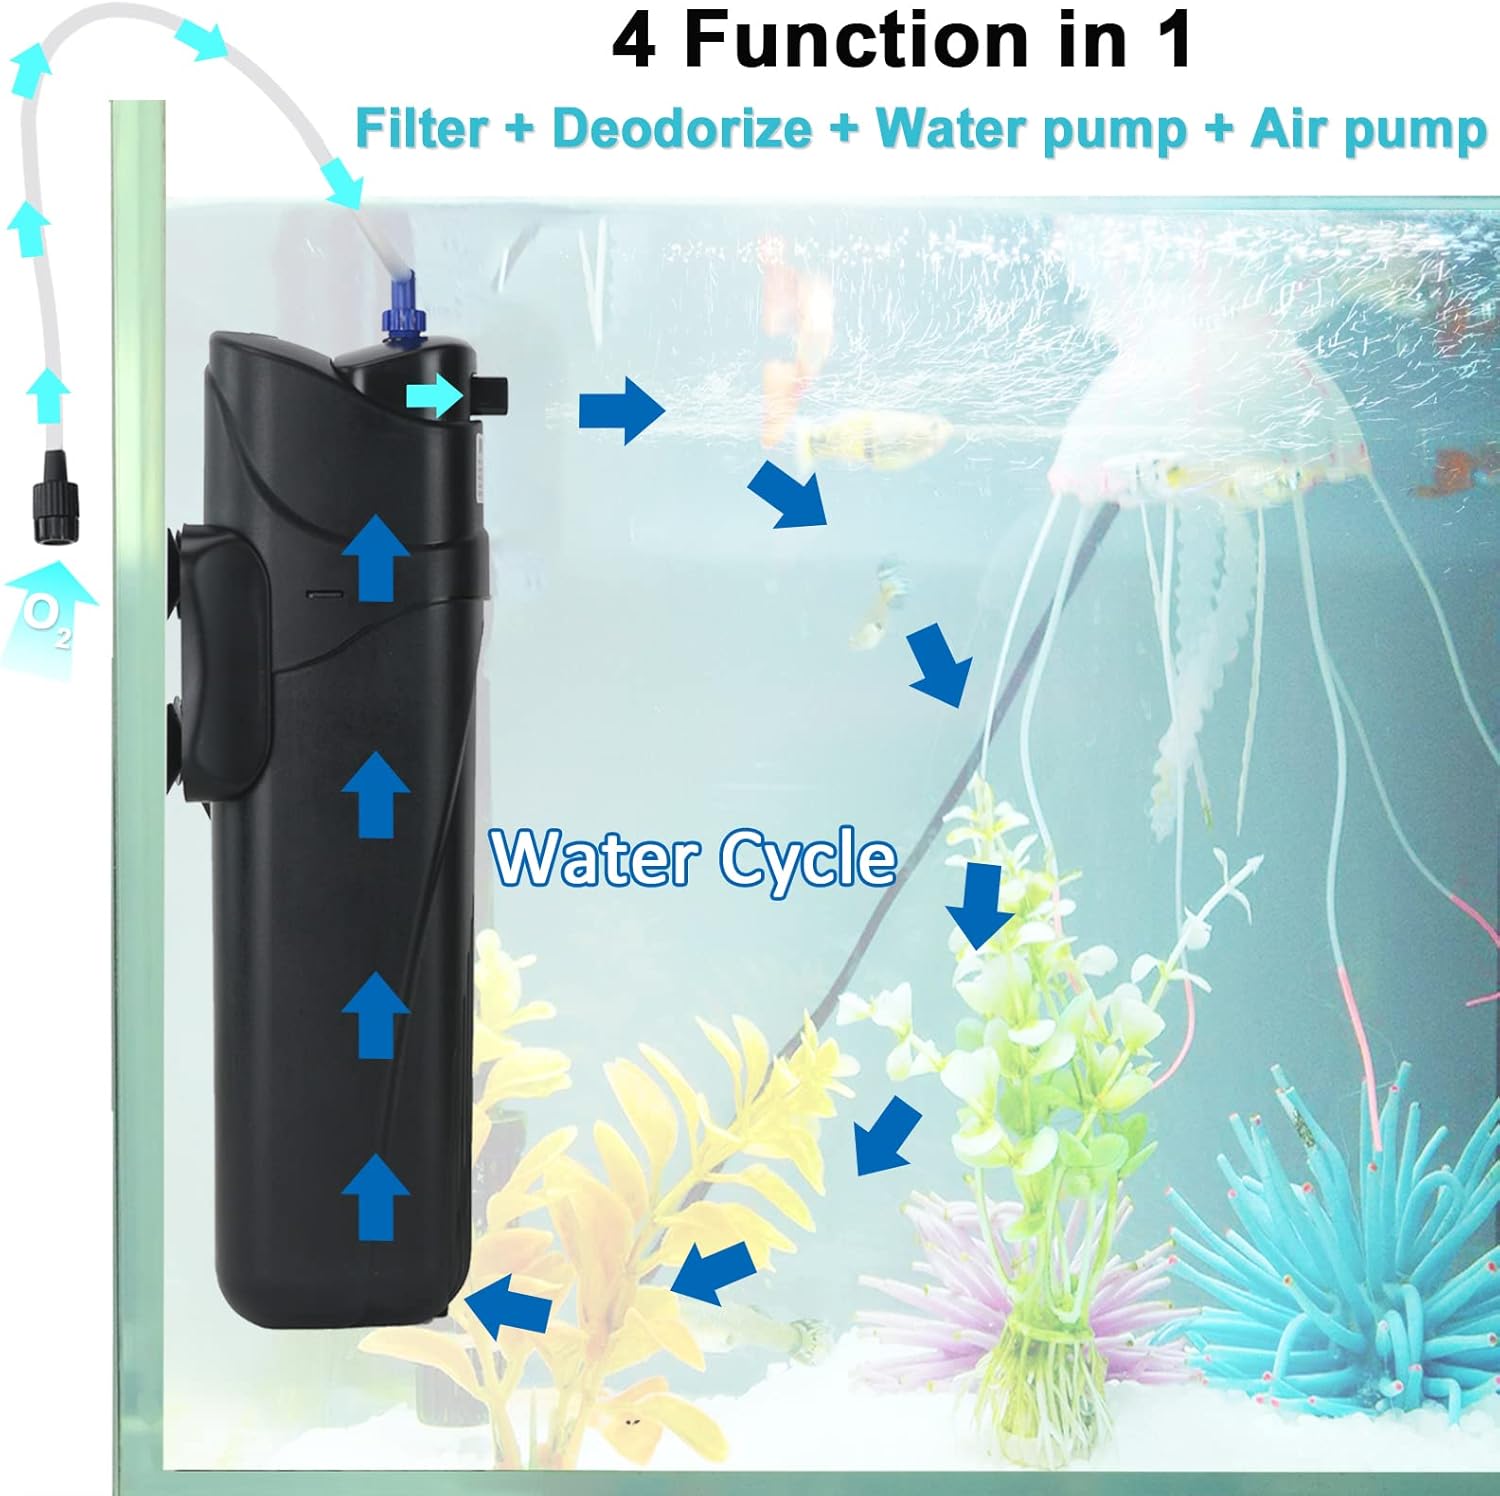
Image 2.1: Illustration of the filter's four primary functions and water circulation within an aquarium.
2.2 Product Dimensions
- Size: 3.5" x 3.9" x 12" (9cm x 10cm x 30.5cm)
- Cord Length: 4.6 ft (1.4 meters)
- Flow Rate: 210 gallons per hour

Image 2.2: Visual representation of the filter's physical dimensions.
3. Setup Instructions
Follow these steps carefully before operating the filter to ensure proper function and safety.
- Open the Case: Hold and press both sides of the machine to open the main case.
- Remove Shock-Proof Sponge: Locate and remove the shock-proof sponge from inside the unit. This sponge is for packaging protection only and must be removed before use.
- Inspect UV Bulb and Quartz Sleeve: Unscrew the black case at the bottom of the unit. Check that the quartz sleeve and the UV bulb inside are intact and undamaged.
- Check Shock-Proof Rubber: Ensure the shock-proof rubber is properly positioned around the UV bulb. Its presence or absence is acceptable as long as the bulb is secure.
- Secure Black Case: Screw the black case back onto the unit, ensuring it is tightly sealed.
- Submerge Completely: The entire filter unit must be fully submerged in the aquarium water. The filter will not function correctly or safely if it is not completely underwater.
- Power On: Install the machine in the aquarium, plug it into a power outlet, and check if the indicator light is on.

Image 3.1: Step-by-step visual guide for initial filter setup.

Image 3.2: Proper submersion of the filter unit in the aquarium.
4. Operating Instructions
Once properly installed and submerged, the COOSPIDER JUP-01 filter will begin its operation. The unit functions as a submersible pump, drawing water through its filtration system and exposing it to UV light before returning clean water to the tank.
4.1 Water Circulation and Filtration
The filter draws cloudy water from the aquarium, passes it through the internal filter media, and then exposes it to the UV bulb within the quartz sleeve. This process helps to clarify the water and reduce harmful microorganisms. The treated water is then returned to the aquarium, creating a continuous water cycle.

Image 4.1: Diagram illustrating the internal water flow and filtration process.
4.2 Air Intake and Water Volume Adjustment
The filter includes an air intake feature to increase oxygen levels in the water. The blue knob on top of the unit allows for adjustment of the air intake and water volume. Rotate the knob to control the flow and aeration as needed for your aquarium.

Image 4.2: Air intake nozzle.

Image 4.3: Adjusting water volume.

Image 4.4: Water flow adjustment knob.
5. Maintenance
Regular maintenance is crucial for the optimal performance and longevity of your COOSPIDER JUP-01 filter.
5.1 Filter Sponge Cleaning/Replacement
- The filter sponges should be cleaned regularly, typically every few weeks, depending on the bio-load of your aquarium.
- To clean, unplug the unit, remove it from the water, and disassemble the case. Rinse the sponges thoroughly with old aquarium water (not tap water) to preserve beneficial bacteria.
- Replace filter sponges when they become too degraded or clogged to clean effectively. The product includes two spare sponges.
5.2 UV Bulb Replacement
- The UV bulb has a limited lifespan and should be replaced periodically, usually every 6-12 months, to maintain its effectiveness.
- To replace, unplug the unit, remove it from the water, and carefully unscrew the black case at the bottom. Gently remove the old bulb and insert the new one into the quartz sleeve.
- Ensure the quartz sleeve is clean and free of debris before reassembly. The product includes one spare UV bulb.
5.3 Quartz Sleeve Cleaning
- Periodically inspect and clean the quartz sleeve to ensure maximum UV light penetration. Algae or mineral buildup on the sleeve can reduce the UV bulb's effectiveness.
- Gently wipe the quartz sleeve with a soft cloth. For stubborn deposits, a mild acid solution (like vinegar) can be used, followed by thorough rinsing with clean water.

Image 5.1: UV bulb and quartz sleeve for inspection and cleaning.

Image 5.2: The UV light's function in controlling microorganisms.
6. Troubleshooting
| Problem | Possible Cause | Solution |
|---|---|---|
| Filter not turning on / No indicator light |
|
|
| Water remains cloudy / Algae persists |
|
|
| Reduced water flow / Poor circulation |
|
|
| Water inside quartz sleeve / Leakage |
|
|

Image 6.1: Visual demonstration of water clarity improvement after filter use.
7. Specifications
| Feature | Detail |
|---|---|
| Model Name | JUP-01 |
| Brand | COOSPIDER |
| Item Weight | 2.3 Pounds (1.04 kg) |
| Product Dimensions (LxWxH) | 3.5 x 3.9 x 12 inches (9 x 10 x 30.5 cm) |
| Cord Length | 4.6 feet (1.4 meters) |
| Flow Rate | 210 gallons per hour |
| Recommended Tank Size | 40-80 Gallons |
| Specific Uses for Product | Indoor Aquarium Filtration |
| Included Components | Filter unit, 1 spare UV bulb, 2 filter sponges |
8. Warranty and Support
The COOSPIDER JUP-01 Aquarium Filter comes with a 1-year warranty. If you have any questions or encounter problems with your product, please contact the service mailbox indicated on the product packaging. Customer support aims to resolve issues and reply within 24 hours.
For further assistance, you may also visit the official COOSPIDER store on Amazon: COOSPIDER Store