
1. Introduction
This manual provides essential information for the safe and effective operation, maintenance, and troubleshooting of your Hyper Tough AQ10019G 12-Amp, 7-1/4 inch Circular Saw. Please read this manual thoroughly before using the tool to ensure proper handling and to prevent injury or damage.
The Hyper Tough AQ10019G is a powerful 12-amp circular saw designed for various cutting tasks. Key features include:
- 12-amp motor for robust performance.
- 7-1/4 inch blade for versatile cutting applications.
- Adjustable bevel from 0° to 45° for angled cuts.
- Adjustable cutting depth for precise control.
2. Important Safety Instructions
WARNING: Read all safety warnings, instructions, illustrations, and specifications provided with this power tool. Failure to follow all instructions listed below may result in electric shock, fire, and/or serious injury.
General Power Tool Safety Warnings:
- Work Area Safety: Keep work area clean and well lit. Cluttered or dark areas invite accidents. Do not operate power tools in explosive atmospheres, such as in the presence of flammable liquids, gases, or dust.
- Electrical Safety: Power tool plugs must match the outlet. Never modify the plug in any way. Do not expose power tools to rain or wet conditions.
- Personal Safety: Stay alert, watch what you are doing, and use common sense when operating a power tool. Do not use a power tool while you are tired or under the influence of drugs, alcohol, or medication. Always wear eye protection.
- Power Tool Use and Care: Do not force the power tool. Use the correct power tool for your application. Disconnect the plug from the power source before making any adjustments, changing accessories, or storing power tools.
Circular Saw Specific Safety Warnings:
- Keep hands away from cutting area and the blade. Keep your second hand on the auxiliary handle, or motor housing. If both hands are holding the saw, they cannot be cut by the blade.
- Do not reach underneath the workpiece. The guard cannot protect you from the blade below the workpiece.
- Adjust the cutting depth to the thickness of the workpiece. Less than a full tooth of the blade teeth should be visible below the workpiece.
- Never hold the workpiece in your hands or across your leg while cutting. Secure the workpiece to a stable platform. It is important to support the workpiece properly to minimize body exposure, blade binding, or loss of control.
- Hold the power tool by insulated gripping surfaces when performing an operation where the cutting accessory may contact hidden wiring or its own cord.
- Always use the correct size and type of blade.
3. Components and Features
Familiarize yourself with the various parts of your Hyper Tough AQ10019G Circular Saw before operation.

Figure 3.1: Overview of the Hyper Tough AQ10019G Circular Saw, showing the main unit, blade, and included accessories such as the rip guide and blade wrench.

Figure 3.2: The Hyper Tough AQ10019G Circular Saw, highlighting its robust power cord and ergonomic handle design for comfortable use.
Key Components:
- Motor Housing: Contains the motor and internal components.
- Handle: Main gripping surface for control.
- Trigger Switch: Activates the saw.
- Blade Guard (Upper & Lower): Protects the user from the blade. The lower guard retracts during cutting.
- Blade: The cutting accessory, typically 7-1/4 inches in diameter.
- Base Plate (Shoe): Provides a stable surface for the saw to glide on the workpiece.
- Depth Adjustment Lever: Allows setting the cutting depth.
- Bevel Adjustment Lever: Allows setting the cutting angle (0° to 45°).
4. Setup
Before beginning any cutting operation, ensure the saw is properly set up and adjusted for the task.
4.1 Blade Installation/Removal
- Disconnect Power: Always unplug the saw from the power source before installing or removing the blade.
- Retract Lower Guard: Lift the lower blade guard lever to retract the guard.
- Loosen Arbor Nut: Use the provided blade wrench to loosen the arbor nut while pressing the spindle lock button. Turn the nut counter-clockwise to loosen.
- Remove Old Blade: Carefully remove the old blade and any washers.
- Install New Blade: Place the new blade onto the arbor, ensuring the teeth are pointing in the direction of rotation (indicated by an arrow on the blade guard). Replace any washers and tighten the arbor nut clockwise using the blade wrench and spindle lock.
- Check Guard: Ensure the lower blade guard moves freely and returns to its closed position.
4.2 Adjusting Cutting Depth
The cutting depth should be set so that the blade extends approximately 1/8 inch (3 mm) below the workpiece. This minimizes kickback and ensures a clean cut.
- Loosen Depth Adjustment Lever: Locate and loosen the depth adjustment lever on the side of the saw.
- Set Depth: Raise or lower the saw's base plate until the desired blade depth is achieved relative to the workpiece.
- Tighten Lever: Securely tighten the depth adjustment lever.
4.3 Adjusting Bevel Angle
The saw can make bevel cuts from 0° (straight cut) to 45°.

Figure 4.1: Demonstrating the adjustment of the bevel angle on the circular saw, allowing for angled cuts up to 45 degrees.
- Loosen Bevel Adjustment Lever: Locate and loosen the bevel adjustment lever on the front of the saw.
- Set Angle: Tilt the saw's base plate to the desired angle, aligning the indicator with the angle scale.
- Tighten Lever: Securely tighten the bevel adjustment lever.
5. Operating Instructions
Always ensure your work area is clear and the workpiece is securely clamped before starting any cut.
5.1 General Cutting Procedure
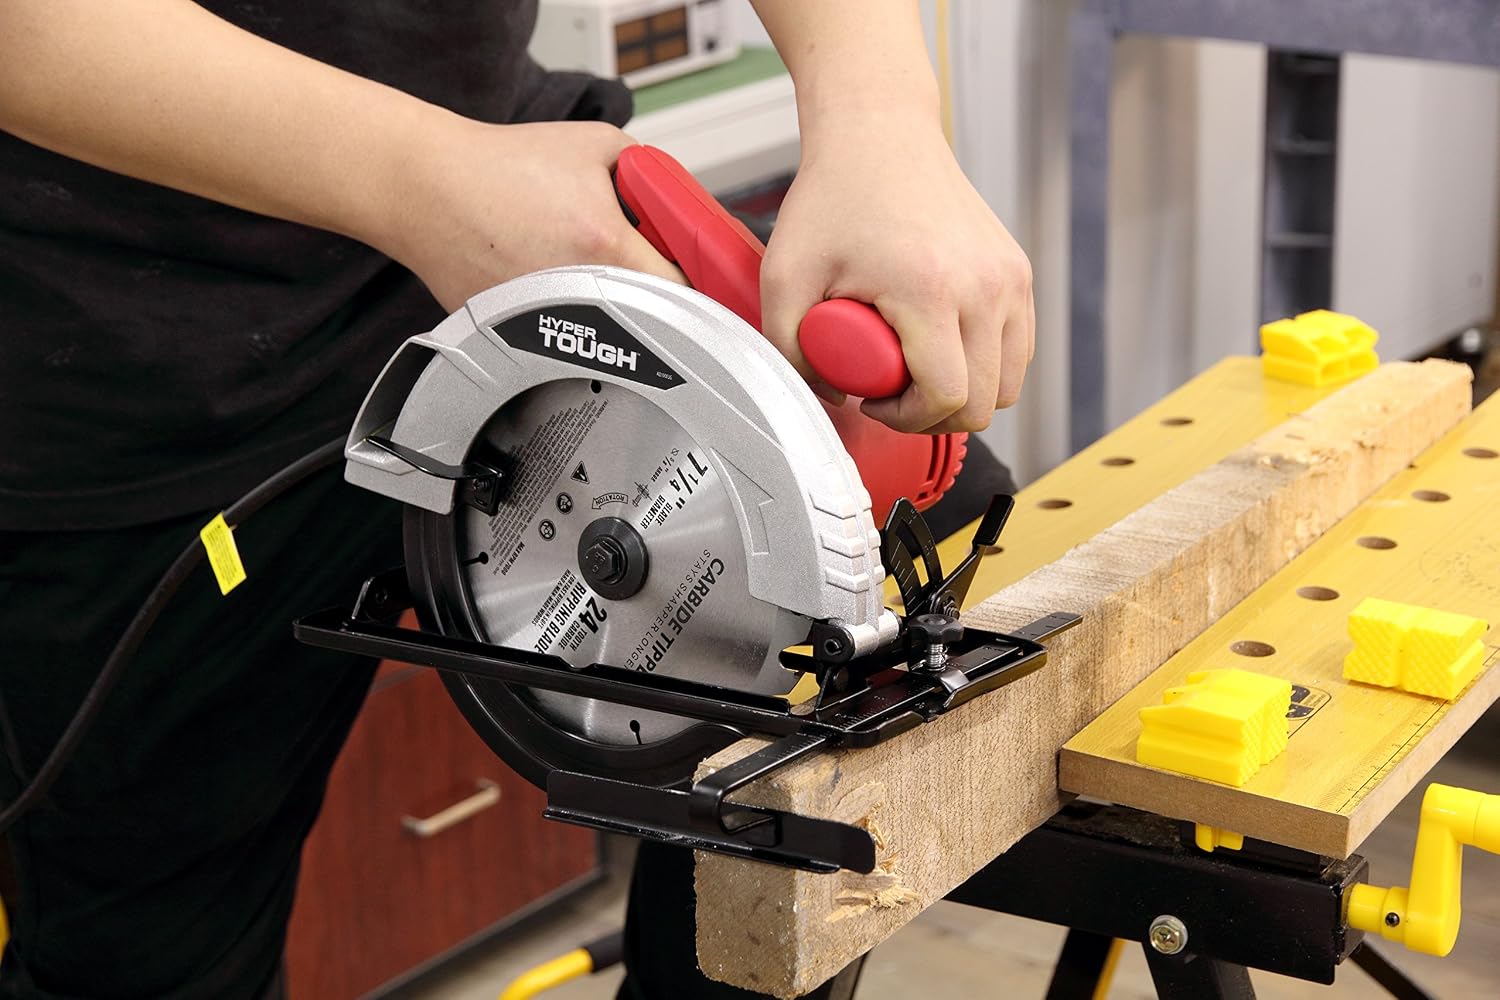
Figure 5.1: A user demonstrating the proper technique for operating the Hyper Tough circular saw to make a straight cut on a wooden board, emphasizing secure workpiece placement.
- Prepare Workpiece: Mark your cut line clearly. Secure the workpiece with clamps to prevent movement during cutting. Ensure the cut-off piece will not bind the blade.
- Position Saw: Place the front of the saw's base plate flat on the workpiece, ensuring the blade is clear of the material. The lower blade guard should be resting on the workpiece.
- Start Cut: Depress the trigger switch to start the saw. Allow the blade to reach full speed before beginning the cut.
- Guide Saw: Slowly and steadily push the saw forward along the marked cut line. Maintain firm pressure on the saw, keeping the base plate flat against the workpiece. Do not force the saw; let the blade do the work.
- Complete Cut: Continue pushing until the cut is complete. Support the cut-off piece to prevent it from falling and binding the blade.
- Release Trigger: Once the cut is finished, release the trigger switch and allow the blade to stop completely before lifting the saw from the workpiece.
5.2 Important Operating Tips:
- Kickback Prevention: Avoid binding the blade. Do not cut wet or warped wood. Always use a sharp blade.
- Support Workpiece: Ensure the workpiece is adequately supported on both sides of the cut to prevent pinching the blade.
- Dust Collection: If available, connect a dust collection system to minimize airborne dust.
- Extension Cords: If an extension cord is necessary, ensure it is rated for outdoor use and has the proper gauge for the saw's amperage.
6. Maintenance
Regular maintenance ensures the longevity and safe operation of your circular saw. Always disconnect the saw from the power source before performing any maintenance.
6.1 Cleaning
- After Each Use: Use a soft brush or compressed air to remove sawdust and debris from the motor vents, blade guard, and base plate.
- Do Not Use Solvents: Never use flammable or combustible solvents to clean the tool.
6.2 Blade Care
- Keep Blades Sharp: Dull blades can cause kickback and strain the motor. Replace or sharpen blades as needed.
- Clean Blades: Remove resin and pitch buildup from blades using a blade cleaner.
6.3 Storage
- Store the saw in a clean, dry place, out of reach of children.
- Protect the power cord from damage.
7. Troubleshooting
Refer to the table below for common issues and their potential solutions.
| Problem | Possible Cause | Solution |
|---|---|---|
| Saw does not start. | No power supply. Faulty switch. | Check power cord and outlet. Contact customer support for switch replacement. |
| Blade binds or stalls during cut. | Dull blade. Improper cutting depth. Workpiece not supported. | Replace or sharpen blade. Adjust cutting depth. Securely clamp workpiece. |
| Excessive vibration. | Loose blade. Damaged blade. | Ensure blade is securely tightened. Replace damaged blade. |
| Motor overheats. | Overloading the saw. Blocked ventilation. | Reduce cutting pressure. Clean motor vents. |
8. Technical Specifications
Detailed specifications for the Hyper Tough AQ10019G Circular Saw.
| Specification | Value |
|---|---|
| Model Number | AQ10019G |
| Power Source | Corded Electric |
| Amperage | 12 Amps |
| Voltage | 127 Volts |
| Wattage | 1524 Watts |
| Blade Diameter | 7-1/4 inches (17.8 cm) |
| Bevel Capacity | 0° to 45° |
| Blade Material | Alloy Steel |
| Recommended Surface | Wood |
| Dimensions (L x W x H) | 32.51 x 25.4 x 24.13 cm |
| Weight | 4.54 kg |
| Special Feature | Portable |
9. Warranty and Customer Support
The Hyper Tough AQ10019G Circular Saw comes with a 2-year warranty from the date of purchase, covering defects in material and workmanship under normal use.
For warranty claims, technical assistance, or replacement parts, please contact Hyper Tough customer support. Keep your proof of purchase for warranty validation.
Please refer to the product packaging or the official Hyper Tough website for the most current contact information and detailed warranty terms.
