Readytosky CameraB
Readytosky 1500TVL FPV Camera User Manual
Model: CameraB
Introduction
Thank you for purchasing the Readytosky 1500TVL FPV Camera. This compact and high-performance camera is designed for First Person View (FPV) applications, particularly suited for RC FPV racing drones. Featuring a 1/3" CMOS sensor, 2.1mm lens, and On-Screen Display (OSD) for internal adjustments, it provides a clear and vivid image for an immersive flying experience. This manual will guide you through the setup, operation, and maintenance of your new FPV camera.
Safety Information
- Always ensure correct polarity when connecting power to avoid damage to the camera and other components. The camera supports a voltage range of 5V-30V.
- Do not expose the camera to extreme temperatures, moisture, or direct sunlight for prolonged periods.
- Handle the lens with care to prevent scratches or damage. Avoid touching the lens surface directly.
- Ensure all connections are secure before powering on your FPV system.
- Keep the camera away from strong magnetic fields, which can interfere with its operation.
Package Contents
Verify that all the following items are included in your package:

Image showing the Readytosky 1500TVL FPV Camera, OSD adjustment board, connection cables, mounting screws, and lens cap.

Another view of the complete kit, including the camera, OSD board, two types of connection cables, mounting hardware, and a protective lens cap.
- Readytosky 1500TVL FPV Camera (Orange)
- OSD Adjustment Board
- Power/Video Cable
- OSD Control Cable
- Mounting Screws and Nuts
- Lens Cap
Product Overview
The Readytosky 1500TVL FPV Camera is a compact and lightweight solution for high-definition FPV feeds. Its robust design and versatile features make it suitable for various drone builds.

This image displays the front and side profile of the Readytosky 1500TVL FPV Camera, highlighting its orange casing and 2.1mm lens.

A top-down view of the camera, focusing on the 2.1mm lens with "1/1.8" 2.1mm 5MP IR" markings, indicating its specifications.
Key Features:
- High Definition: 1500TVL resolution for clear FPV feed.
- Wide Angle Lens: 2.1mm lens with 145-degree field of view.
- OSD Control: On-Screen Display for easy adjustment of camera settings.
- Wide Voltage Input: Supports 5V-30V DC input.
- PAL/NTSC Switchable: Compatible with both video formats.
- Low Illumination Performance: Excellent performance in low light conditions (0.001Lux/1.2F).
- Lightweight Design: Weighs approximately 6g, ideal for minimizing drone weight.
Setup
1. Wiring Diagram:
Connect the camera to your Flight Controller (FC) or Video Transmitter (VTX) according to the following pinout. Ensure correct voltage supply.
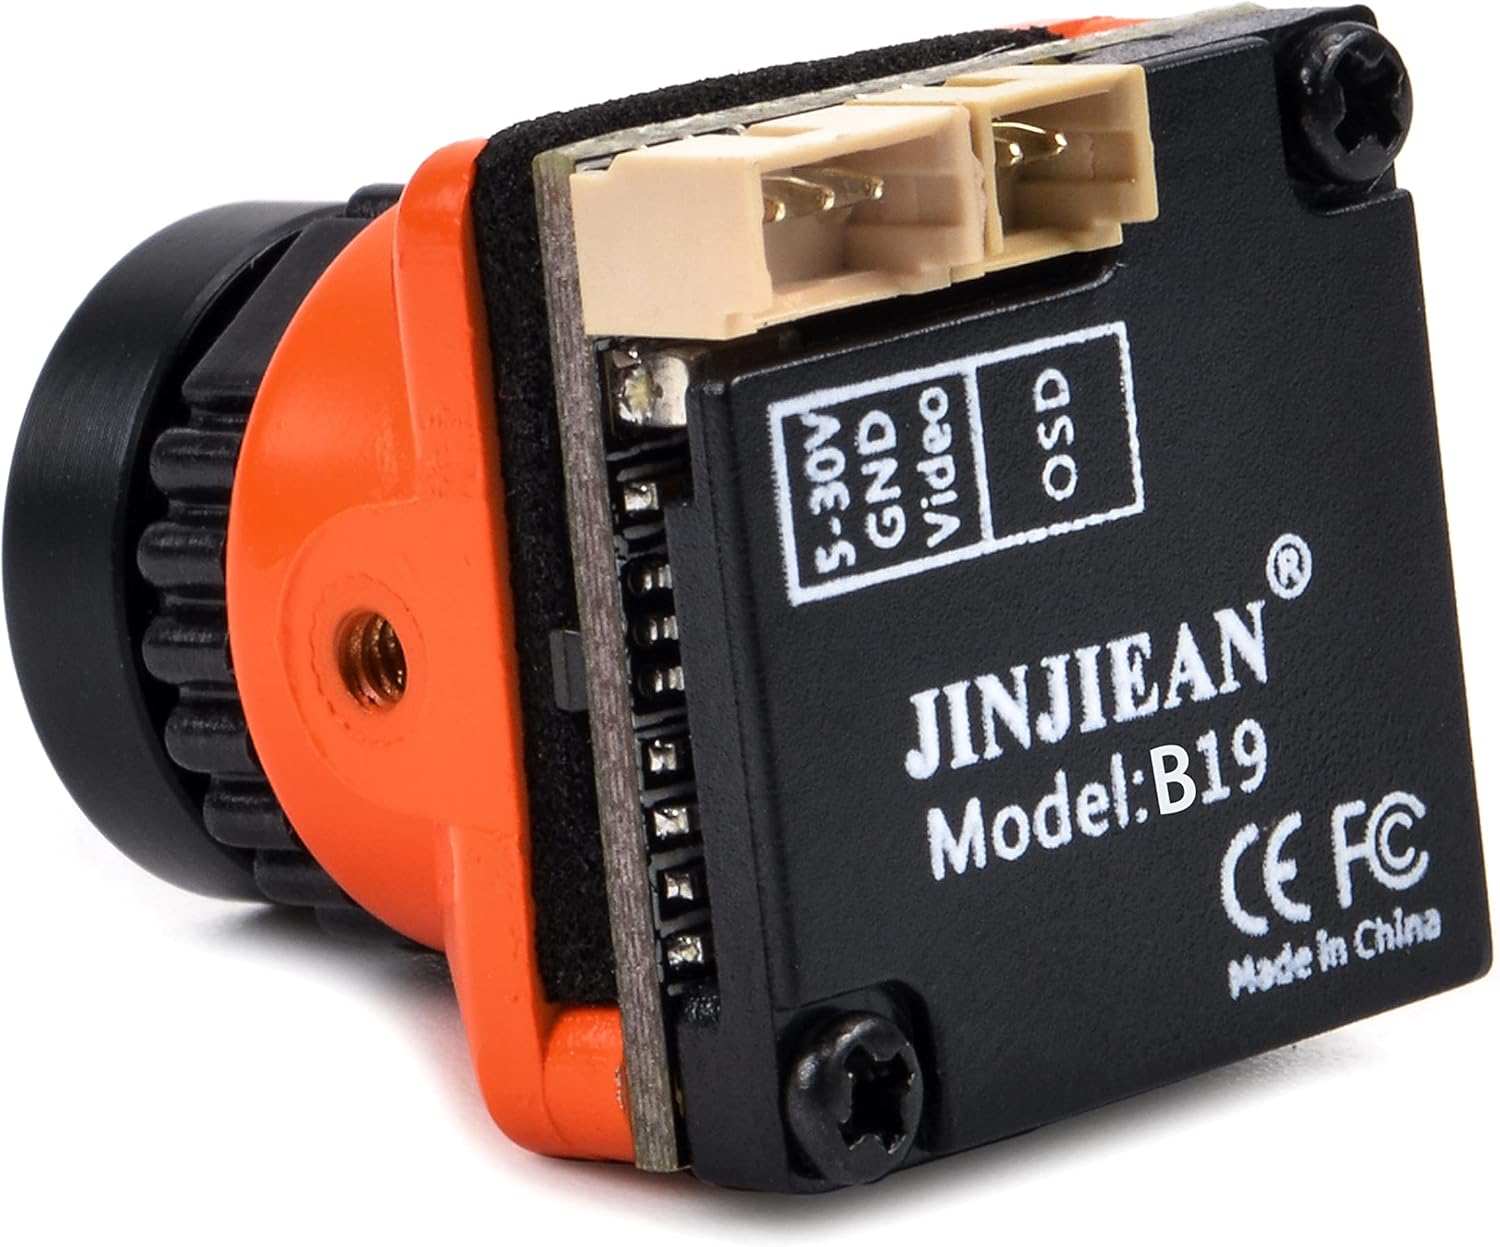
This image shows the back of the camera with clearly labeled connection points: 5-30V (Power Input), GND (Ground), and Video (Video Output). The OSD port is also visible.
- 5-30V: Connect to a stable DC power source within the 5V-30V range.
- GND: Connect to the ground of your power source.
- Video: Connect to the video input of your VTX or FPV goggles.
- OSD Port: Connect the included OSD adjustment board here for menu access.
2. OSD (On-Screen Display) Adjustment:
The camera features an internal OSD for adjusting various settings such as brightness, contrast, color, and PAL/NTSC format. Use the included OSD adjustment board to navigate the menu.

A detailed view of the OSD adjustment board, featuring a joystick-like button for menu navigation and selection.
- Connect the OSD adjustment board to the OSD port on the camera.
- Power on the camera. The OSD menu should appear on your FPV display.
- Use the joystick on the OSD board to navigate:
- Push Up/Down/Left/Right: Navigate through menu options.
- Press In (Click): Select an option or enter a sub-menu.
- Hold Down: Exit the current menu or save settings (refer to OSD menu for specific functions).
- To switch between PAL and NTSC formats, navigate to the appropriate setting in the OSD menu and select your desired format.
Operating
Once the camera is correctly wired and configured, it will provide a live video feed to your FPV goggles or monitor. Ensure your video receiver is tuned to the correct frequency of your Video Transmitter (VTX) to receive the signal.
- Power On: Apply power to your FPV system. The camera will power on instantly.
- Image Quality: If the image appears blurry, gently rotate the lens ring to adjust focus until the image is sharp.
- OSD Menu Access: If you need to change settings during operation, connect the OSD board and access the menu as described in the Setup section.
- Flight Conditions: The camera is designed for various lighting conditions, but extreme direct sunlight or very dark environments may affect image quality. Adjust OSD settings like WDR (Wide Dynamic Range) or BLC (Backlight Compensation) if available in the menu for optimal performance.
Maintenance
- Cleaning the Lens: Use a soft, lint-free cloth specifically designed for optical lenses to clean the camera lens. Do not use abrasive materials or harsh chemicals.
- Storage: When not in use, store the camera in a dry, dust-free environment. Use the included lens cap to protect the lens from dust and scratches.
- Physical Inspection: Periodically check the camera casing and connectors for any signs of damage or wear.
- Firmware: This camera does not typically require user-upgradable firmware. Do not attempt to flash custom firmware unless explicitly instructed by the manufacturer.
Troubleshooting
| Problem | Possible Cause | Solution |
|---|---|---|
| No image on FPV display. | Incorrect wiring, no power, VTX/VRX frequency mismatch, damaged camera. | Check all wiring connections (power, ground, video). Ensure camera is receiving power. Verify VTX and VRX are on the same frequency. Test with another known-good camera if possible. |
| Image is blurry or out of focus. | Lens focus needs adjustment. | Gently rotate the lens ring until the image becomes sharp. Secure the lens if it has a locking mechanism. |
| Image is black and white. | Incorrect PAL/NTSC setting, low light mode. | Access OSD menu and ensure PAL/NTSC setting matches your display. In very low light, the camera may automatically switch to B&W for better visibility. |
| OSD menu does not appear. | OSD board not connected correctly, OSD function disabled. | Ensure the OSD adjustment board is securely connected to the OSD port. Check if there's an option in the OSD menu (if you can access it) to enable/disable OSD display. |
| Image flickers or has lines. | Power interference, ground loop, damaged video cable. | Ensure clean power supply. Check for proper grounding. Replace video cable if damaged. Add a low ESR capacitor to the power input if experiencing noise. |
Specifications
Detailed technical specifications for the Readytosky 1500TVL FPV Camera:
| Model Name | FPV mini Camera (CameraB) |
| Image Sensor | 1/3" CMOS |
| Horizontal Resolution | 1500TVL |
| Lens | 2.1mm, 145 Degree FOV |
| Signal System | PAL/NTSC (Switchable via OSD) |
| Min. Illumination | 0.001Lux/1.2F |
| WDR | D-WDR |
| DNR | 3DNR |
| Day/Night Mode | Auto/Color/B&W |
| Power Input | DC 5V-30V |
| Net Weight | Approx. 6g (0.21 ounces) |
| Dimensions | 19mm x 19mm x 19mm (0.75 x 0.75 x 0.75 inches) |

The camera and its accessories on a digital scale, indicating a total weight of 11 grams for the kit. The camera itself weighs approximately 6 grams.
Warranty and Support
Readytosky products are designed for reliability and performance. For warranty information, technical support, or service inquiries, please refer to the official Readytosky website or contact your retailer.
Online Resources:
- Visit the Readytosky Store on Amazon for product updates and additional information.
Please retain your proof of purchase for warranty claims.
Ask a question about this manual
Ask about setup, troubleshooting, compatibility, parts, safety, or missing instructions. Manuals+ will review the question and use this page’s manual context to help answer it.