1. Introduction
This instruction manual provides detailed guidance for the safe and effective use of the EWK 1-1/4 to 3-1/2 Inch 3 Stones Engine Cylinder Hone Tool. This tool is designed to deglaze the walls of cylinders in gasoline and diesel engines, remove burrs, and properly roughen cylinder walls to produce an oil-holding cross-hatch pattern, ensuring an adequate seal for piston rings.
The tool is compatible with cylinder bores ranging from 1-1/4 inches to 3-1/2 inches (31.75mm to 88.9mm) in diameter, making it suitable for various automotive, motorcycle, and industrial equipment applications. It is designed for use with a 1/4-inch power drill.
2. Safety Information
Always observe the following safety precautions when using this tool:
- Wear appropriate personal protective equipment, including safety glasses and gloves.
- Ensure the workpiece is securely clamped before beginning any operation.
- Disconnect the power drill from its power source before attaching or detaching the honing tool.
- Use the tool only for its intended purpose.
- Keep hands and loose clothing away from rotating parts.
- Do not exceed the recommended operating speed of your power drill.
- Use adequate lubrication (honing oil) during operation to prevent excessive heat and stone wear.
- Keep children and bystanders away from the work area.
3. Product Overview
The EWK Cylinder Hone Tool features a flexible shaft, an adjustable tension screw, and three rigid honing stones (220 grit) for effective cylinder deglazing. The design ensures smooth movement and consistent pressure against the cylinder walls.

Figure 3.1: Labeled diagram of the EWK Cylinder Hone Tool, highlighting the 1/4" power drill connection, flexible shaft, tension screw, rigid honing stones, and upgrading joints. The overall length is approximately 8.9 inches.

Figure 3.2: Detailed view of the EWK Cylinder Hone Tool, illustrating the flexible shaft for smoother movement, spring tension screw for easy adjustment, upgrading joints for stability, and rigid honing stones for removing carbon and heat glaze deposits.
Key Components:
- Flexible Shaft: Ensures smooth movement and improved durability during operation.
- Tension Screw: Allows adjustment of the spring pressure, controlling how firmly the stones press against the cylinder bore. Turning clockwise tightens, counter-clockwise loosens.
- Rigid Honing Stones: Three 1.96-inch (50mm) 220-grit stones designed to remove carbon and heat glaze deposits. These stones are replaceable.
- Upgrading Joints: Stable and securely fastened connections for reliable performance.
4. Specifications
| Feature | Specification |
|---|---|
| Brand | EWK |
| Model Number | EB0270 |
| Honing Range | 1-1/4" to 3-1/2" (31.75mm to 88.9mm) |
| Stone Grit | 220 Grit |
| Number of Stones | 3 |
| Stone Length | 1.96 inches |
| Material | Alloy Steel, Zinc Plated |
| Item Weight | 5.3 ounces |
| Product Dimensions | 8.66 x 1.57 x 1.18 inches |
| Compatible Power Drill | 1/4" Chuck |
| UPC | 700587513916 |
5. Setup
Before operating the cylinder hone tool, ensure proper setup:
- Prepare the Cylinder: Ensure the cylinder bore is clean and free of debris.
- Attach to Power Drill: Securely insert the shaft of the honing tool into the chuck of a 1/4-inch power drill. Tighten the chuck firmly to prevent slippage.

Figure 5.1: Illustration showing the EWK Cylinder Hone Tool being attached to a power drill.
- Adjust Stone Tension: Use the adjustable tension screw to set the spring pressure. The stones should expand enough to make firm contact with the cylinder walls but not be overly tight, which could cause excessive wear or damage. Adjust the screw by turning it clockwise to increase tension or counter-clockwise to decrease tension.

Figure 5.2: Close-up view of the tension screw, indicating 'Tight' and 'Loose' directions for adjusting stone pressure.
6. Operating Instructions
Follow these steps for effective cylinder honing:
- Apply Honing Oil: Liberally apply a suitable honing oil to the cylinder bore. This is crucial for lubrication, cooling, and carrying away debris.

Figure 6.1: Illustration showing honing oil being applied to the cylinder bore before honing.
- Insert the Tool: Carefully insert the honing tool into the cylinder bore. The flexible shaft allows for self-alignment.
- Begin Honing: Start the power drill at a low to medium speed. Move the honing tool up and down the cylinder bore with a steady, even motion. The goal is to create a cross-hatch pattern, typically at a 45-degree angle. Avoid dwelling in one spot.

Figure 6.2: The flexible shaft of the honing tool in operation, ensuring smooth movement and adaptability within the cylinder bore.

Figure 6.3: Illustration depicting the honing tool being operated inside a cylinder, moving up and down to deglaze the walls.
- Monitor Progress: Periodically remove the tool and inspect the cylinder walls. Continue honing until the desired cross-hatch pattern is achieved and any glaze or rust is removed.
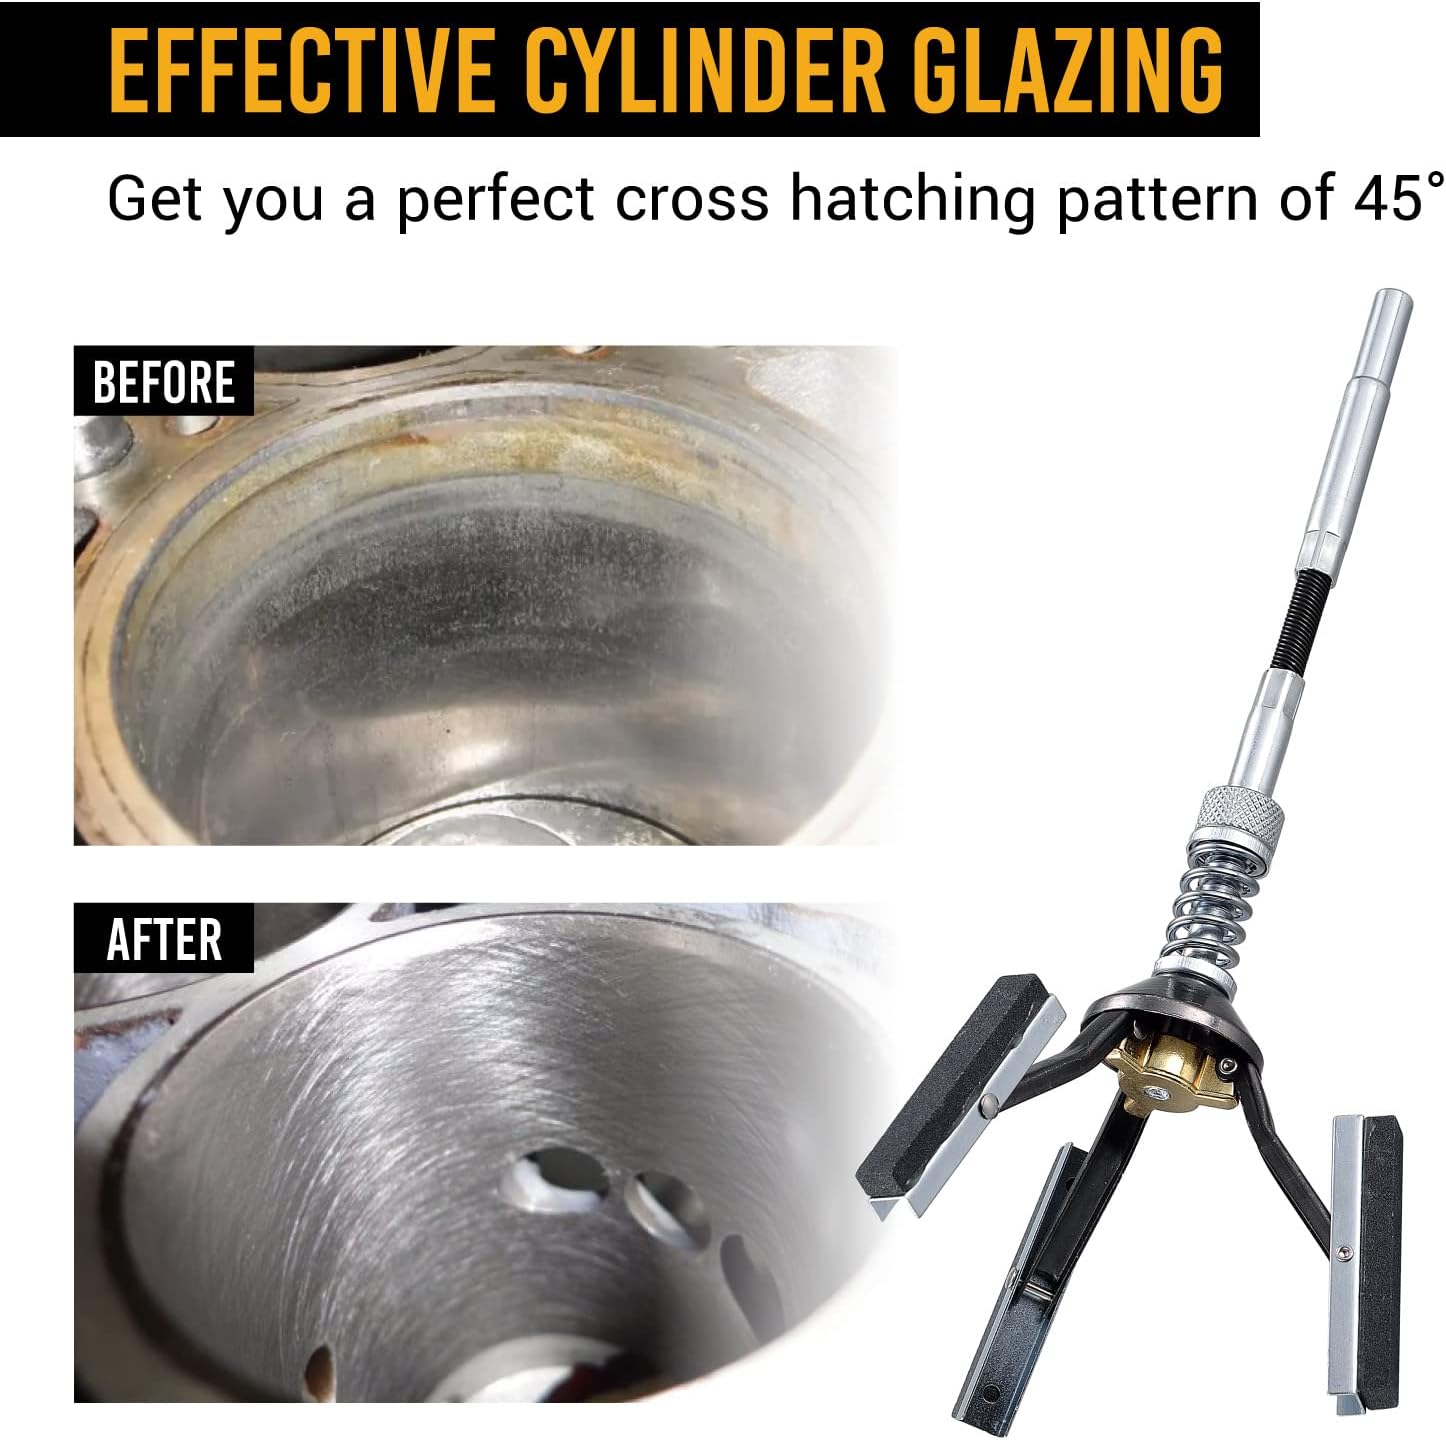
Figure 6.4: Comparison showing a cylinder bore before honing (with rust and glaze) and after honing, displaying a clean surface with a proper cross-hatch pattern.
- Clean the Cylinder: After honing, thoroughly clean the cylinder bore to remove all honing residue and abrasive particles. Use soap and water, followed by a light oil, to prevent rust.
7. Maintenance
Proper maintenance extends the life of your EWK Cylinder Hone Tool:
- Cleaning: After each use, clean the honing stones and the tool body to remove any metal particles or honing oil residue. Use a brush and a suitable cleaning agent.
- Inspection: Regularly inspect the honing stones for wear. Worn stones will reduce effectiveness and may need replacement.
- Stone Replacement: The 220-grit stones are replaceable. When stones become excessively worn, they can be easily replaced to restore the tool's performance.
- Storage: Store the tool in a clean, dry place to prevent rust and damage.
8. Troubleshooting
If you encounter issues while using the EWK Cylinder Hone Tool, consider the following:
- Uneven Honing Pattern: Ensure consistent up-and-down motion. Check that the tension screw is properly adjusted for even pressure.
- Stones Not Expanding: Verify the tension screw is adjusted correctly. Ensure no debris is obstructing the stone expansion mechanism.
- Slow Material Removal: Check if the honing stones are worn and require replacement. Ensure sufficient honing oil is being used.
- Tool Slipping in Drill Chuck: Ensure the drill chuck is tightened securely around the tool's shaft.
9. Warranty and Support
The EWK 1-1/4 to 3-1/2 Inch 3 Stones Engine Cylinder Hone Tool is backed by an extraordinary 12+6 month warranty, providing coverage for manufacturing defects and material failures under normal use. For warranty claims, technical support, or inquiries regarding replacement parts, please contact EWK customer service through their official channels or the retailer where the product was purchased.