
1. Introduction
This manual provides instructions for the installation, operation, and maintenance of your Geekpure Tankpro 4.0 Gallon RO Water Storage Tank. This tank is designed for use with Reverse Osmosis (RO) systems to store purified water, ensuring a continuous supply and consistent water pressure.

Image 1.1: Geekpure Tankpro 4.0 Gallon RO Water Storage Tank. This image shows the white cylindrical tank with a blue cap on top and a label on the side.
The Tankpro 4.0 Gallon RO Water Storage Tank is NSF certified, meeting NSF/ANSI 58 standards for material and structural integrity. It is designed to increase water pressure within your RO system, which is beneficial for appliances like refrigerators and ice makers, and helps reduce frequent system restarts.
2. Safety Information
Important Safety Instructions:
- Read all instructions carefully before installation and operation.
- Ensure all connections are secure to prevent leaks.
- Do not attempt to modify the tank or its components.
- The tank is pre-pressurized; do not adjust the pressure of a new tank unless specifically instructed for troubleshooting.
- The first two tanks of water produced after installation or maintenance should not be consumed.
- If water leakage occurs at the bottom air charge position or top thread, replace the tank.
3. Package Contents
The package contains the following item:
- 1 x Tankpro 4.0 Gallon RO Water Storage Tank
Note: A tank ball valve is not included and must be purchased separately. For a compatible 1/4" thread x 3/8" tube tank ball valve, search for ASIN: B078W6CFRH on Amazon.
4. Specifications
| Feature | Specification |
|---|---|
| Capacity | 4.0 Gallons |
| Material | Stainless Steel (internal components), Polypropylene Shell |
| Product Dimensions (D x W x H) | 10.83" x 10.83" x 17.34" |
| Item Weight | 9 Pounds |
| Inlet/Outlet Thread | 1/4" NPT valve thread |
| Pre-charge Pressure (empty tank) | 5-7 psi |
| Certifications | NSF/ANSI 58, WQA |
| Shelf Life | 3 Years |
| Service Life | 5 Years minimum |

Image 4.1: Diagram showing the dimensions of the RO tank, including height and width measurements.
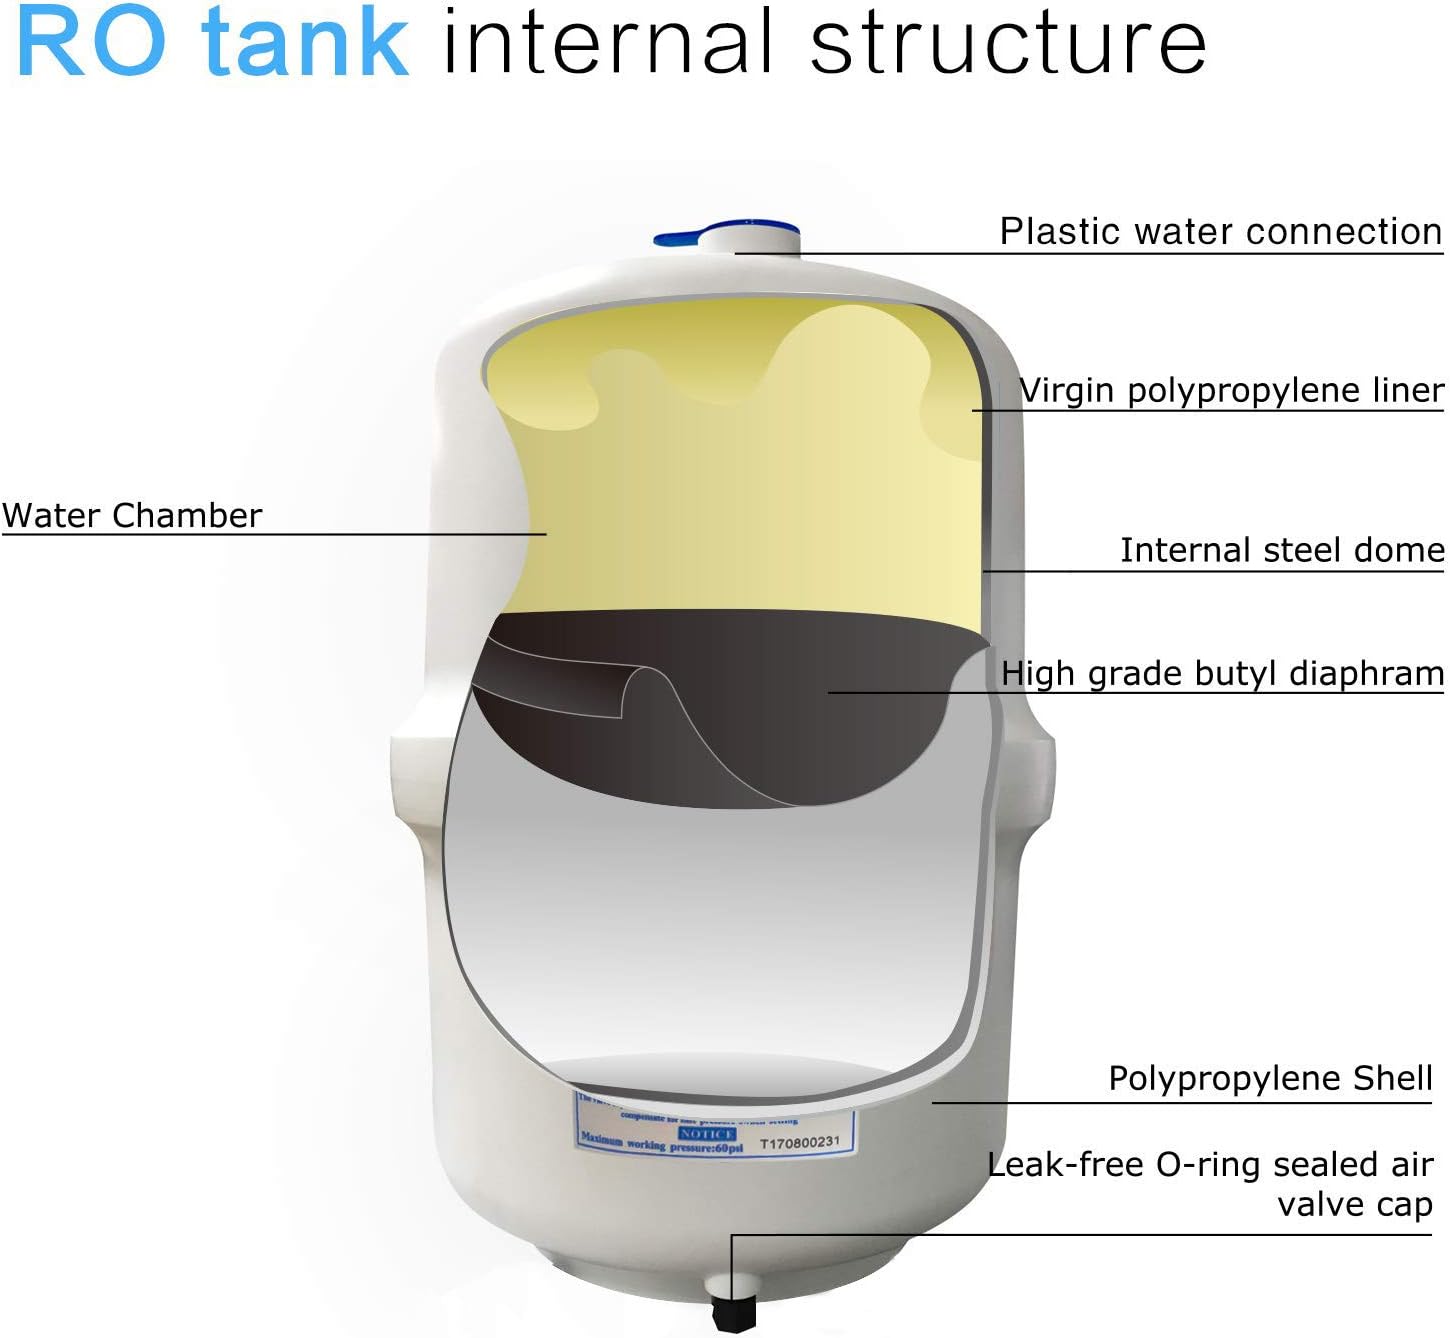
Image 4.2: Cross-section diagram illustrating the internal components of the RO tank, including the water chamber, virgin polypropylene liner, internal steel dome, high-grade butyl diaphragm, polypropylene shell, and leak-free O-ring sealed air valve cap.
5. Setup and Installation
- Unpack the Tank: Carefully remove the tank from its packaging.
- Inspect for Damage: Check the tank for any visible damage. Do not install a damaged tank.
- Prepare the Location: Ensure you have adequate space for the tank. Recommended space is approximately 11" x 11" x 17".
- Connect the Ball Valve: Screw the tank ball valve (not included) onto the 1/4" NPT valve thread at the top of the tank. Ensure a tight, leak-free connection.
- Integrate with RO System: Connect the tank to your Reverse Osmosis system according to your RO system's specific installation instructions. The tank is designed to work with standard RO systems.
- Check for Leaks: After connecting the tank and pressurizing the entire RO system, thoroughly check all connections for any leaks before leaving the installation site.
- Initial Water Flush: The first two tanks of water produced by the system after installation should be drained and not used for consumption. This flushes out any manufacturing residues.
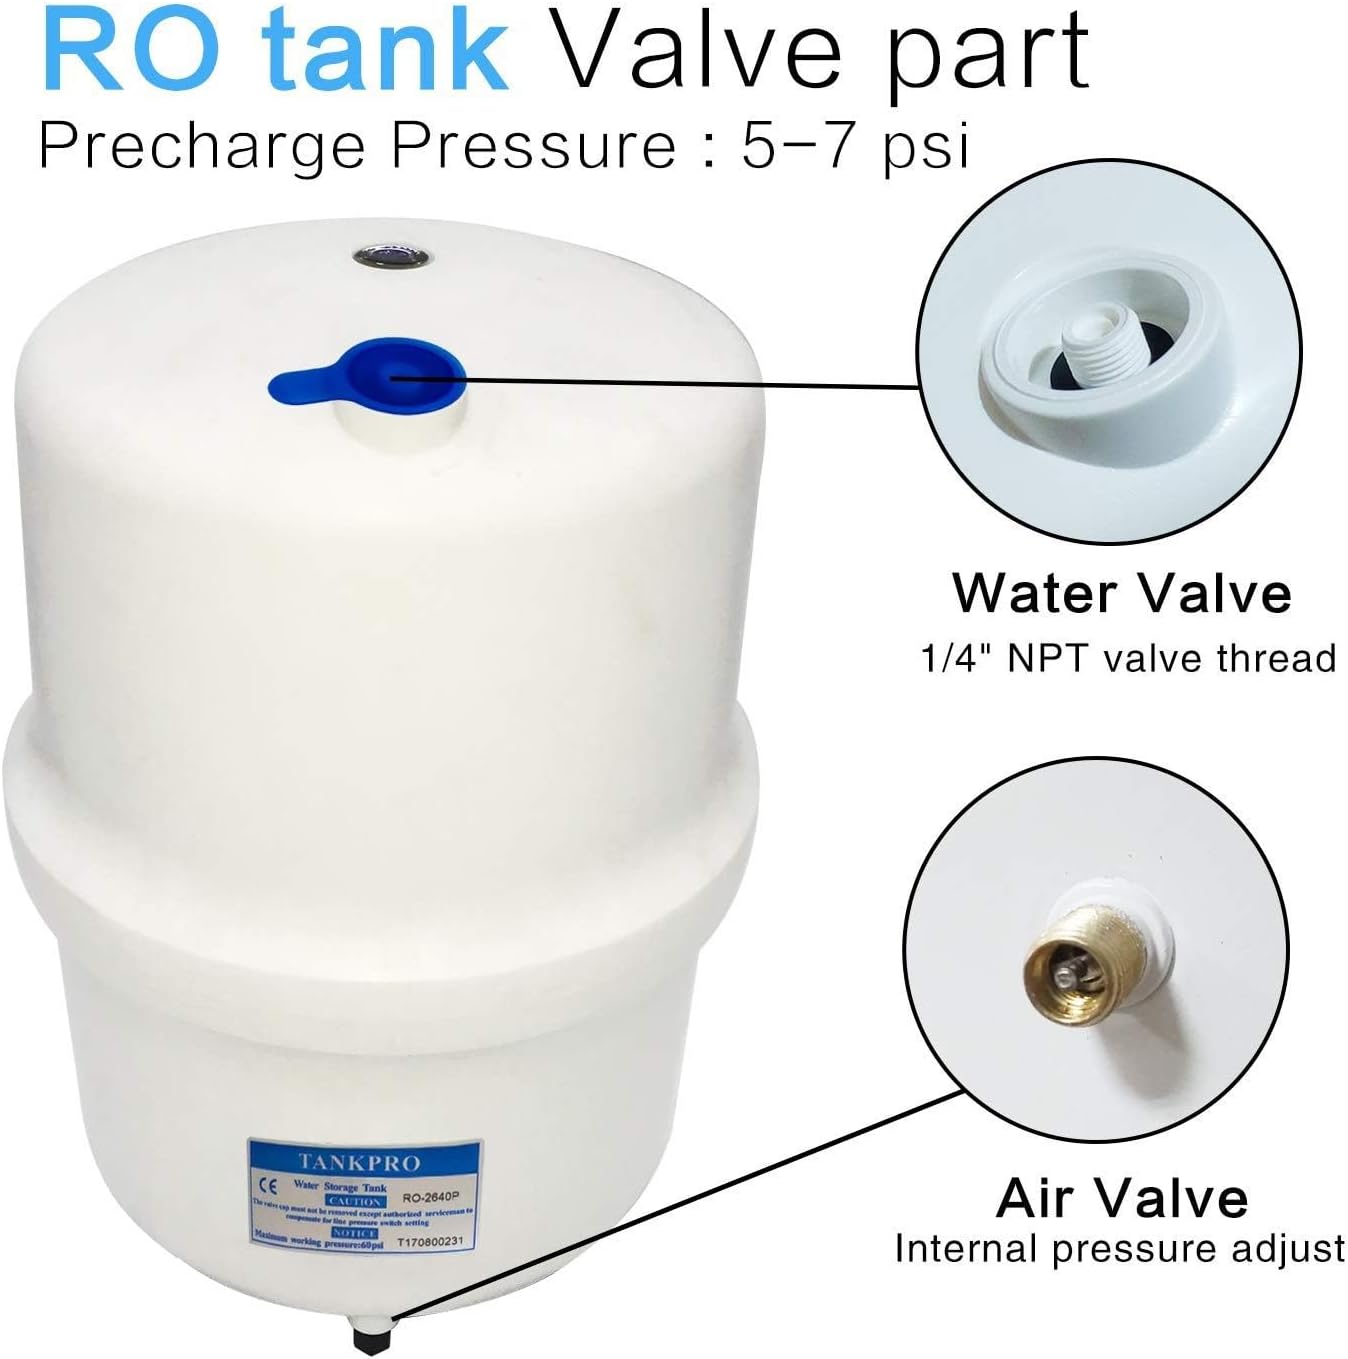
Image 5.1: Close-up view of the RO tank's top, highlighting the water valve (1/4" NPT valve thread) and the air valve for internal pressure adjustment. The pre-charge pressure of 5-7 psi is indicated.
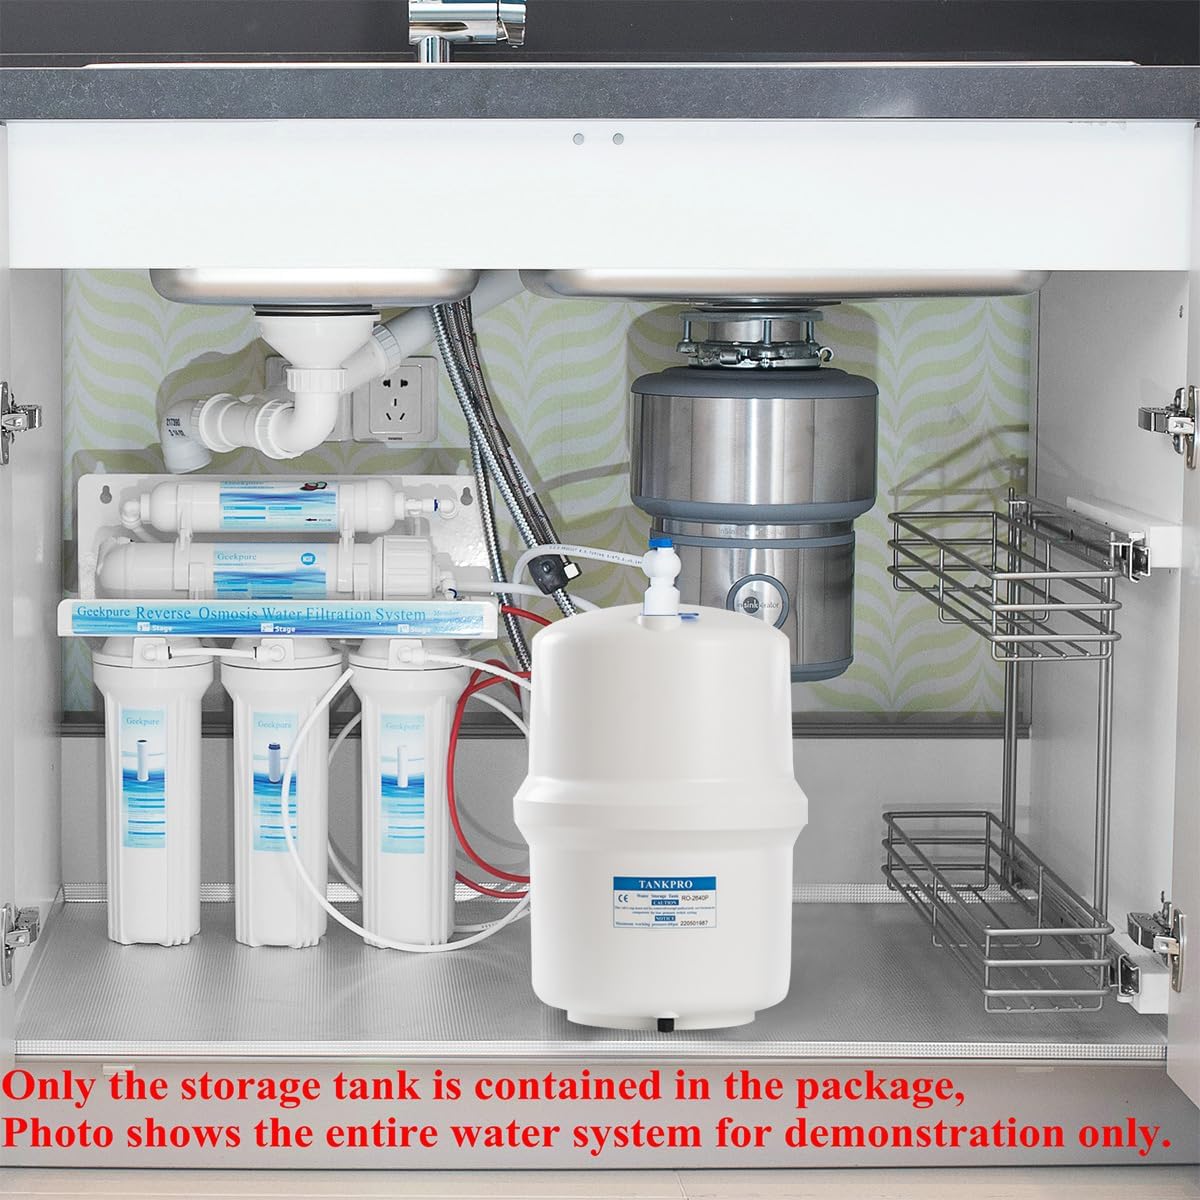
Image 5.2: An example installation showing the RO tank positioned under a sink alongside a complete reverse osmosis water filtration system. Note: Only the storage tank is included in this product package.
6. Operation
The Tankpro RO Water Storage Tank operates in conjunction with your Reverse Osmosis system. Once installed, the RO system will automatically fill the tank with purified water. The tank's internal diaphragm maintains pressure, allowing water to be dispensed on demand.
- The RO system will cycle on and off automatically, maintaining a balanced pressure between the tank and the auto shut-off valve.
- The tank's design ensures a continuous flow of water, improving the performance of your RO system, especially when connected to refrigerators or ice makers.
7. Maintenance
Regular maintenance ensures optimal performance and longevity of your RO water storage tank.
7.1 Pressure Adjustment
The tank comes pre-pressurized (5-7 psi when empty). Do not adjust the pressure of a new tank. The RO system is designed to work with this standard pressure.
If, after several months of use, you notice unusual water flow from your faucet when using the RO system, you may need to check the tank pressure. If there is no water leaking from the bottom air charge position or top thread, you can adjust the tank pressure to the correct level (5-7 psi when empty). Use an air pressure gauge to check and a bicycle pump or similar device to adjust the pressure via the air valve.
7.2 Tank Replacement
Replace the tank if you observe any of the following conditions:
- Water leaking from the bottom air charge position.
- Water leaking from the top thread connection.
- Significant and persistent loss of water pressure or capacity that cannot be resolved by adjusting the air pressure.
The typical service life of the tank is 5 years minimum.
8. Troubleshooting
| Problem | Possible Cause | Solution |
|---|---|---|
| Low water flow from faucet | Low tank pressure; clogged RO filters/membrane; faulty auto shut-off valve. | Check and adjust tank pressure to 5-7 psi (empty). Replace RO filters/membrane if due. Inspect auto shut-off valve. |
| RO system constantly running | Low tank pressure; faulty auto shut-off valve; system leak. | Check and adjust tank pressure. Inspect auto shut-off valve. Check for leaks in the system. |
| Water leaking from tank | Damaged tank diaphragm or shell; loose connections. | Tighten connections. If leak is from air charge position or top thread, replace the tank. |
| No water from faucet | Tank empty; RO system not producing water; tank valve closed. | Allow RO system to fill tank. Check if tank ball valve is open. Troubleshoot RO system if it's not producing water. |
9. Warranty and Support
For warranty information and technical support, please contact Geekpure customer service. Refer to your purchase documentation for specific warranty terms and contact details.
Manufacturer: tankpro (Brand: Geekpure)
UPC: 680577669376
ASIN: B07D9JKSLJ
Date First Available: February 28, 2018