1. Product Overview
The Simple Houseware Clothing Rack is a robust and versatile storage solution designed to organize your garments and accessories efficiently. Its industrial pipe design with a bronze finish offers a modern aesthetic while providing exceptional durability. This single rod model includes convenient bottom shelves for additional storage.
Key Features:
- Industrial Pipe Design: Sturdy metal frame with an elegant Bronze coating for a modern look.
- Hanging Rod with Stoppers: Keeps hangers in place and adds space for hats, bags & more.
- Bottom Storage Shelves: Wire shelves provide extra room for shoes, boots & accessories.
- Heavy-Duty Metal Build: Built for durability with a sleek, clean finish.

Image: The Simple Houseware Clothing Rack, showcasing its single hanging rod, bottom wire shelves, and overall bronze finish. Clothes are hung on the rod, and shoes and bags are placed on the shelves, demonstrating its storage capacity.
2. Safety Information
Please read and understand all safety instructions before assembling and using this product. Failure to follow these instructions may result in injury or damage to the product.
- Weight Capacity: Do not exceed the maximum load capacity of 100 pounds (approximately 45 kg) for the entire rack. Distribute weight evenly.
- Stability: Ensure the rack is placed on a flat, level surface to prevent tipping. Avoid placing heavy items disproportionately on one side.
- Child Safety: Keep small parts and packaging materials away from children. Do not allow children to climb on or play with the rack.
- Assembly: Assemble the product strictly according to the instructions. Do not force components together.
- Inspection: Periodically check all connections and fasteners to ensure they remain tight and secure.
3. Package Contents
Before beginning assembly, verify that all parts are present and undamaged. If any parts are missing or damaged, please contact Simple Houseware customer support.
- Main Frame Pipes (Vertical and Horizontal sections)
- Bottom Wire Shelves
- Connecting Screws and Fasteners
- Foot Caps
- Assembly Tool (e.g., Hex Key/Allen Wrench)
4. Assembly Instructions
Assembly typically requires one person and a screwdriver (not always included, but useful for some fasteners). Follow these steps carefully:
- Unpack and Identify Parts: Lay out all components on a clean, soft surface to prevent scratches. Refer to the parts list (if provided in physical manual) to identify each piece.
- Assemble Base Frame: Connect the horizontal base pipes to the vertical support pipes using the provided screws and the assembly tool. Ensure all connections are snug but do not overtighten initially.
- Attach Vertical Supports: Secure the remaining vertical pipes to the base frame.
- Install Top Rod: Connect the top horizontal hanging rod to the vertical supports. Ensure the stoppers on the rod are correctly oriented.
- Place Bottom Shelves: Carefully place the wire shelves onto the designated support bars at the bottom of the rack. Note that these shelves are designed to rest on the bars and may not snap into place, allowing for slight movement.
- Secure All Connections: Once all parts are in place, go back and firmly tighten all screws and fasteners.
- Attach Foot Caps: Press the protective foot caps onto the bottom of the rack's legs to prevent scratching floors.
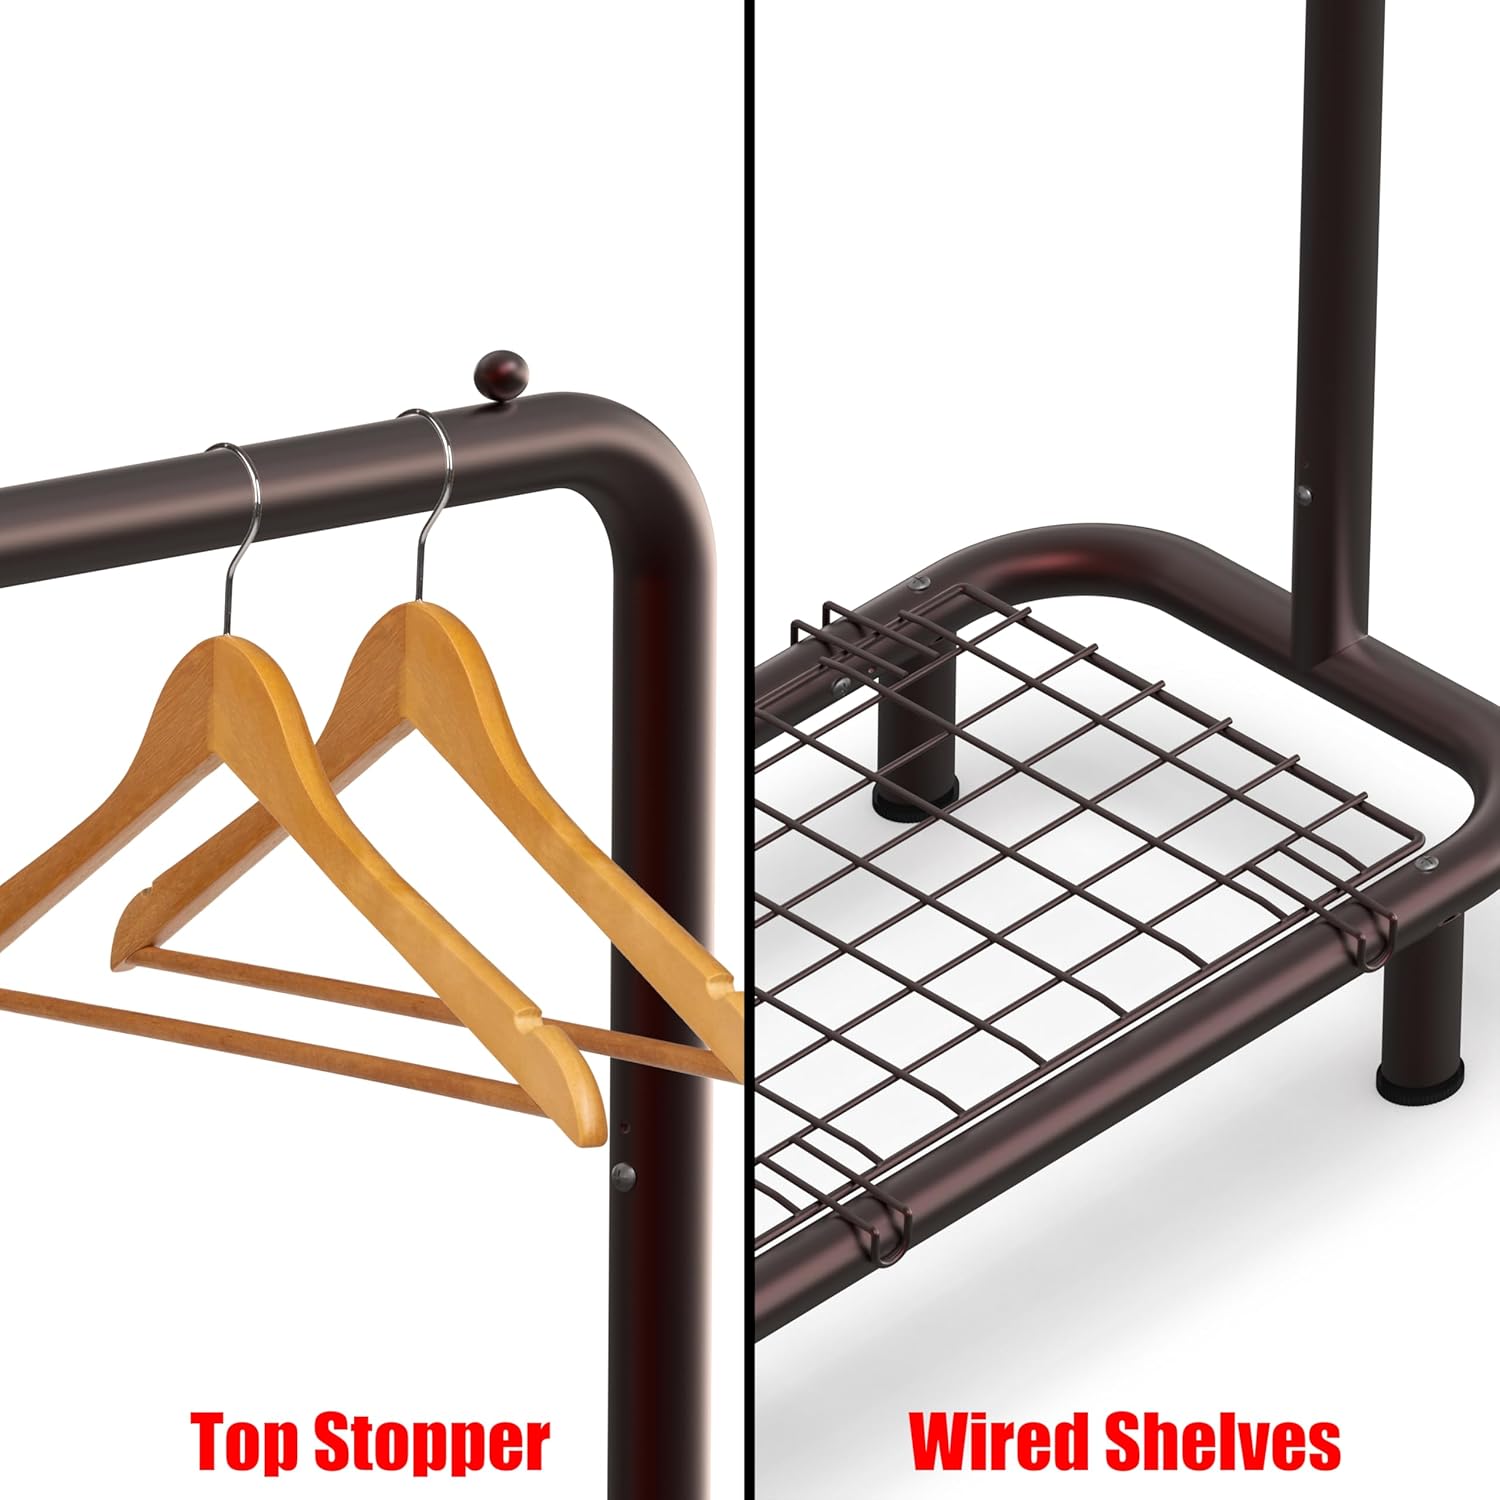
Image: A detailed view highlighting the top stopper on the hanging rod, which prevents hangers from sliding off, and the construction of the wired bottom shelves.
5. Usage Guidelines
This clothing rack is designed for convenient storage of various garments and accessories.
- Hanging Clothes: Use the top rod to hang shirts, dresses, coats, and other garments. The integrated stoppers help keep hangers from sliding off the ends.
- Bottom Storage: Utilize the wire shelves at the bottom for storing shoes, boots, bags, folded clothing, or storage bins.
- Weight Distribution: Always distribute the weight of your items evenly across the hanging rod and shelves to maintain stability and prevent strain on the frame.
- Placement: Place the rack on a stable, flat surface. Avoid placing it in high-traffic areas where it might be easily bumped or tipped.

Image: The clothing rack positioned in a bedroom, demonstrating its use for hanging pajamas and storing shoes on the bottom shelf, integrating seamlessly into a living space.
6. Maintenance
Regular maintenance will help prolong the life and appearance of your clothing rack.
- Cleaning: Wipe down the metal frame and wire shelves with a soft, damp cloth. Avoid using abrasive cleaners or harsh chemicals, as they may damage the finish.
- Dusting: Regularly dust the rack to prevent buildup.
- Fastener Check: Periodically inspect all screws and connections to ensure they are tight. Retighten if necessary to maintain stability.
- Rust Prevention: While the bronze coating offers protection, avoid prolonged exposure to moisture to prevent rust.
7. Troubleshooting
If you encounter any issues with your clothing rack, refer to the following common problems and solutions:
- Rack is Wobbly/Unstable:
- Ensure all screws and fasteners are fully tightened.
- Verify the rack is placed on a flat, level surface. Adjust the position if necessary.
- Check that all pipes are fully inserted into their connectors.
- Bottom Wire Shelves Slide Around:
- The wire shelves are designed to rest on the support bars and may have some movement. This is normal.
- Placing items with some weight (e.g., shoes, storage boxes) on the shelves will help keep them in place.
- Parts Not Fitting/Misaligned Screw Holes:
- Double-check that you are using the correct parts for each step as per the assembly diagram.
- Loosen all screws slightly, align the parts, and then retighten them evenly. Sometimes, a slight adjustment of connected pieces can help align stubborn holes.
- If a part appears defective (e.g., missing a screw hole), contact customer support for a replacement.
- Product Appears Old/Has Marks (e.g., rust):
- Inspect the packaging for signs of damage during transit.
- If the product arrived with significant cosmetic defects or rust, contact customer support immediately with photos for assistance.
Note on Videos: No official seller videos are available for embedding in this manual. All available videos are from customers and do not meet the criteria for inclusion.
8. Specifications
| Attribute | Detail |
|---|---|
| Brand | Simple Houseware |
| Model Number | BO-007-4 |
| Color | Bronze |
| Material | Metal |
| Product Dimensions (D x W x H) | 17"D x 42.75"W x 64"H |
| Item Weight | 11.9 Pounds |
| Maximum Weight Recommendation | 100 Pounds |
| Installation Type | Free Standing |
| Assembly Required | Yes |
| Special Feature | Wired Bottom Shelves |

Image: A diagram illustrating the precise dimensions of the Simple Houseware Clothing Rack, including its depth, width, and height.
9. Warranty and Support
For specific warranty information regarding your Simple Houseware Clothing Rack, please refer to the documentation included with your purchase or visit the official Simple Houseware website. Standard product warranties typically cover manufacturing defects for a limited period.
Extended protection plans may be available for purchase separately. These plans are not part of the manufacturer's standard warranty.
Customer Support:
If you have any questions, require assistance with assembly, or need to report a missing/damaged part, please contact Simple Houseware customer support through their official channels. Refer to the contact information provided on the product packaging or the Simple Houseware brand website.