AstroAI 250PSI-M
AstroAI Digital Tire Pressure Gauge with Inflator
Model: 250PSI-M
Introduction
Thank you for choosing the AstroAI Digital Tire Pressure Gauge with Inflator. This device is designed to provide accurate tire pressure readings and facilitate efficient tire inflation and deflation. Proper tire pressure is crucial for vehicle safety, fuel efficiency, and tire longevity. This manual will guide you through the setup, operation, and maintenance of your new tire inflator gauge.

Image: The AstroAI Digital Tire Pressure Gauge with Inflator, including the digital display, flexible hose, air chuck, and various accessories like valve caps and a valve core tool.
Why Proper Tire Pressure Matters
Maintaining correct tire pressure is vital for several reasons:
- Increased Safety: Properly inflated tires offer better handling, braking, and overall vehicle stability, reducing the risk of accidents.
- Improved Fuel Efficiency: Underinflated tires increase rolling resistance, leading to higher fuel consumption.
- Extended Tire Lifespan: Correct pressure ensures even tire wear, prolonging the life of your tires.
- Reduced Risk of Blowouts: Over or underinflation can lead to tire damage and sudden blowouts.

Image: Visual representation of the consequences of incorrect tire pressure, including increased fuel consumption, accelerated tire wear, and elevated accident risk.
Setup and Components
Before first use, familiarize yourself with the components and ensure proper setup.
Package Contents:
- AstroAI Digital Tire Pressure Gauge with Inflator
- 4 x Valve Caps
- 1 x Valve Core Tool
- 1 x Thread Seal Tape Roll
- 2 x AAA Batteries (pre-installed or included)
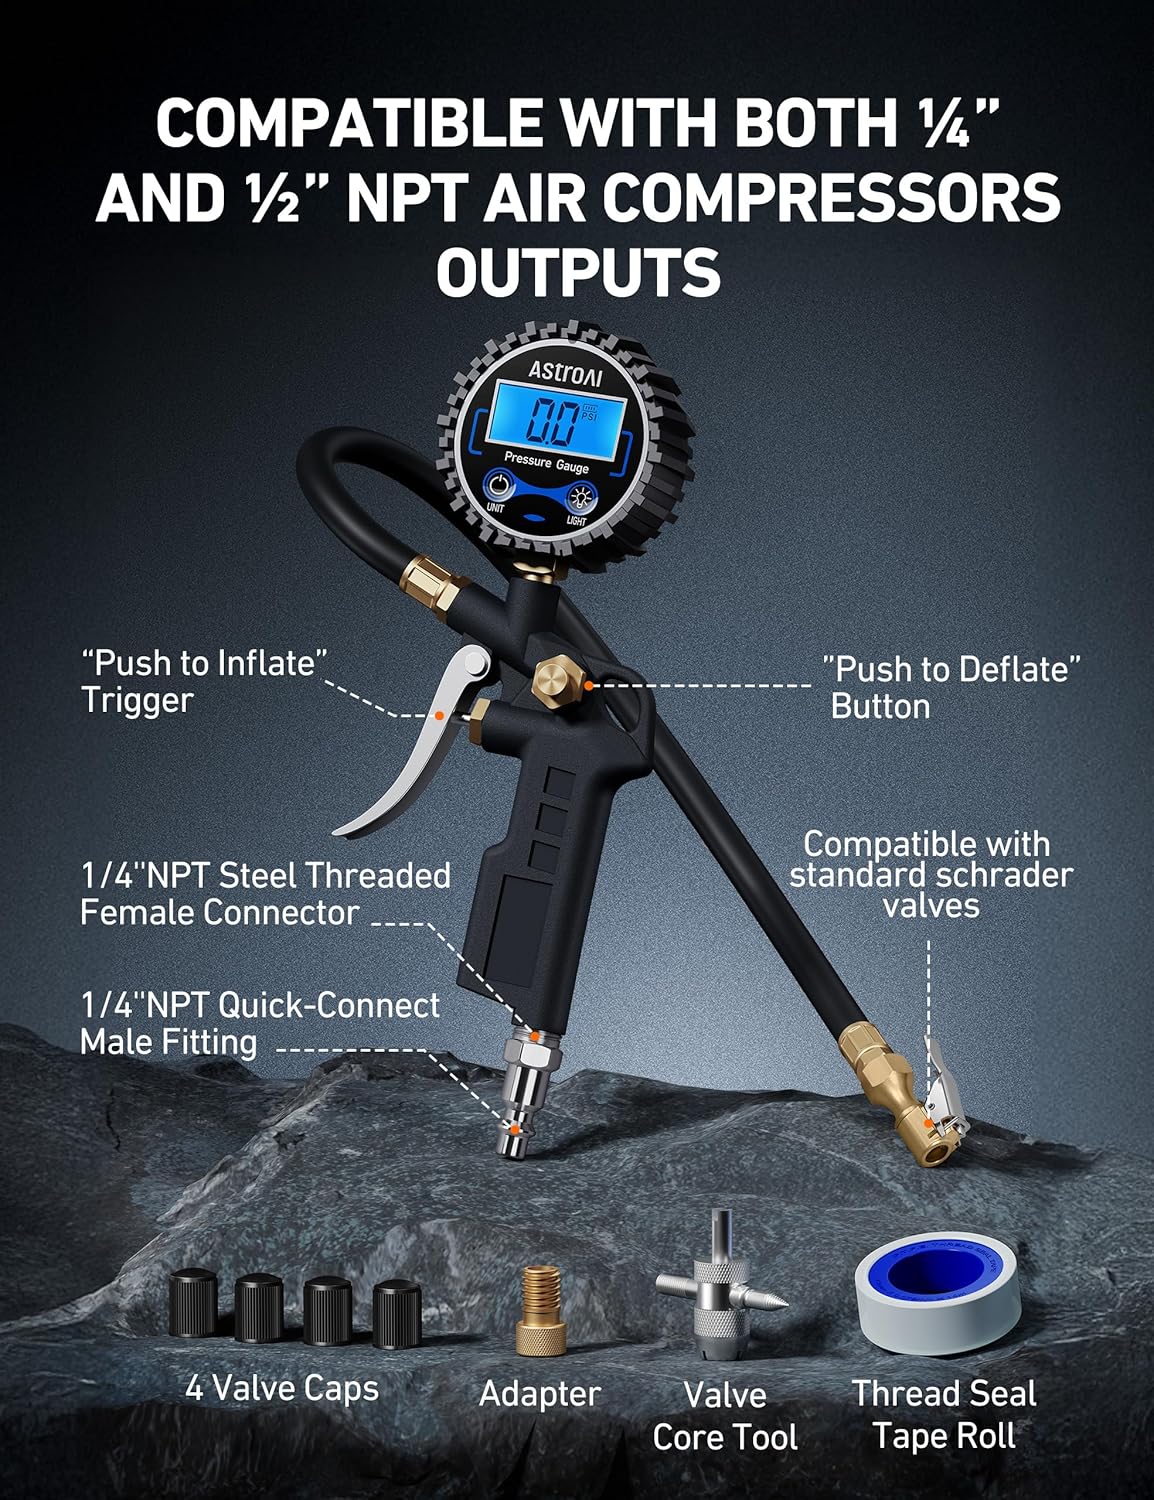
Image: Labeled diagram illustrating the main parts of the tire inflator gauge and included accessories, such as the inflation trigger, deflation button, various connectors, valve caps, and tools.
Battery Installation (if not pre-installed):
- Locate the battery compartment on the back of the digital gauge.
- Slide open the battery cover.
- Insert 2 AAA batteries, ensuring correct polarity (+/-).
- Close the battery cover securely.

Image: A detailed view of the battery compartment, showing the placement of two AAA batteries within the gauge unit.
Connecting to an Air Compressor:
The inflator is compatible with both ¼” and ½” NPT air compressor outputs. Ensure your air compressor is equipped with a quick-connect coupler.
- Attach the 1/4" NPT Quick-Connect Male Fitting of the inflator to your air compressor's quick-connect coupler.
- Ensure the connection is secure to prevent air leaks.
Operating Instructions
This section details how to use your AstroAI Digital Tire Pressure Gauge for checking, inflating, and deflating tires.
Power On/Off and Unit Selection:
- The gauge automatically turns on when pressurized air is detected.
- Press the "UNIT" button to cycle through measurement units: PSI, BAR, KPA, and KG/CM².
- The gauge automatically turns off after 20 seconds of inactivity to conserve battery.
- Press the "LIGHT" button to activate the backlight for improved visibility in low-light conditions.
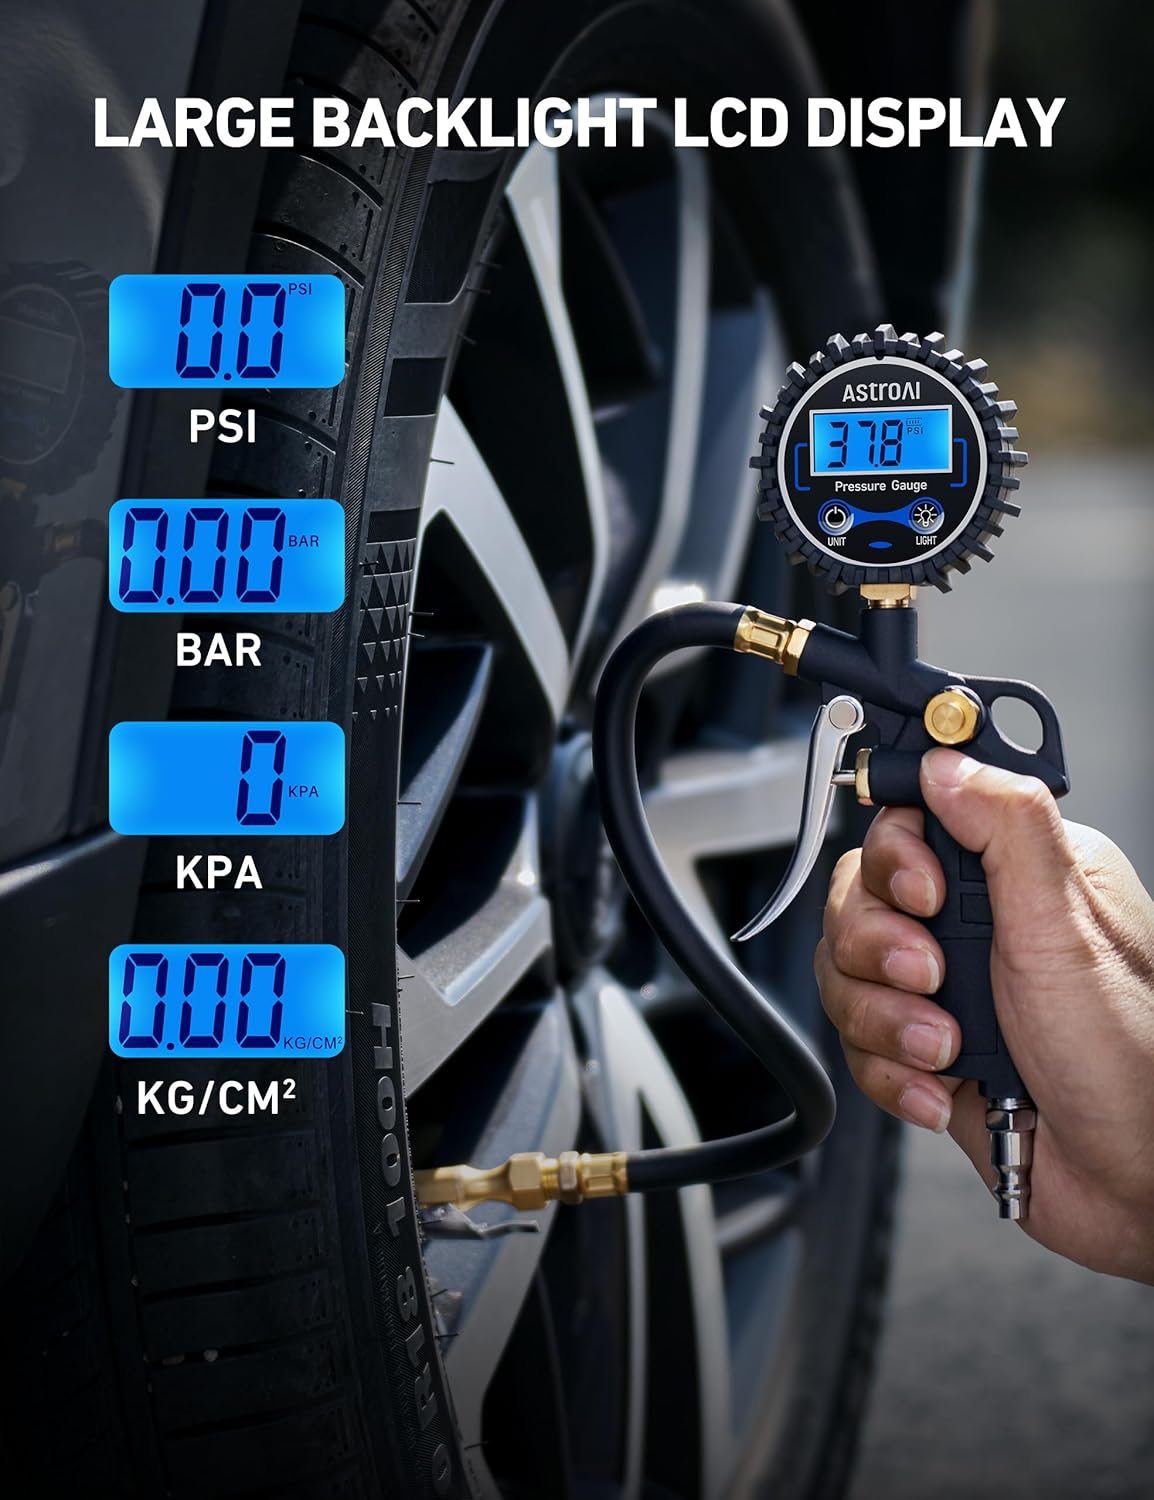
Image: The digital display of the gauge showing various pressure units (PSI, BAR, KPA, KG/CM²) and its clear backlight for easy reading.
The gauge provides accurate readings with 0.1 display resolution, allowing for precise monitoring.
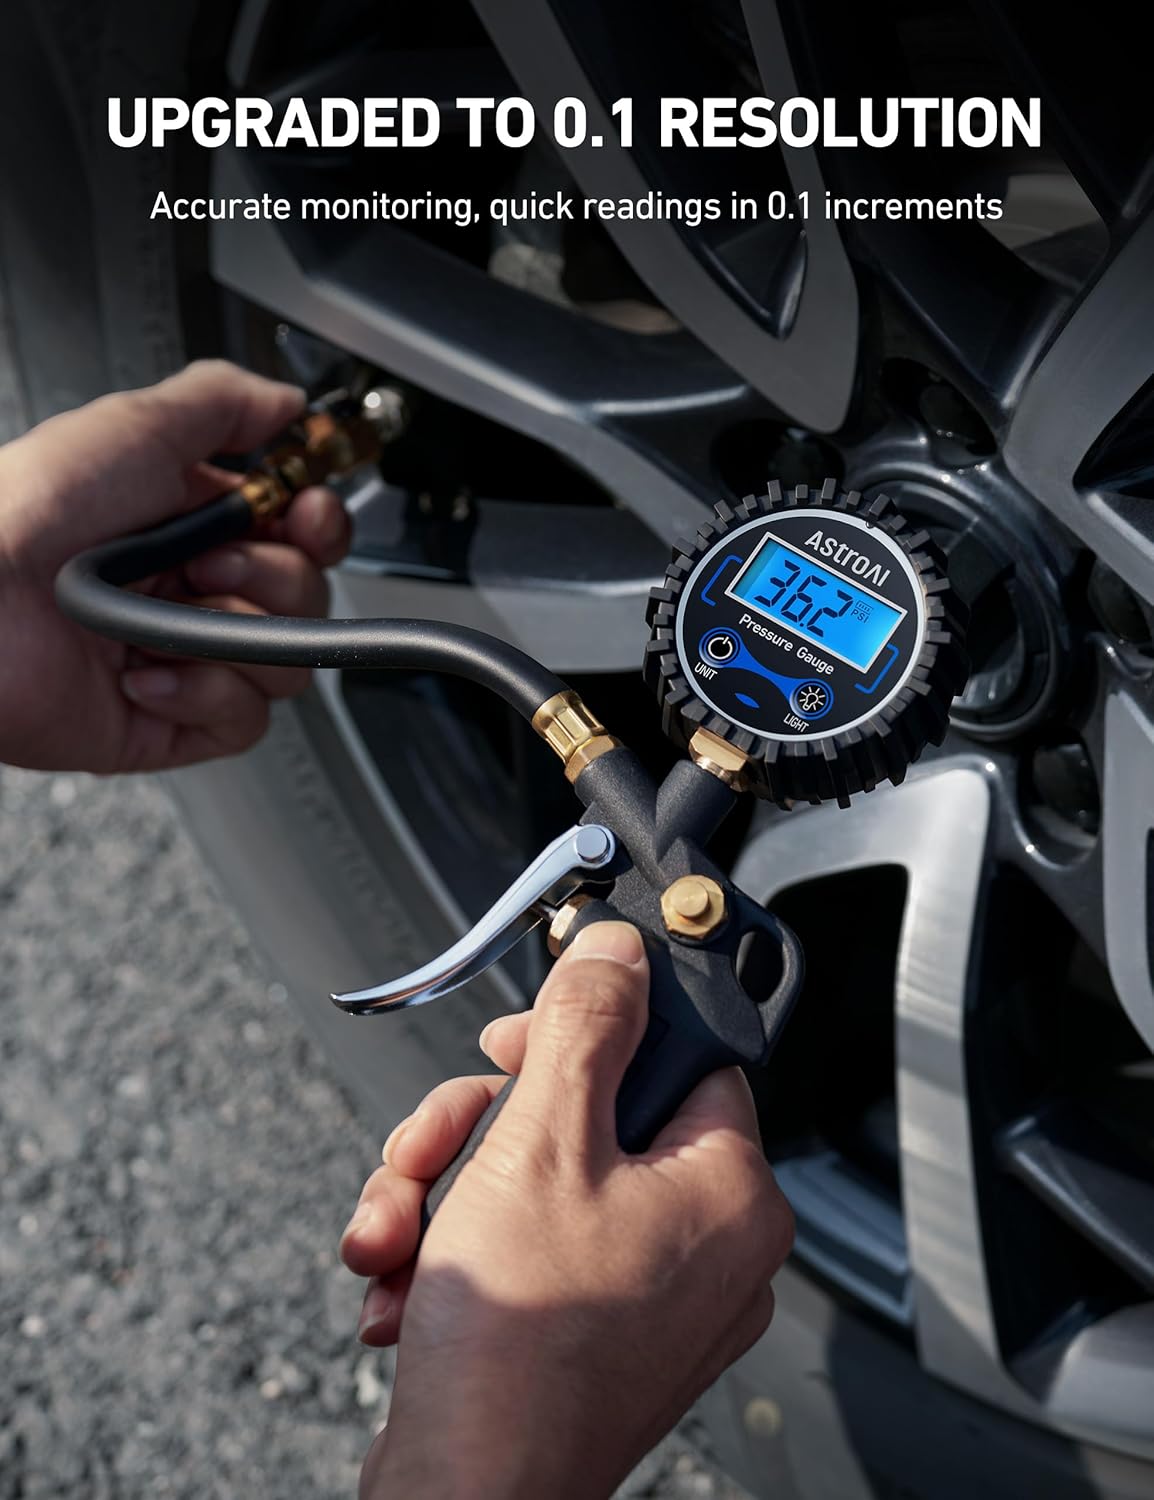
Image: A close-up of the digital display showing a reading of 36.2 PSI, emphasizing the gauge's high resolution for precise measurements.
Checking Tire Pressure:
- Ensure the tire is cold (driven less than a mile).
- Remove the valve cap from the tire stem.
- Firmly press the brass air chuck onto the tire valve stem. You may hear a slight hiss; this is normal.
- The digital display will show the current tire pressure.
- Remove the chuck from the valve stem.
- Replace the valve cap.

Image: A user demonstrating how to check tire pressure by connecting the gauge to a vehicle's tire valve, with the digital display showing the reading.
Inflating Tires:
- Connect the inflator to your air compressor as described in the Setup section.
- Attach the brass air chuck to the tire valve stem.
- Press the "Push to Inflate" trigger (thumb trigger) to begin inflating the tire. The display will show the pressure increasing.
- Release the trigger periodically to check the current pressure reading.
- Inflate to the recommended PSI for your vehicle (found in your vehicle's owner's manual or on a sticker inside the driver's side door jamb).
- Once the desired pressure is reached, release the trigger and remove the chuck.
- Replace the valve cap.

Image: A user inflating a car tire with the AstroAI gauge, demonstrating the connection to an air compressor and the process of inflation.
Deflating Tires:
- Attach the brass air chuck to the tire valve stem.
- Press the "Push to Deflate" button (bleed valve) to release air from the tire. The display will show the pressure decreasing.
- Release the button periodically to check the current pressure reading.
- Once the desired pressure is reached, release the button and remove the chuck.
- Replace the valve cap.

Image: A user deflating a car tire using the AstroAI gauge, illustrating the use of the deflate button to release air.
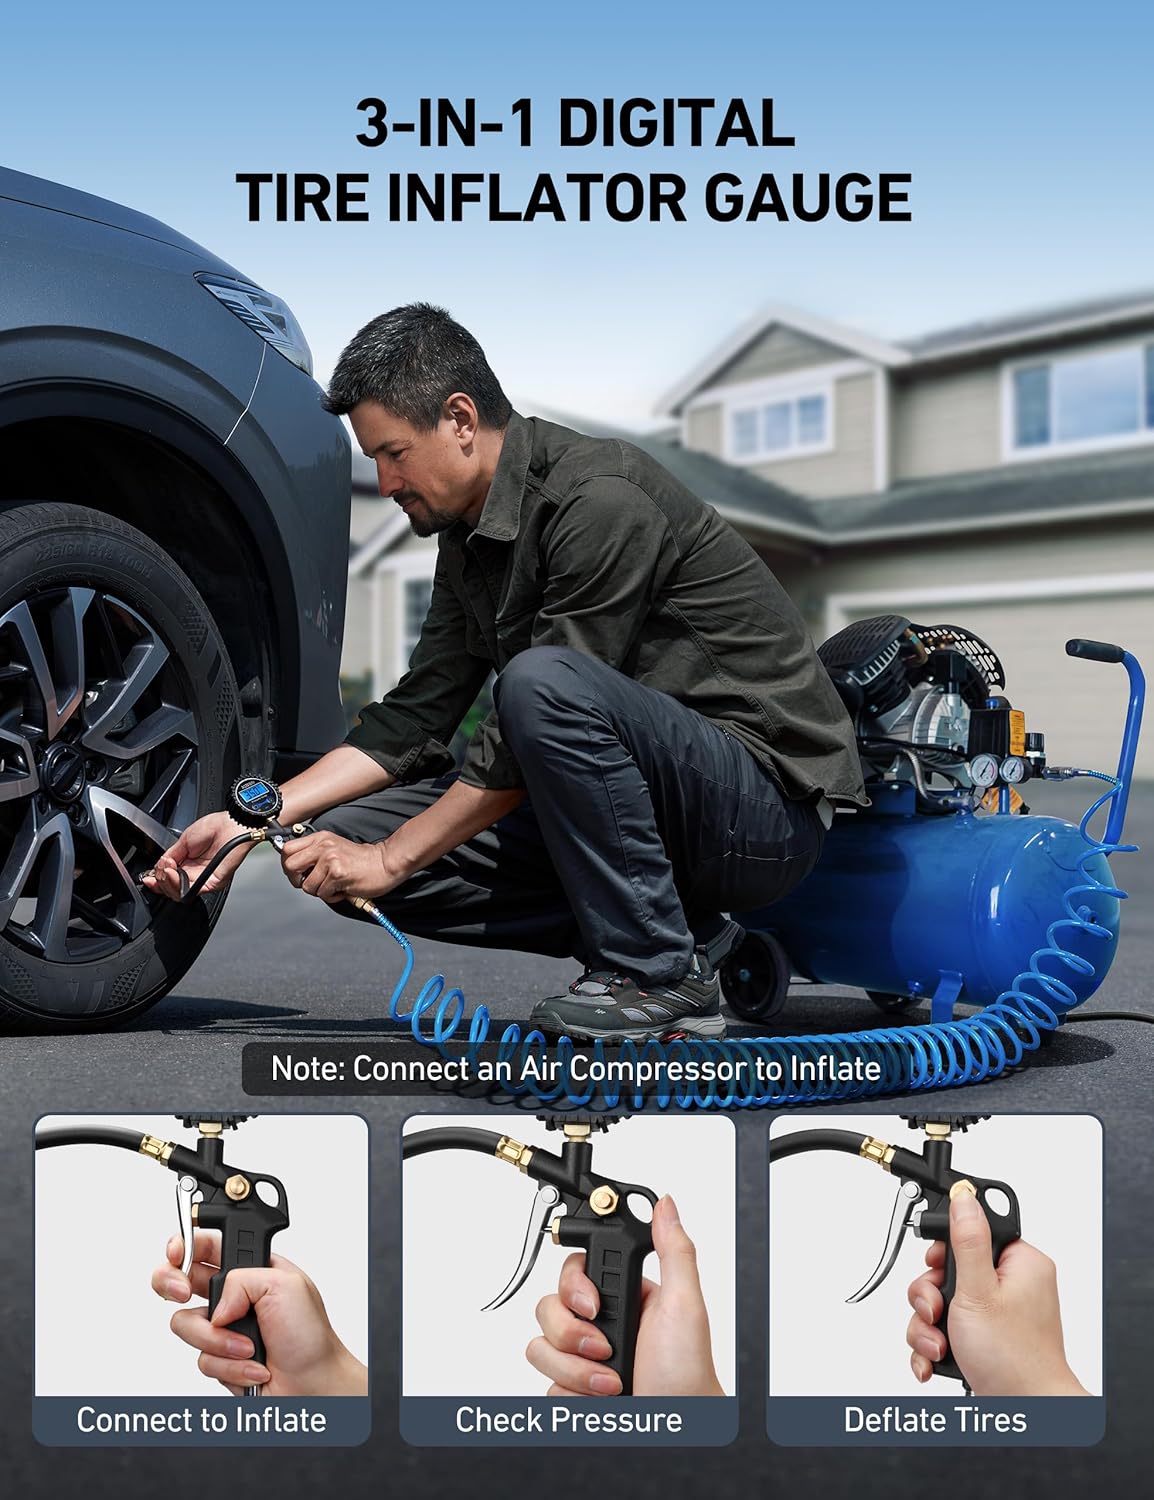
Image: A composite image demonstrating the three primary functions of the gauge: connecting for inflation, checking pressure, and deflating tires.
Versatile Use:
The AstroAI Digital Tire Pressure Gauge is suitable for a wide range of vehicles, including cars, trucks, motorcycles, SUVs, off-road vehicles, RVs, and trailers.

Image: An illustration highlighting the broad compatibility of the gauge with different vehicle types, from motorcycles to large trucks.
Maintenance
Proper maintenance will ensure the longevity and accuracy of your AstroAI Digital Tire Pressure Gauge.
- Cleaning: Wipe the gauge with a soft, dry cloth. Do not use abrasive cleaners or immerse the unit in water.
- Storage: Store the gauge in a cool, dry place away from direct sunlight and extreme temperatures.
- Battery Replacement: If the display becomes dim or unresponsive, replace the AAA batteries. Always replace both batteries at the same time.
- Check Connections: Periodically inspect the hose and connections for any signs of wear or damage. Ensure the quick-connect coupler and air chuck are clean and free of debris.
Troubleshooting
If you encounter issues with your AstroAI Digital Tire Pressure Gauge, refer to the following common problems and solutions:
| Problem | Possible Cause | Solution |
|---|---|---|
| Gauge does not turn on. | Dead or incorrectly installed batteries. | Replace batteries, ensuring correct polarity. |
| Inaccurate readings. | Gauge not properly seated on valve stem; valve stem leak; gauge malfunction. | Ensure firm, straight connection to valve stem. Check valve stem for damage. If problem persists, contact support. |
| Air leaks during inflation/deflation. | Loose connections; damaged O-rings/seals; improper chuck attachment. | Tighten all connections. Inspect and replace any damaged seals. Ensure the chuck is fully and squarely seated on the valve stem. |
| Display is dim or flickering. | Low battery power. | Replace batteries. |
If you experience issues not listed here or if the problem persists after attempting the solutions, please contact AstroAI customer support.
Specifications
| Feature | Detail |
|---|---|
| Brand | AstroAI |
| Model | 250PSI-M |
| Material | Brass, Stainless Steel |
| Measurement Range | 3-250 PSI (0.2-17.2 Bar; 20-1724 Kpa; 0.2-17.5 kg/cm²) |
| Display Resolution | 0.1 PSI |
| Accuracy | ±1% |
| Power Source | 2 x AAA Batteries |
| Auto-Off | 20 seconds of inactivity |
| Dimensions (L x W x H) | 4.96 x 1.06 x 1.5 inches |
| Item Weight | 0.66 Pounds (approx. 10.6 ounces) |
| Compatible Air Compressor Outputs | ¼” and ½” NPT |
| Valve Compatibility | Standard Schrader Valves |
Warranty Information
AstroAI products come with a 1-year limited warranty from the date of purchase. This warranty covers defects in materials and workmanship under normal use. It does not cover damage resulting from misuse, accident, alteration, neglect, or unauthorized repair.
For warranty claims or further details, please retain your proof of purchase and contact AstroAI customer support.
Customer Support
If you have any questions, concerns, or require assistance with your AstroAI Digital Tire Pressure Gauge, please do not hesitate to contact our dedicated customer support team.
AstroAI Customer Service:
- Website: www.astroai.com
- Email: support@astroai.com
- Phone: (Refer to AstroAI website for regional contact numbers)
Please have your product model number (250PSI-M) and purchase details ready when contacting support.
Ask a question about this manual
Ask about setup, troubleshooting, compatibility, parts, safety, or missing instructions. Manuals+ will review the question and use this page’s manual context to help answer it.