1. Introduction
The YOJOCK USB Voltage Current Tester (Model UT003-JP) is a versatile diagnostic tool designed to monitor the electrical performance of your USB and Type-C devices. It provides real-time data on voltage, current, power, accumulated capacity, and more, helping you understand charging efficiency and identify potential issues with chargers, cables, or devices.
This manual will guide you through the features, setup, operation, and specifications of your new tester.
2. Product Features
- Multi-functional USB Tester: Easily check voltage (V), current (A), time, power (W), accumulated current (Ah), and accumulated power (Wh) for both USB and the latest Type-C devices.
- Charging Safety Protection: Equipped with protection functions against over-voltage, under-voltage, and over-current. Features a settable power-on time from 1 to 24 hours to protect your devices like mobile batteries, iPhones, and Android smartphones.
- Quick Charge 3.0 Compatibility: Supports fast charging protocols including QC2.0/QC3.0/MTK-PE/iPhone/Android. Capable of measuring voltages from 3-30V and currents from 0-5.1A. Useful for mobile battery capacity testing and verifying USB cable charging performance.
- OTG Adapter Function: The Type-C tester can connect smartphones to USB memory, gamepads, or keyboards. (Note: The Type-C output interface requires a fast-charging device to be connected before the display lights up. If only the input port is connected, the display will not light up. Some smartphones may not be compatible.)
- Rich Data Display & Compact Design: Displays eight types of information at a glance: Current (A), Accumulated Current (mAh), Voltage (V), Power (W), Accumulated Power (Wh), Temperature (°C), Power-on Time (h:m:s), and Resistance (Ω). A single button on the top right allows for switching between display modes.
3. Package Contents
The product package includes the following items:
- USB Voltage Current Tester Main Unit
- Transparent Protective Case
- English Instruction Manual
- OTG Adapter
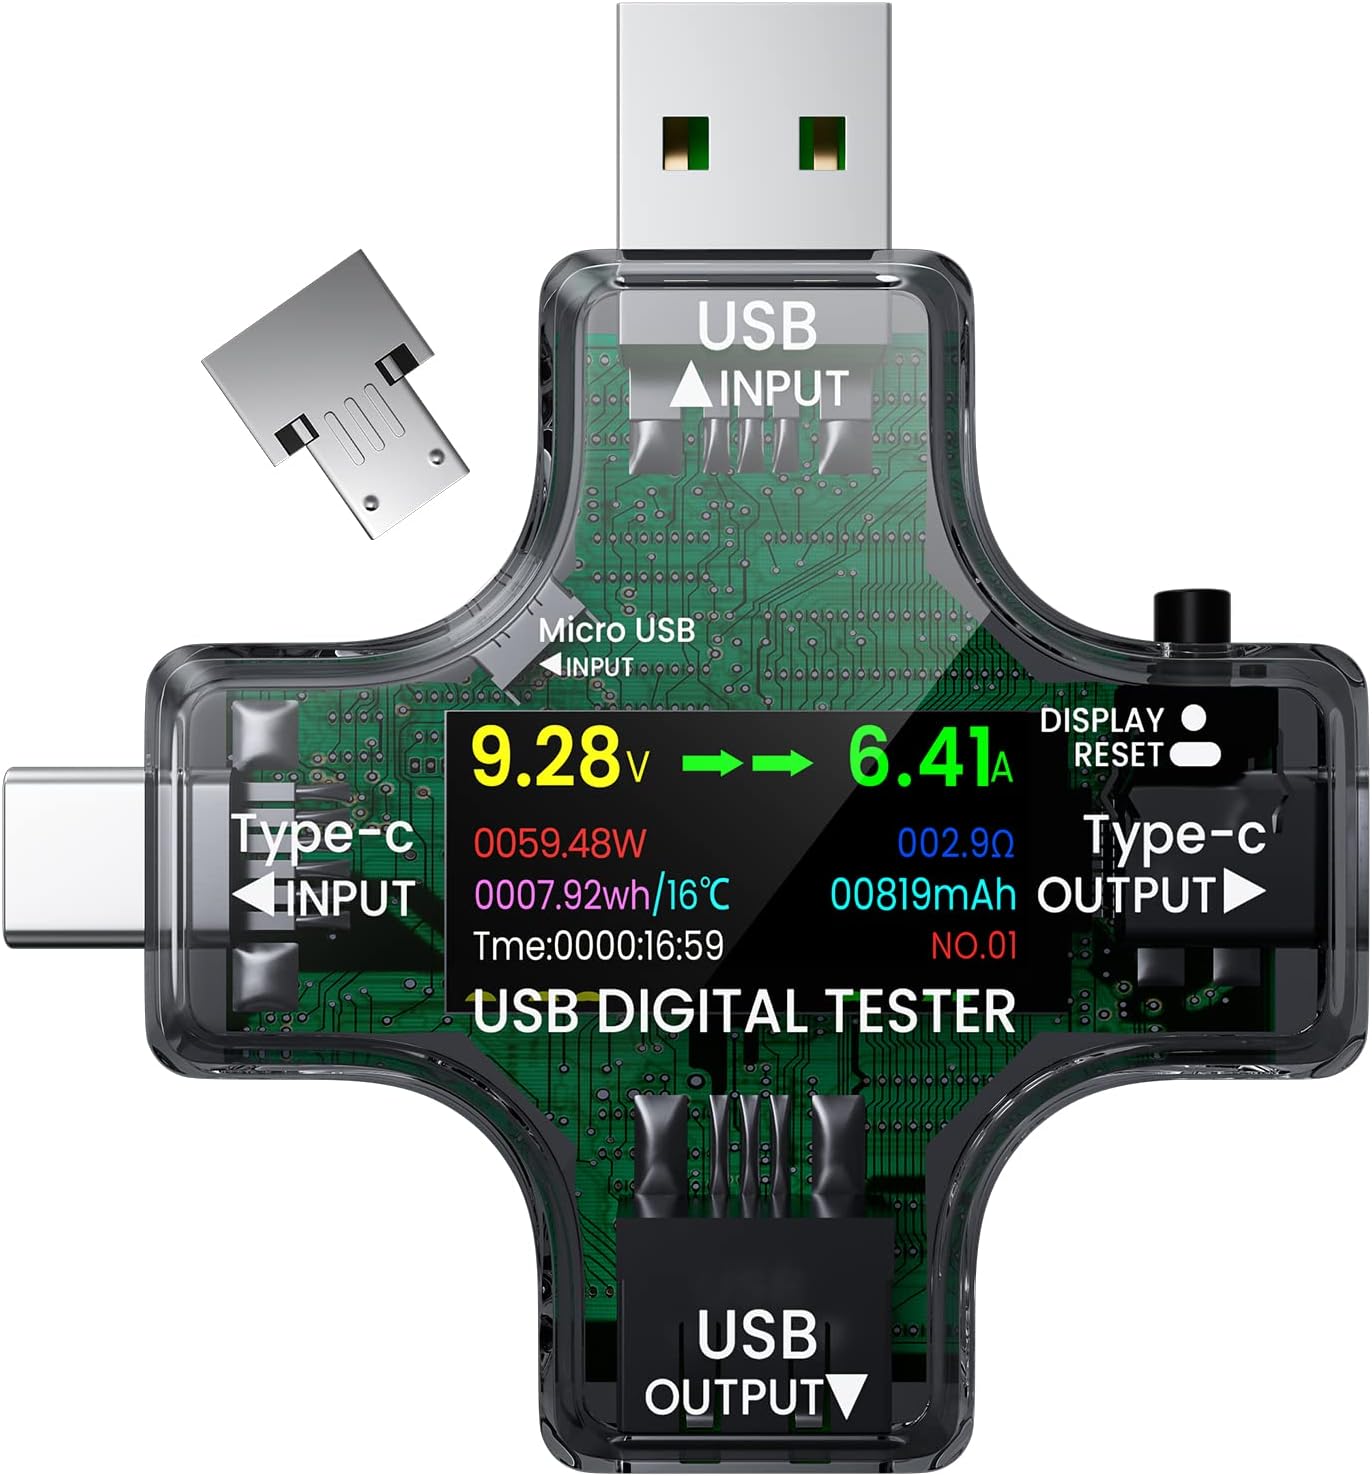
Image: YOJOCK USB Voltage Current Tester package contents.
4. Product Overview
The YOJOCK USB Voltage Current Tester features multiple input and output ports for broad compatibility and a clear display for easy monitoring.
Image: Close-up of the tester showing USB-A input, Type-C input, Micro USB input, USB-A output, Type-C output, and the display screen.
- USB Input (USB-A): Connects to standard USB power sources.
- Type-C Input: Connects to Type-C power sources.
- Micro USB Input: Used for the OTG adapter function.
- USB Output (USB-A): Connects to devices for charging or data transfer.
- Type-C Output: Connects to Type-C devices for charging or data transfer.
- Display Screen: Shows real-time measurement data.
- Function Button: Used to switch display modes and reset data.
5. Setup and Basic Operation
Follow these steps to set up and begin using your USB Voltage Current Tester:
- Connect to Power Source: Plug the USB-A or Type-C input of the tester into a power source (e.g., USB charger, power bank, computer USB port).
- Connect Your Device: Plug your device (e.g., smartphone, tablet, laptop) into the corresponding USB-A or Type-C output port of the tester.
- Power On: The tester will automatically power on and display measurements once both a power source and a load device are connected.

Image: Connection diagram showing the tester connected to various input and output devices.
5.1. Display Mode Switching
Press the function button once to cycle through the different display screens, showing various parameters such as voltage, current, power, accumulated capacity, temperature, and time.
5.2. Resetting Data
- Capacity (mAh) Reset: Double-click the function button to reset the accumulated capacity (mAh) value.
- Power (Wh) Reset: Triple-click the function button to reset the accumulated power (Wh) value.
- Time (h:m:s) Reset: Quadruple-click the function button to reset the timer (h:m:s).
Video: Demonstrates unboxing, connecting the tester, and cycling through display modes and resetting data by pressing the function button.
6. Display Modes
The tester offers multiple display interfaces to show various electrical parameters. Press the function button to switch between these modes.

Image: Examples of the multi-screen interface displaying various data points.
- Main Display: Shows Voltage (V), Current (A), Power (W), Accumulated Capacity (mAh), Accumulated Power (Wh), Temperature (°C), Time (h:m:s), and Resistance (Ω).
- D+/D- Voltage Display: Shows the voltage on the D+ and D- data lines, useful for diagnosing USB data communication issues.
- Voltage/Current Thresholds: Displays set thresholds for voltage and current, indicating potential over/under conditions.
- Screen Rotation: Allows for rotating the display orientation for better viewing angles.
7. OTG Function
The included OTG adapter allows you to expand the functionality of your smartphone or tablet by connecting USB peripherals through the tester.
- Insert the OTG adapter into the Micro USB input port of the tester.
- Connect the tester's Type-C output to your smartphone or tablet.
- Plug your USB peripheral (e.g., USB flash drive, keyboard, mouse, gamepad) into the USB-A output port of the tester.

Image: Using the OTG adapter to connect a keyboard and mouse to a tablet via the tester.
Note: Compatibility with OTG functions may vary depending on your smartphone or tablet model.
8. Safety Precautions
- Do not expose the device to water, moisture, or extreme temperatures.
- Avoid disassembling or modifying the tester, as this may void the warranty and pose safety risks.
- Ensure that input and output connections are made correctly to prevent damage to the tester or connected devices.
- When testing Power Delivery (PD) chargers, the tester's display may not light up if only the PD power source is connected without a load device. Connect a device to the output to activate the display.

Image: Tester display behavior when connected to a PD charger with and without a load.
9. Specifications
| Parameter | Value |
|---|---|
| Voltage Measurement Range | 3.60V ~ 32.0V (Resolution: 0.01V) |
| Current Measurement Range | 0.00 ~ 8.0A (Resolution: 0.01A) |
| Capacity Accumulation Range | 0 ~ 99999mAh (Resolution: 0.001Ah) |
| Power Accumulation Range | 0 ~ 999999mWh (Resolution: 0.001Wh) |
| Power Measurement Range | 000.00 ~ 150.00 W (Resolution: 0.01W) |
| Impedance Measurement Range | 1 ~ 999.9Ω (Resolution: 0.1Ω) |
| Temperature Measurement Range | 0 ~ 80°C (Resolution: 1°C) |
| Timing Range | 999 hours 59 minutes 59 seconds |
| Input Interface | 5A High Current USB / Type-C |
| Output Interface | USB / Type-C |
| USB D+ Voltage Range | 0V ~ 2.99V |
| USB D- Voltage Range | 0V ~ 2.99V |
| Self-consumption Current | 0.02A |
| Product Model Number | FT-ut003 |
| Dimensions | 8.4 x 7.4 x 1.9 cm |
| Weight | 30 g |
10. Troubleshooting
- Display Not Lighting Up: If the display does not light up when connected to a power source, ensure that a load device (e.g., smartphone, tablet) is also connected to the tester's output. Some power sources, especially PD chargers, require a load to activate.
- Inaccurate Readings: While the product is factory calibrated, significant deviations over time might occur. Refer to the calibration function in section 5.2 if you suspect inaccuracies.
- OTG Function Not Working: Verify that your smartphone or tablet supports OTG functionality. Not all devices are compatible.
- No Readings: Check all cable connections to ensure they are secure and correctly oriented. Try different cables or power sources to isolate the issue.
11. Warranty and Support
For warranty information, please refer to the terms and conditions provided by your retailer or visit the official YOJOCK website.
If you encounter any issues or require further assistance, please contact YOJOCK customer support through their official channels.