HDView 4MP PoE IP Bullet Camera
HDView 4MP PoE IP Bullet Camera User Manual
Model: 4MP PoE IP Bullet Camera (ASIN: B07CZ65GCD)
1. Introduction
This manual provides detailed instructions for the installation, operation, maintenance, and troubleshooting of your HDView 4MP PoE IP Bullet Camera. Please read this manual thoroughly before using the product to ensure proper setup and functionality. Keep this manual for future reference.
2. Product Overview
The HDView 4MP PoE IP Bullet Camera is a high-resolution surveillance device designed for both indoor and outdoor security applications. It features Power over Ethernet (PoE) for simplified installation, H.265 encoding for efficient storage, and advanced night vision capabilities.

Figure 2.1: HDView 4MP PoE IP Bullet Camera. This image shows the white bullet-style camera with its mounting bracket.

Figure 2.2: Key features of the HDView camera, including H.265 encoding, 4MP Full HD resolution, 106-degree view, IP66 weatherproof rating, and night vision.

Figure 2.3: The camera's weatherproof design, highlighting its waterproof, dustproof, heat dissipation, and tamper-proof qualities, suitable for outdoor installation.
3. Setup
3.1 Physical Installation
The camera is designed for flexible mounting on walls or ceilings. Ensure the mounting surface is strong enough to support the camera's weight. The camera's angle can be adjusted after mounting.
- Mounting Location: Choose a location that provides the desired field of view and is within range of your network cable. Consider environmental factors for outdoor installations.
- Mounting Procedure: Secure the camera's base to the chosen surface using appropriate screws and anchors. Adjust the pan, tilt, and rotation angles as needed.
3.2 Network Connection (PoE)
This camera supports Power over Ethernet (PoE), allowing both power and data transmission through a single Ethernet cable (Cat 5 or Cat 6). This simplifies wiring and installation.
- Connect to PoE Switch/Injector: Connect one end of an Ethernet cable to the camera's RJ45 port and the other end to a PoE-enabled switch or PoE injector.
- Non-PoE Setup (Optional): If a PoE switch/injector is not available, connect the camera to a standard network switch using an Ethernet cable and provide power via a DC12V power adapter (not included).
3.3 Initial Configuration
After physical installation and network connection, the camera requires initial configuration. This typically involves discovering the camera on your network, setting an IP address, and creating user credentials.
- Software Tool: Use the manufacturer's provided software tool (if available) or a standard IP camera discovery tool to locate the camera on your network.
- Default Credentials: Refer to the camera's packaging or manufacturer's website for default login credentials. Change these immediately after initial access for security.
- Network Settings: Configure network settings such as IP address (static or DHCP), subnet mask, and gateway.
4. Operating Instructions
4.1 Remote Viewing
The camera supports remote viewing on various devices, allowing you to monitor your premises from anywhere.
- Mobile App: Download the official mobile application (e.g., for iPhone, Android) from your device's app store. Follow the in-app instructions to add your camera.
- Web Browser: Access the camera's web interface by entering its IP address into a web browser on your computer.
- NVR/VMS: Integrate the camera with a Network Video Recorder (NVR) or Video Management Software (VMS) for centralized monitoring and recording.

Figure 4.1: The camera supports multi-platform viewing, allowing users to access live feeds from iPhones, Android phones, iPads, and computers.
4.2 Motion Detection and Alerts
Configure motion detection settings to receive alerts when activity is detected in specified areas.
- Detection Zones: Define specific areas within the camera's view for motion detection.
- Sensitivity: Adjust the motion detection sensitivity to minimize false alarms.
- Alerts: Set up notifications via email, push notifications to your mobile device, or other integrated alert systems.
4.3 Video Recording and H.265 Encoding
The camera utilizes H.265 encoding technology, which offers significant advantages over older H.264 compression.
- Efficient Compression: H.265 encoding reduces bandwidth consumption and storage requirements by over 50% compared to H.264, while maintaining high image quality.
- Recording Options: Configure continuous recording, scheduled recording, or motion-triggered recording.
- Storage: Recordings can be stored on a Network Video Recorder (NVR) or remote network storage.

Figure 4.2: Comparison illustrating that H.265 consumes significantly less bandwidth than H.264 for similar image quality.
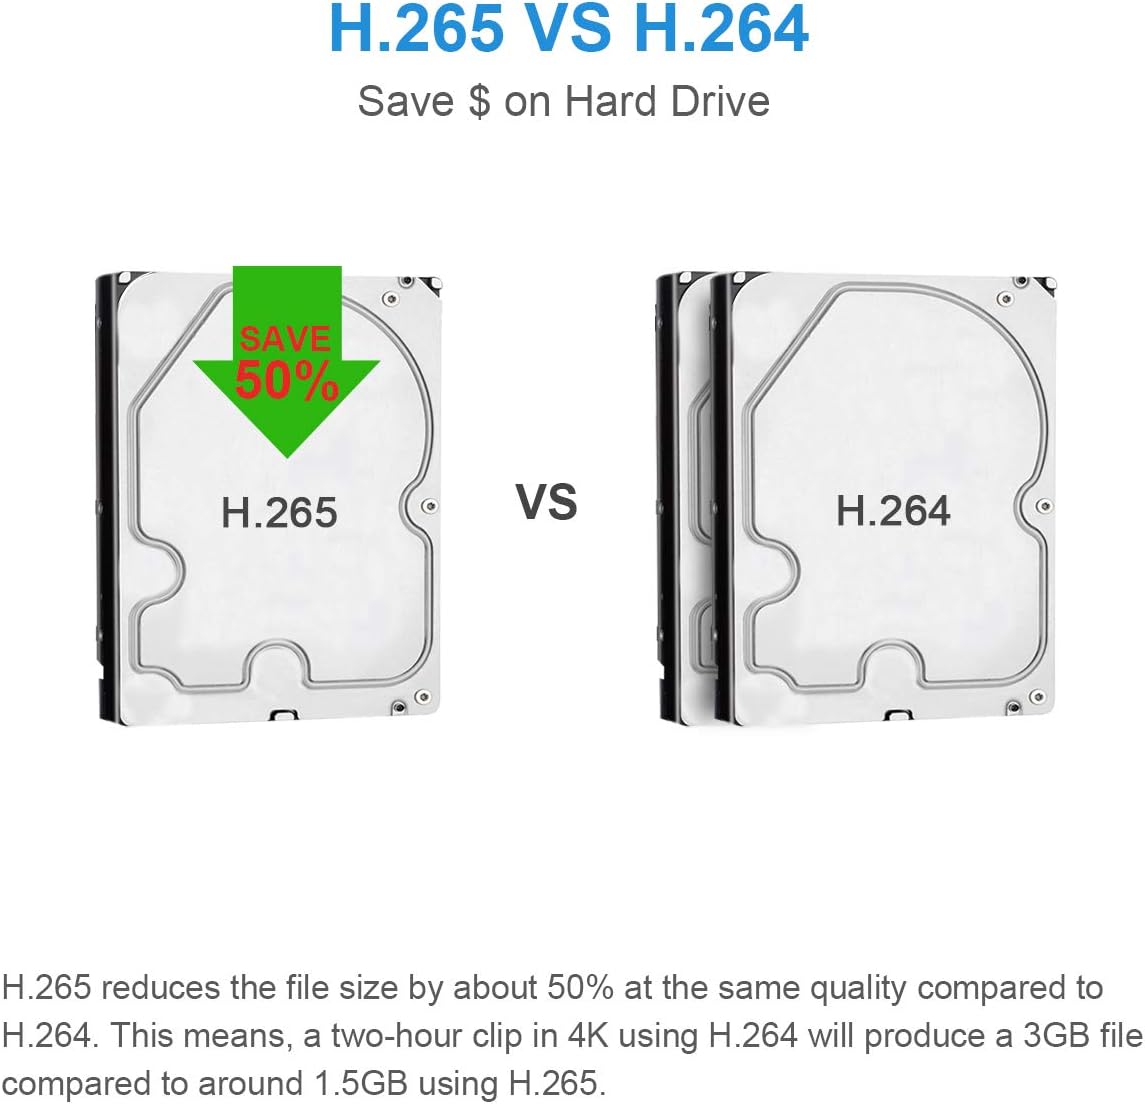
Figure 4.3: Comparison showing that H.265 reduces file size by approximately 50% compared to H.264, leading to significant storage savings.
4.4 Night Vision
The camera is equipped with smart infrared (IR) LEDs and black film technology to provide clear surveillance in low-light conditions.
- IR Distance: Provides night vision up to 66 feet (20-30 meters).
- Black Film Technology: Enhances night vision performance by improving heat dissipation, reducing brightness attenuation, and increasing luminous efficiency.

Figure 4.4: The camera's smart IR LEDs enable clear night vision up to 66 feet, as depicted in a nighttime scene of a house with a pool.

Figure 4.5: A visual comparison showing the improved night vision quality with black film technology compared to cameras without it, demonstrating clearer images in low light.
4.5 Video Resolution
The camera supports multiple video resolutions, with a maximum of 4 Megapixels for high-definition clarity.
- 4MP (2560x1440): Provides sharp and detailed images.
- Other Resolutions: Supports 3MP (2304x1296), 1080P (1920x1080), 720P (1280x720), D1, CIF, and 480x240 for flexibility.

Figure 4.6: Visual representation of the clarity provided by 4MP (2592x1520 pixels) resolution compared to 2MP (1920x1080 pixels) and 720P (1280x720 pixels).
5. Maintenance
5.1 Cleaning
Regular cleaning helps maintain optimal image quality and extends the camera's lifespan.
- Lens: Gently wipe the camera lens with a soft, clean cloth. For stubborn dirt, use a lens cleaning solution designed for optical surfaces.
- Housing: Clean the camera housing with a damp cloth. Avoid abrasive cleaners or solvents.
5.2 Firmware Updates
Periodically check the manufacturer's website for firmware updates. Firmware updates can improve performance, add new features, and enhance security.
- Download: Download the latest firmware file from the official HDView support page.
- Installation: Follow the specific instructions provided with the firmware update. Ensure the camera remains powered during the update process.
6. Troubleshooting
This section addresses common issues you might encounter with your HDView camera.
- No Power: Ensure the PoE connection is active or the DC12V power adapter is correctly connected and functioning. Check network cables for damage.
- No Video/Offline: Verify network connectivity. Check if the camera's IP address is correct and accessible. Ensure no firewall rules are blocking communication. Reboot the camera and network equipment.
- Poor Image Quality: Clean the camera lens. Check network bandwidth if streaming is choppy. Ensure the camera is configured for the desired resolution.
- Motion Detection Not Triggering: Review motion detection zone settings and sensitivity levels. Ensure the camera's time is synchronized.
- Cannot Access Remotely: Verify local network access first. Check router settings for port forwarding or UPnP if required for external access. Ensure the mobile app or web browser settings are correct.
If issues persist, consult the HDView support website or contact customer service.
7. Specifications
| Feature | Specification |
|---|---|
| Image Sensor | 1/2.7" CMOS |
| Image Size | 2560 × 1440 |
| Electronic Shutter | 1/25 s ~ 1/100000 s |
| Minimum Illumination | 0.011 lux @F1.2 (AGC ON); 0 lux with IR |
| IR Distance | 20 ~ 30 m (66 ft) |
| Wide Dynamic Range | Digital WDR |
| Video Compression | H.265 / H.264 |
| Video Resolution | 4MP (2560 × 1440), 3MP (2304 × 1296), 1080P, 720P, D1, CIF |
| Video Frame Rate (Main Stream) | 60Hz: 4MP/3MP/1080P (1~30fps); 50Hz: 4MP/3MP/1080P (1~25fps) |
| Video Bitrate | 64 Kbps ~ 5 Mbps |
| Digital Noise Reduction | 3D DNR |
| Ethernet | RJ45 |
| Network Protocols | UDP, DHCP, NTP, RTSP, PPPoE, DDNS, SMTP, FTP, 802.1x, UPnP, HTTP, HTTPs, QoS |
| Storage | Network remote storage |
| Power Supply | DC12V/PoE |
| Power Consumption | <5W |
| Operating Temperature | -30 °C ~ 60 °C (-22 °F ~ 140 °F) |
| Humidity | <95% (non-condensing) |
| Ingress Protection | IP67 |
| Dimensions | 167.5 × 74.5 × 74.5 mm |
| Weight | Approx. 0.38 KG (0.84 lbs) |
| Lens | 2.8mm Wide Angle |
| Form Factor | Bullet |
| Color | White |
| Connectivity Technology | Wired (PoE) |
| Indoor/Outdoor Usage | Indoor, Outdoor |
8. Warranty and Support
For warranty information, technical support, or service inquiries, please refer to the official HDView website or contact their customer support directly. Keep your purchase receipt as proof of purchase for warranty claims.
- Online Resources: Visit the HDView support page for FAQs, software downloads, and additional documentation.
- Contact Support: Use the contact information provided on the official website for direct assistance.
Ask a question about this manual
Ask about setup, troubleshooting, compatibility, parts, safety, or missing instructions. Manuals+ will review the question and use this page’s manual context to help answer it.