1. Introduction
Thank you for purchasing the MASUNN JY-29C. This device is a versatile 3-in-1 unit, combining a Qi wireless charger, a Bluetooth speaker, and an alarm clock. This manual provides essential information for the safe and efficient operation of your new device. Please read it thoroughly before use and retain it for future reference.
2. Product Features
- 3-in-1 Functionality: Integrates an alarm clock, Qi wireless charger, and Bluetooth speaker.
- Bluetooth 3.0 + NFC: Enables quick and convenient wireless audio streaming and pairing.
- Qi Wireless Charging: Effortlessly charge compatible smartphones without cables.
- Multiple Audio Inputs: Supports Bluetooth, TF Card (up to 16GB), and 3.5mm AUX input.
- Hands-Free Calling: Built-in microphone for answering calls.
- Large Digital Display: Clear display for time and alarm settings.
3. Package Contents
Please check the package for the following items:
- 1 x MASUNN JY-29C Wireless Charger Bluetooth Speaker
- 1 x USB Charging Cable
If any items are missing or damaged, please contact your retailer.
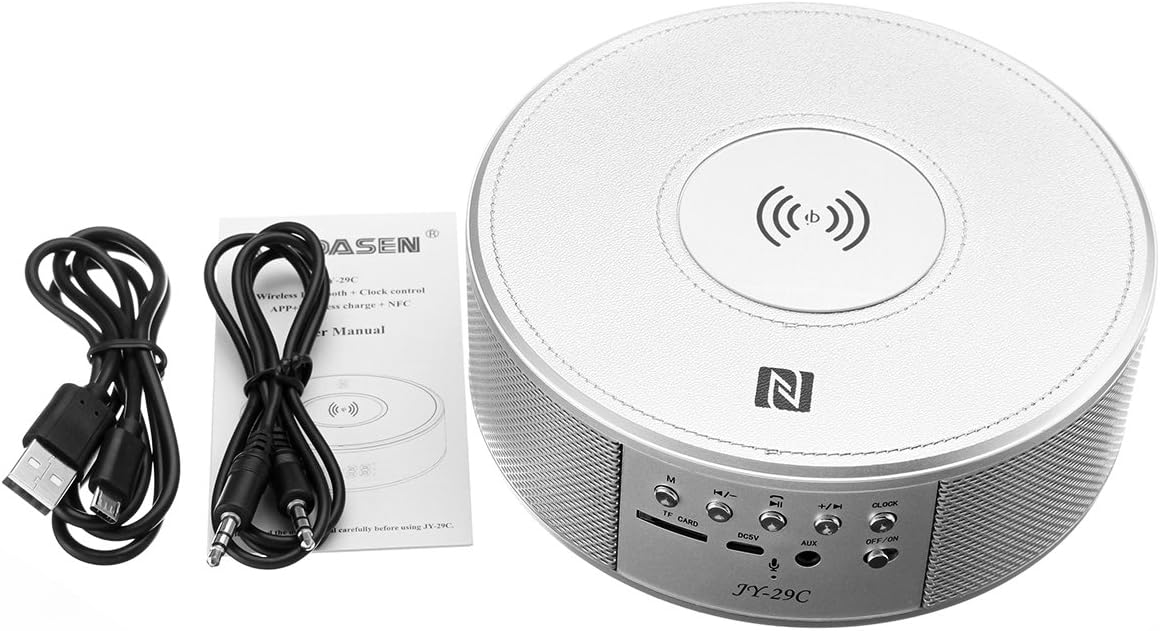
Image: The MASUNN JY-29C unit shown with its accompanying USB charging cable, 3.5mm AUX cable, and a small instruction manual.
4. Controls and Indicators
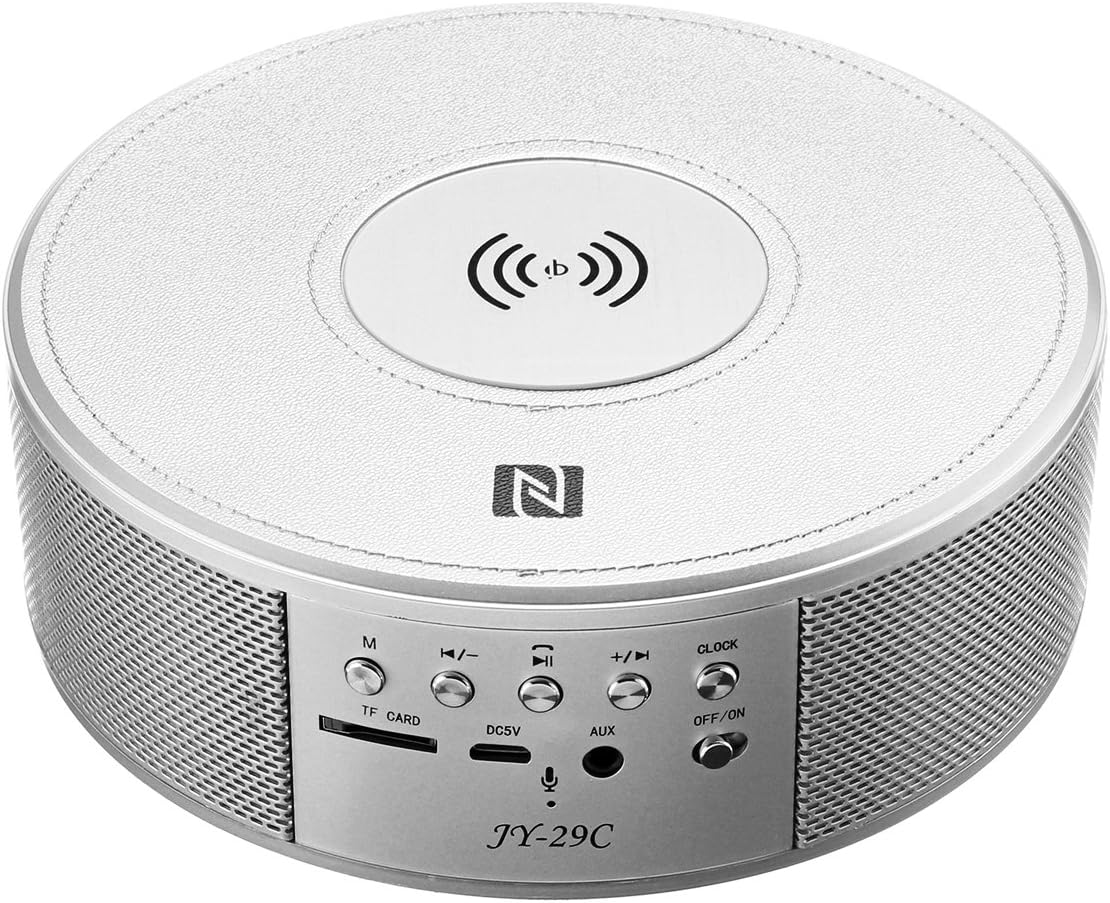
Image: A top-down view of the MASUNN JY-29C device, highlighting the control panel at the front. The panel includes buttons for mode (M), volume down/previous track, play/pause/call, volume up/next track, and clock settings. It also features a TF card slot, DC5V charging port, AUX input, and an ON/OFF switch. The top surface shows the Qi wireless charging pad and NFC logo.
Front Panel Controls:
- M (Mode) Button: Switches between Bluetooth, TF Card, and AUX modes.
- Volume Down / Previous Track Button: Press briefly to decrease volume, press and hold to go to the previous track.
- Play / Pause / Call Button: Press to play/pause music. Press to answer/end calls. Press and hold to reject a call.
- Volume Up / Next Track Button: Press briefly to increase volume, press and hold to go to the next track.
- CLOCK Button: Used for setting the time and alarm.
- ON/OFF Switch: Powers the device on or off.
Ports and Indicators:
- TF Card Slot: Insert a TF (MicroSD) card for music playback.
- DC5V Port: Connect the USB charging cable here to power the device.
- AUX Input: Connect external audio devices using a 3.5mm audio cable.
- Wireless Charging Pad: Located on the top surface, indicated by the wireless charging symbol.
- NFC Area: Located on the top surface, indicated by the NFC logo.
5. Setup
5.1 Initial Charging
- Connect the supplied USB charging cable to the DC5V port on the back of the JY-29C.
- Connect the other end of the USB cable to a standard USB power adapter (5V 500mA recommended, not included) or a computer USB port.
- The charging indicator will illuminate. A full charge takes approximately 4 hours.
- Once fully charged, disconnect the charging cable.
5.2 Powering On/Off
- To power on the device, slide the ON/OFF switch to the 'ON' position.
- To power off the device, slide the ON/OFF switch to the 'OFF' position.
6. Operating Instructions
6.1 Bluetooth Pairing
- Ensure the JY-29C is powered on and in Bluetooth mode (press the 'M' button if necessary). The display will show 'BT' and an indicator light will flash, indicating it's ready for pairing.
- On your smartphone or Bluetooth-enabled device, enable Bluetooth and search for available devices.
- Select 'JY-29C' from the list of found devices.
- Once paired, the device will confirm the connection, and the indicator light will stop flashing.
6.2 NFC Pairing (for NFC-enabled devices)
- Ensure NFC is enabled on your smartphone and the JY-29C is powered on.
- Gently tap your NFC-enabled smartphone on the NFC area of the JY-29C (indicated by the 'N' logo).
- Your phone will prompt you to confirm the Bluetooth pairing. Accept the connection.
6.3 Music Playback
- Bluetooth Mode: After successful pairing, play music from your connected device. Use the volume buttons on the JY-29C or your device to adjust volume. Use the track buttons to skip tracks.
- TF Card Mode: Insert a TF (MicroSD) card with MP3 audio files into the TF card slot. The device will automatically switch to TF card mode and begin playback. Use the track buttons to navigate.
- AUX Mode: Connect an external audio device (e.g., MP3 player) to the AUX input using a 3.5mm audio cable. Press the 'M' button until 'AUX' is displayed. Control playback from your external device.
6.4 Qi Wireless Charging
The JY-29C features a Qi wireless charging pad on its top surface.
- Place your Qi-compatible smartphone directly onto the center of the wireless charging pad.
- Ensure the phone is properly aligned with the charging coil. Charging will begin automatically.
- The phone's screen or indicator will show that it is charging.

Image: A smartphone placed on the top surface of the MASUNN JY-29C, indicating active wireless charging with a battery icon on the phone screen.
Compatible Wireless Charging Models (No Receiver Needed):
- iPhone 8, 8 Plus, X
- Samsung Galaxy S8, S7, S7 Edge, S6, S6 Edge, Note 5, Note 5 Edge, Note 7, Note 7 Edge, Note 8
- LG G2/G3/G Pro
- Google Nexus 4/Nexus 5/Nexus 6/Nexus 7
- Nokia Lumia 822/Lumia 830/Lumia 1020/Lumia 1520
- HTC Droid DNA/One mini2/One M8 Eye, HTC 8x/Incredible 4G LTE/Butterfly/One E9 Butterfly 3
- Sony Z3V/Z4V
- GEAK Mars, Hiking X1, Philips X732
- And other Qi-compatible devices.
Compatible Wireless Charging Models (Qi-Compatible Receiver Needed):
- iPhone 7/7 Plus/SE/6S Plus/6S/6 Plus/6/5/5C/5S/4/4S
- Samsung Galaxy S3/S4/S5/Note 2/Note 3/Note 4
- BlackBerry Z30
- HTC Rzound
- Nokia Lumia 1020/535
- And other devices requiring a Qi receiver.
6.5 Alarm Clock Setup
- Setting Time: In clock mode, press and hold the 'CLOCK' button until the hour digits flash. Use the '+' and '-' buttons to adjust the hour. Press 'CLOCK' again to set minutes, then use '+' and '-' to adjust. Press 'CLOCK' a third time to confirm.
- Setting Alarm: In clock mode, press the 'CLOCK' button briefly to enter alarm setting mode (an alarm icon may appear). The hour digits will flash. Use '+' and '-' to adjust the alarm hour. Press 'CLOCK' again to set minutes, then use '+' and '-' to adjust. Press 'CLOCK' a third time to confirm.
- Activating/Deactivating Alarm: After setting, press the 'CLOCK' button briefly to toggle the alarm on or off. An alarm icon on the display indicates it is active.
6.6 Hands-Free Calling
When connected via Bluetooth, the JY-29C can be used for hands-free calls.
- Answer Call: When an incoming call rings, press the 'Play/Pause/Call' button briefly to answer.
- End Call: During a call, press the 'Play/Pause/Call' button briefly to end the call.
- Reject Call: When an incoming call rings, press and hold the 'Play/Pause/Call' button to reject the call.
7. Specifications
| Feature | Specification |
|---|---|
| Bluetooth Version | v3.0 |
| Battery Capacity | 2000mAh (internal) |
| Charging Time | Approximately 4 hours |
| Charging Voltage | 5V 500mA |
| TF Card Support | Max. 16GB |
| Audio Interface | 3.5mm AUX port |
| Connectivity | USB (for charging) |
| Compatible Devices | Speakers, Smartphones |
8. Troubleshooting
| Problem | Possible Cause | Solution |
|---|---|---|
| Device does not power on. | Low battery. | Charge the device for at least 4 hours. |
| Cannot pair via Bluetooth. | Device not in pairing mode; Bluetooth disabled on phone; too far from device. | Ensure JY-29C is in Bluetooth mode and flashing. Enable Bluetooth on your phone. Move phone closer to the speaker (within 10 meters). |
| Wireless charging not working. | Phone not Qi-compatible; phone not aligned; phone case too thick. | Ensure your phone supports Qi wireless charging or has a receiver. Realign phone on the charging pad. Remove thick phone cases. |
| No sound from speaker. | Volume too low; incorrect mode selected; audio cable loose. | Increase volume on both the speaker and your connected device. Ensure correct mode (BT, TF, AUX) is selected. Check AUX cable connection. |
9. Maintenance
- Clean the device with a soft, dry cloth. Do not use abrasive cleaners or solvents.
- Keep the device away from water, moisture, and extreme temperatures.
- Avoid dropping the device or subjecting it to strong impacts.
- Store in a cool, dry place when not in use for extended periods.
10. Warranty and Support
MASUNN products are designed for reliability and performance. For warranty information or technical support, please refer to the documentation provided at the point of purchase or contact your retailer. Please note that availability of spare parts and software updates is not specified.