1. Introduction and Overview
The URayCoder HEVC H.265 H.264 SD HD 3G SDI to IP Encoder is a professional-grade device designed for high-quality video and audio live streaming and transmission over IP networks. This encoder converts SDI signals into various IP streaming formats, making it suitable for broadcasting, remote monitoring, and other professional video applications. It supports a wide array of streaming protocols and offers extensive customization options for video and audio output.
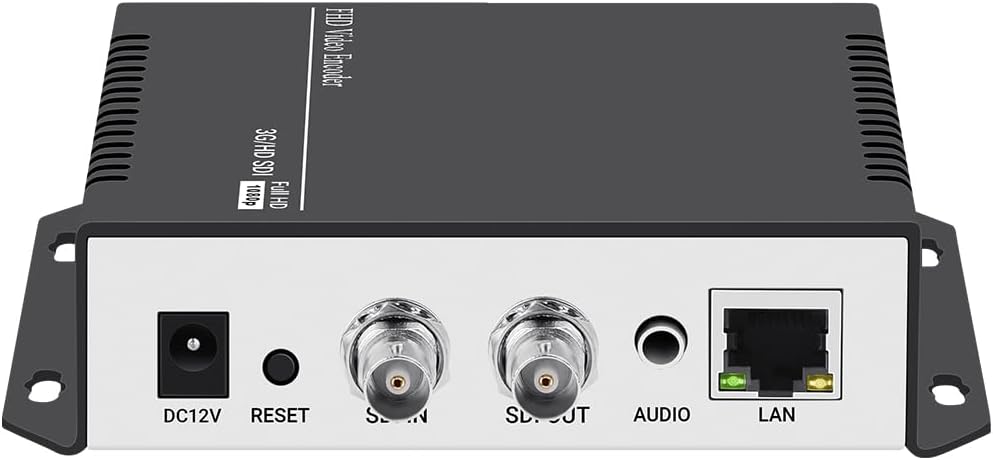
Figure 1.1: Front and Rear View of the URayCoder SDI to IP Encoder, showing DC12V power input, Reset button, SDI IN, SDI OUT, Audio input, and LAN port.
2. Product Features
This encoder is equipped with advanced features to ensure reliable and versatile video streaming:
- Innovative Technology: Ideal for broadcast video and audio, supporting live streaming to major platforms like YouTube, Facebook, Ustream, Livestream, Twitch, Vimeo, Streamspot, Dacast, and Tikilive.
- Multiple Video Stream Output: Capable of outputting up to 4 video streams simultaneously, each configurable with different streaming protocols.
- Extensive Streaming Protocols: Supports HTTP, RTSP, RTMP(S), SRT, HLS(M3U8), UDP, RTP, MP4, Multicast, Unitcast, FLV, and ONVIF.
- Flexible Video Stream Settings: Customize output video streams by adding static text, scrolling text, logos, or time. Adjust parameters such as resolution, frame rate, bitrate, and apply cropping, rotation, flipping, or mirroring. Audio output is also adjustable.
- High-Quality Chip: Utilizes an upgraded high-end chip (e.g., Ambarella S6L55M) for more powerful and stable performance.
- 24/7 Operation: Designed for stable and effective continuous operation.

Figure 2.1: Supported Streaming Protocols including MP4, RTSP, HTTP, RTMP(S), HLS, SRT, Onvif, and UDP.

Figure 2.2: Key Features of the URayCoder Encoder.
3. Setup Guide
Follow these steps to set up your URayCoder SDI to IP Encoder:
- Power Connection: Connect the provided DC12V power adapter to the encoder's DC12V input port.
- SDI Input: Connect your SDI video source (e.g., broadcast camera, CCTV camera, other SDI source) to the 'SDI IN' port on the encoder.
- SDI Loop Out (Optional): If you need to monitor the SDI input locally, connect a display monitor to the 'SDI OUT' port. This provides a direct passthrough of the SDI signal.
- Audio Input (Optional): If using external audio, connect your audio source to the 'AUDIO' 3.5mm jack. The encoder also supports embedded SDI audio.
- Network Connection: Connect an Ethernet cable from the encoder's 'LAN' port to your router, switch, or network hub. Ensure your network provides DHCP or configure a static IP address as needed.
- Initial Access: Once powered on and connected to the network, the encoder will obtain an IP address (if DHCP is enabled). You can typically find the device's IP address using a network scanner tool or by checking your router's connected devices list. Access the encoder's web-based configuration interface by entering its IP address into a web browser.

Figure 3.1: Typical Setup for Online Live Broadcast.

Figure 3.2: Typical Setup for Remote Video Transmission.

Figure 3.3: Comprehensive Connection Diagram.
4. Operating Instructions
The URayCoder encoder is primarily configured and operated via its web-based graphical user interface (GUI).
4.1. Web Interface Navigation
After accessing the encoder's IP address in your web browser, you will be presented with the main dashboard. The left-hand navigation pane allows you to access different settings categories:
- Status: View real-time operational data, including running time, device time, CPU usage, temperature, network status, input resolution, and collected video/audio frames.
- Encoder: Configure video and audio encoding parameters for main and substreams.
- OSD (On Screen Display): Manage text, logo, and time overlays on the output video.
- System: Access network settings, password management, firmware upgrade, reboot, schedule reboot, and factory reset options.

Figure 4.1: Web GUI - Status Display.
4.2. Video and Audio Settings
Navigate to the 'Encoder' section to configure your streaming outputs:
- Encoding Type: Select H.265 or H.264.
- Resolution & Frame Rate: Adjust encoded video resolution (e.g., 1920x1080, 1280x720) and frame rate (FPS).
- Bitrate: Set the target bitrate for your video streams.
- Streaming Protocols: Enable and configure URLs for various protocols such as TS, HLS, FLV, RTSP, RTMP(S), SRT, UDP, and Multicast.
- Audio Settings: Select audio input (SDI Audio or Line-in Audio), sampling rate, encoder type (AAC, MP3, etc.), bitrate, and digital volume gain.

Figure 4.2: Web GUI - Output Video and Audio Settings.
4.3. On Screen Display (OSD)
The OSD feature allows you to overlay custom elements onto your video stream. Go to the 'OSD' section to configure up to four zones:
- Enable/Disable Zone: Activate or deactivate each OSD zone.
- Type: Choose between text, scrolling text, or time.
- Position: Set X and Y coordinates for the overlay.
- Text/Logo: Enter custom text or upload a logo (BMP/PNG format, max 500KB).
- Font Size & Color: Adjust font size and color for text overlays.
- Background Color: Set background color for text, including transparent option.
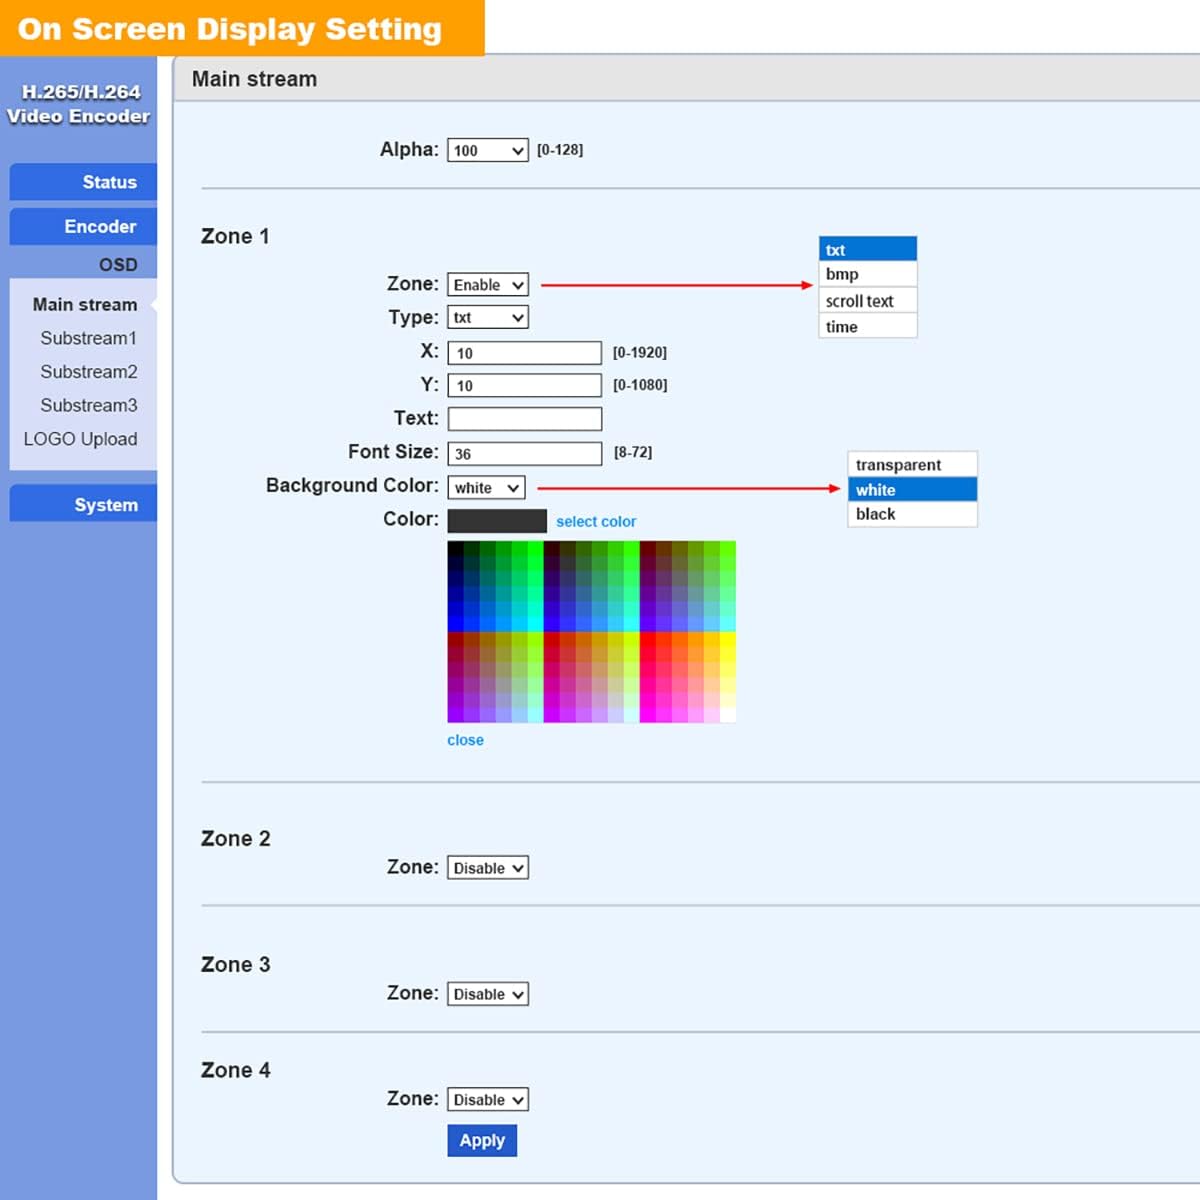
Figure 4.3: Web GUI - On Screen Display Setting.
4.4. Advanced Settings
The 'Advanced' section under 'Encoder' provides granular control over various video processing and network parameters, including EDID settings, deinterlacing, HLS parameters, SRT latency, TS Muxer compatibility, and UDP/RTP settings. Adjust these settings only if you have a clear understanding of their impact on streaming performance.

Figure 4.4: Web GUI - Advanced Settings.
5. Maintenance
To ensure the longevity and optimal performance of your URayCoder encoder, consider the following maintenance practices:
- Physical Environment: Place the encoder in a well-ventilated area to prevent overheating. Avoid exposing it to extreme temperatures, humidity, or direct sunlight.
- Cleaning: Regularly clean the exterior of the device with a soft, dry cloth. Do not use liquid cleaners or aerosols.
- Firmware Updates: Periodically check the manufacturer's website for firmware updates. Firmware updates can improve performance, add new features, and resolve potential issues. You can upload new firmware via the 'System Upgrade' section in the web interface.
- Secure Configuration: Regularly review and update your device's password to prevent unauthorized access.

Figure 5.1: Web GUI - System Upgrade and Logo Upload.
6. Troubleshooting
If you encounter issues with your URayCoder encoder, refer to the following common troubleshooting steps:
- No Power: Ensure the DC12V power adapter is securely connected to both the encoder and a working power outlet. Check the power indicator light on the device.
- No Video Output/Input: Verify that the SDI input source is active and properly connected to the 'SDI IN' port. Check the input resolution and format compatibility in the 'Status' section of the web GUI. Ensure the output streaming URLs are correctly configured and accessible.
- No Audio: Confirm that the audio source is active and connected correctly (either embedded in SDI or via the 3.5mm audio jack). Check audio settings in the web GUI, including input selection and encoding parameters.
- Network Connectivity Issues: Ensure the Ethernet cable is securely connected to the 'LAN' port and your network. Verify the encoder's IP address and network settings (subnet mask, gateway) in the 'System' section. Try rebooting the encoder and your network router.
- Audio/Video Sync Issues: This can sometimes occur due to network latency or incorrect encoding settings. Review the 'Advanced' settings for potential adjustments related to synchronization or buffering.
- Web Interface Unresponsive: Try clearing your browser's cache or using a different web browser. If the issue persists, power cycle the encoder.
- Factory Reset: As a last resort for persistent issues, you can perform a factory reset via the 'System' section in the web GUI. This will revert all settings to their default values.
7. Specifications
| Attribute | Value |
|---|---|
| Product Dimensions | 6.69 x 5.12 x 1.18 inches |
| Item Weight | 1.1 pounds |
| Model Number | USE265-1L |
| Compatible Devices | Devices with SDI Output |
| Connector Type | SDI |
| Color | Black on top, silver on bottom |
| Manufacturer | URay |
| Date First Available | April 26, 2018 |
8. Warranty and Support
All URayCoder video encoders and video decoders include free lifetime technical support and warranty. For assistance, please contact URayCoder customer support through their official channels. Additionally, SDK and API as well as CGI control protocol documents are available for secondary development, enabling advanced integration and customization.
For the most up-to-date support information and resources, please visit the official URayCoder website or refer to the contact details provided with your product packaging.