
Tectite FSBBOXWM
Tectite by Apollo FSBBOXWM Outlet Box Instruction Manual
Model: FSBBOXWM
Introduction
The Tectite by Apollo washing machine outlet box is designed for efficient and secure connection of washing machine water supply lines and drain. It features 1/2-inch push-to-connect washing machine valves, compatible with copper, CPVC, or PEX lines. This manual provides detailed instructions for safe installation, operation, and maintenance of your outlet box.

Figure 1: Tectite FSBBOXWM Outlet Box Overview
This image shows the front view of the Tectite FSBBOXWM Outlet Box. It is a white rectangular box designed to be recessed into a wall. Inside the box, two brass valves with red and blue handles are visible, indicating hot and cold water connections. Below the valves, the push-to-connect fittings are visible. A white cap for the drain opening is also present on the right side of the box.
Safety Information
Always observe the following safety precautions during installation and operation:
- Ensure all water supply is turned off before beginning installation.
- Wear appropriate personal protective equipment (PPE), including safety glasses and gloves.
- Verify local plumbing codes and regulations before installation.
- Do not exceed the maximum pressure rating of 200 psi.
- This product contains lead-free dezincification resistant (DZR) brass.
- If you are unsure about any step, consult a qualified plumber.
Package Contents
Verify that all components are present before beginning installation:
- Washing Machine Outlet Box (1)
- 1/2-inch Push-to-Connect Washing Machine Valves (2)
- Snap-on Faceplate (1)
- 1/2 in. Plastic Demount Clip (1)
Setup and Installation
Follow these steps for proper installation of the Tectite FSBBOXWM Outlet Box:
- Prepare the Wall Opening:
Locate the desired installation area. The box design allows for right or left stud mounting. Cut an appropriate opening in the drywall or wall material to accommodate the outlet box. Ensure there is sufficient space for plumbing connections behind the box.

Figure 2: Outlet Box Angled View
This image displays the Tectite FSBBOXWM Outlet Box from an angled perspective, highlighting its depth and the flanges on the sides designed for mounting to wall studs. The two brass valves are visible inside the box, along with the drain opening. This view helps in understanding how the box fits into a wall cavity.
- Mount the Outlet Box:
Position the outlet box within the wall opening. Secure it to the wall studs using appropriate fasteners (not included). The box can be mounted to either the right or left stud depending on your plumbing layout.

Figure 3: Outlet Box Side View
This image shows the Tectite FSBBOXWM Outlet Box from a side angle, providing a clearer view of its depth and the integrated mounting points for securing it to wall studs. The internal valves and drain opening are also visible from this perspective, aiding in understanding the installation process.
- Connect Water Supply Lines:
The 1/2-inch push-to-connect valves are designed for quick and easy installation. Ensure the pipe ends (copper, PEX, CPVC, or PE-RT) are clean, deburred, and free of scratches. Push the pipe firmly into the valve until it reaches the stop. A secure connection is made when the pipe cannot be pulled out without using the demount clip.
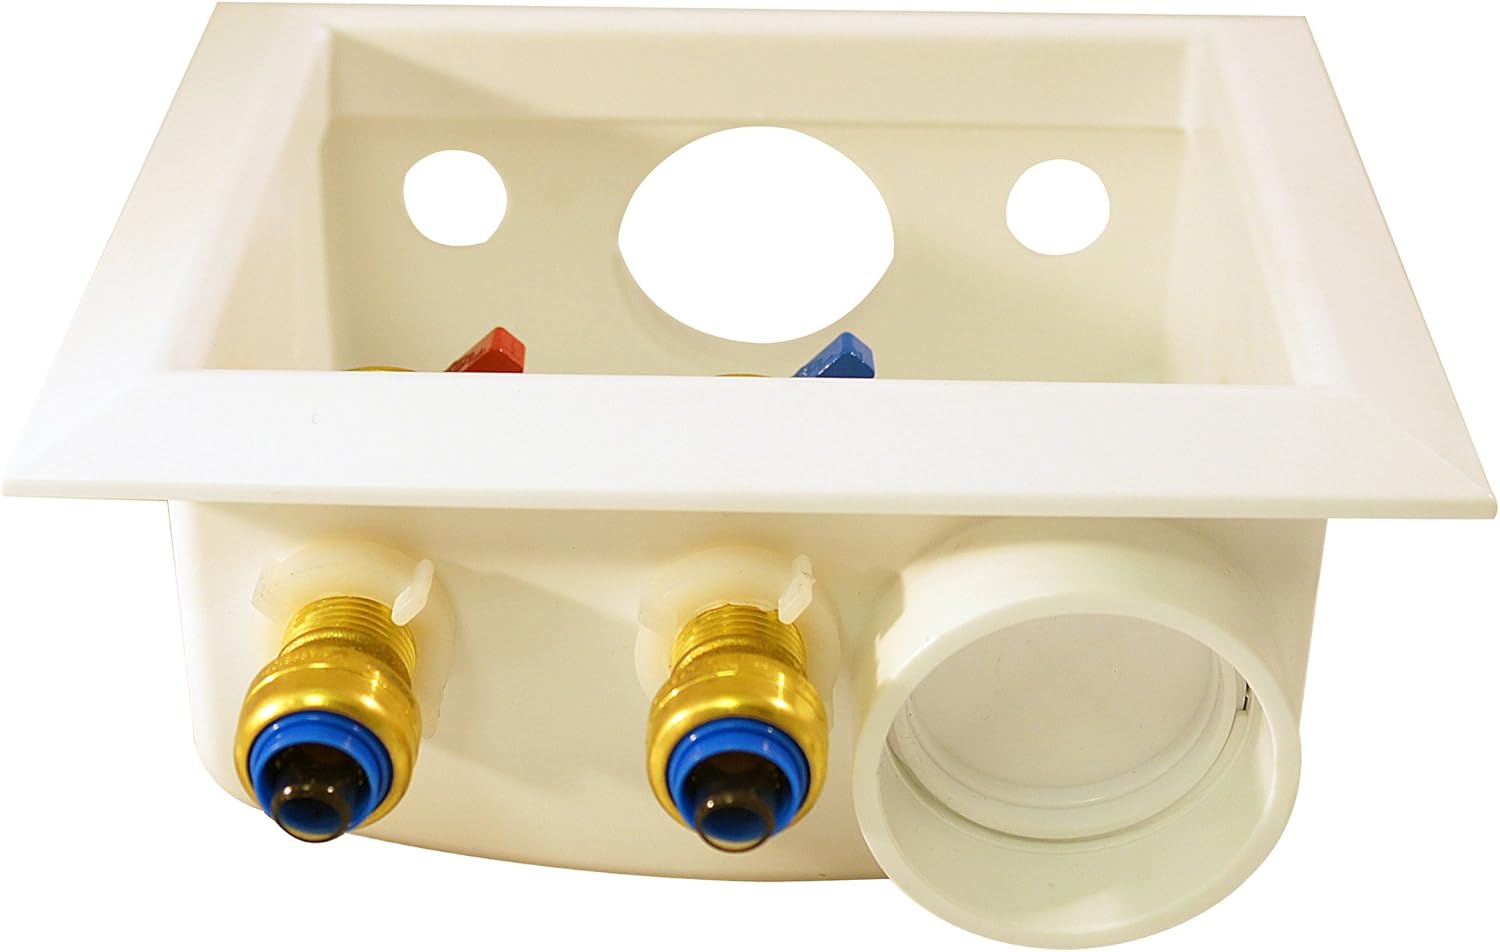
Figure 4: Top View of Connections
This image provides a top-down view of the Tectite FSBBOXWM Outlet Box. It clearly shows the two circular openings where the water supply pipes connect to the valves, and the larger circular opening for the drain pipe. This perspective is useful for understanding the plumbing layout and connections.
- Connect the Drain Line:
Connect the washing machine drain hose to the drain opening on the outlet box. Ensure a tight and secure connection to prevent leaks. The drain opening is typically designed for standard washing machine drain hoses.

Figure 5: Bottom View with Drain
This image shows the bottom view of the Tectite FSBBOXWM Outlet Box, specifically highlighting the large circular opening designed for the washing machine drain pipe connection. The push-to-connect fittings for the water supply lines are also visible from this angle.
- Install Faceplate:
Once all connections are made and tested, snap the faceplate into place. The faceplate is designed to accommodate up to 3/4-inch drywall, providing a clean, finished look.
- Test for Leaks:
Slowly turn on the main water supply. Inspect all connections for any signs of leaks. Address any leaks immediately by re-securing connections or consulting a professional.
Operating Instructions
The Tectite FSBBOXWM Outlet Box is designed for simple operation:
- Water Supply Valves: The red handle controls the hot water supply, and the blue handle controls the cold water supply. Turn the handles clockwise to close the valves (off position) and counter-clockwise to open them (on position).
- Washing Machine Connection: Connect your washing machine's hot and cold water hoses to the 3/4-inch male hose thread outlet connections on the valves.
- Drain Connection: Insert your washing machine's drain hose into the drain opening of the outlet box. Ensure it is securely seated to prevent overflow.
Maintenance
Minimal maintenance is required for the Tectite FSBBOXWM Outlet Box:
- Regular Inspection: Periodically check the connections for any signs of leaks, corrosion, or damage.
- Cleaning: Clean the exterior of the box and faceplate with a mild, non-abrasive cleaner and a soft cloth. Do not use harsh chemicals that could damage the finish.
- Valve Operation: Occasionally operate the valves (turn them on and off) to ensure they remain free and functional.
Troubleshooting
Common issues and their solutions:
| Problem | Possible Cause | Solution |
|---|---|---|
| Water Leakage at Connections | Improperly seated pipe, damaged O-ring, or loose hose connection. | Ensure pipe is fully inserted into push-to-connect fitting. If using the demount clip, ensure it is properly engaged. Check washing machine hose connections for tightness. If O-ring is damaged, valve replacement may be necessary. |
| No Water Flow | Valves are closed, or main water supply is off. | Ensure both red and blue valves are fully open. Check that the main water supply to your home is on. |
| Drain Overflow | Washing machine drain hose not properly inserted or drain pipe blockage. | Ensure the washing machine drain hose is securely inserted into the outlet box drain opening. Check for any blockages in the drain pipe. |
Specifications
| Feature | Detail |
|---|---|
| Model Number | FSBBOXWM |
| Brand | Tectite by Apollo |
| Material | Lead-Free Dezincification Resistant (DZR) Brass (Valves), Plastic (Box) |
| Inlet Connection Size | 1/2-inch Push-to-Connect |
| Outlet Connection Size | 3/4-inch Male Hose Thread |
| Compatible Pipe Types | Copper, PEX, CPVC, PE-RT |
| Maximum Pressure | 200 psi |
| Product Dimensions | 1.6 x 3.75 x 10.13 inches (Box) |
| Item Weight | 1.6 pounds |
| Manufacturer | Conbraco Industries |
Warranty and Support
This Tectite by Apollo product comes with a manufacturer's warranty. For specific warranty details, please refer to the warranty information provided with your purchase or visit the official Tectite by Apollo website.
For technical support, troubleshooting assistance, or to inquire about replacement parts, please contact Tectite by Apollo customer service. Contact information can typically be found on the product packaging or the manufacturer's website.
Important: Always ensure you have your product model number (FSBBOXWM) and purchase date available when contacting support.
Related documentsFSBBOXWM


Ask a question about this manual
Ask about setup, troubleshooting, compatibility, parts, safety, or missing instructions. Manuals+ will review the question and use this page’s manual context to help answer it.