Introduction
Thank you for purchasing the BAOFENG BF-88A FRS Two-Way Radio. This device is designed for reliable and clear communication, suitable for various indoor and outdoor activities. This manual provides essential information for the safe and efficient operation of your radio. Please read it thoroughly before use and retain it for future reference.
Safety Information
To ensure safe operation and optimal performance, please observe the following precautions:
- Do not operate the radio in explosive atmospheres (e.g., flammable gases, dust particles, metallic powders).
- Do not modify or disassemble the radio. Repairs should only be performed by qualified technicians.
- Use only BAOFENG approved batteries and chargers. Improper use may lead to fire, explosion, or injury.
- Avoid exposing the radio to direct sunlight for extended periods or to extreme temperatures.
- Keep the radio away from medical devices to prevent interference.
- Do not transmit without an antenna attached.
- Always turn off the radio in areas where radio use is prohibited, such as aircraft or hospitals.
Package Contents
Verify that all items are present in your package:
- 2 x BAOFENG BF-88A Walkie Talkies
- 2 x Earpieces
- 2 x Li-ion Batteries
- 2 x Desktop Chargers (Charging Base & AC Adapter)
- 2 x Belt Clips
- 2 x Hand Straps
- 1 x User Manual

Image: Complete package contents for the BAOFENG BF-88A FRS Two-Way Radio.
Product Overview
Familiarize yourself with the main components and controls of your BF-88A radio:
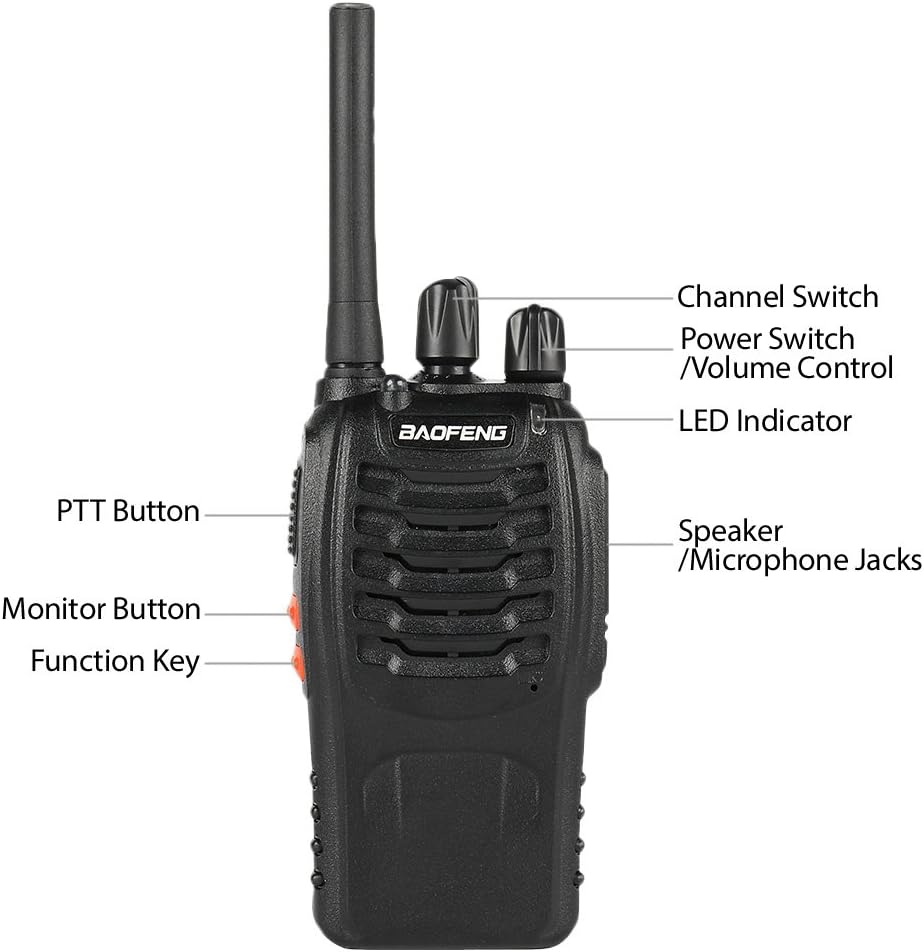
Image: Labeled diagram of the BAOFENG BF-88A radio components.
- Antenna: For transmitting and receiving signals.
- Channel Switch: Rotary knob to select one of the 16 available channels.
- Power Switch/Volume Control: Rotary knob to turn the radio on/off and adjust the speaker volume.
- LED Indicator: Illuminates red during transmission, green during reception.
- Speaker/Microphone Jacks: For connecting external audio accessories like earpieces or speaker microphones.
- PTT (Push-To-Talk) Button: Press and hold to transmit, release to receive.
- Monitor Button: Press to temporarily disable squelch and listen to weak signals.
- Function Key: Can be programmed for various functions (e.g., flashlight, alarm).
- Built-in Flashlight: Located at the top of the radio.
Setup
1. Battery Installation
To install the battery:
- Align the battery pack with the grooves on the back of the radio.
- Slide the battery pack upwards until it clicks into place.
- To remove, press the release latch (if present) and slide the battery downwards.

Image: Rear view of the BAOFENG BF-88A radio with the battery pack.
2. Charging the Battery
Before initial use, fully charge the battery. The LED on the charger indicates charging status:
- Red LED: Charging in progress.
- Green LED: Charging complete.
- Plug the AC adapter into a power outlet and connect it to the charging base.
- Place the radio (with battery installed) into the charging base. Ensure proper contact.
- Allow approximately 3-4 hours for a full charge.

Image: BAOFENG BF-88A radios in their charging cradles.
3. Attaching Accessories
- Belt Clip: Secure the belt clip to the designated slot on the back of the radio.
- Earpiece: Insert the earpiece plug into the speaker/microphone jacks on the side of the radio.
Operating Instructions
1. Power On/Off and Volume Adjustment
- To turn on the radio, rotate the Power Switch/Volume Control knob clockwise. You will hear a voice prompt indicating the current channel.
- Continue rotating the knob clockwise to increase volume, or counter-clockwise to decrease volume.
- To turn off the radio, rotate the knob counter-clockwise until it clicks.
2. Channel Selection
- Rotate the Channel Switch knob to select one of the 16 available channels.
- The radio will announce the selected channel number.
- Ensure all radios in your group are set to the same channel for communication.
3. Transmitting and Receiving
- To transmit, press and hold the PTT (Push-To-Talk) button on the side of the radio. The LED indicator will glow red. Speak clearly into the microphone.
- To receive, release the PTT button. The LED indicator will glow green when a signal is being received.
- Maintain a distance of approximately 2-5 cm (1-2 inches) between your mouth and the microphone for optimal audio clarity.
4. VOX Function (Voice Operated Exchange)
The VOX function allows hands-free transmission. When VOX is enabled, the radio will automatically transmit when it detects your voice.
- VOX sensitivity can be adjusted via programming software (CHIRP).
- To use VOX, ensure an earpiece with a microphone is connected.
5. Monitor Function
Press and hold the Monitor Button (often the orange button below PTT) to temporarily disable the squelch function. This allows you to listen to very weak signals or to check if a channel is clear before transmitting.
6. LED Flashlight
The built-in LED flashlight can be activated via the programmable Function Key. Consult your radio's programming settings if you wish to change this function.
7. CTCSS/DCS (Privacy Codes)
CTCSS (Continuous Tone-Coded Squelch System) and DCS (Digitally Coded Squelch) are sub-audible tones that allow you to filter out unwanted conversations on a channel. If your radio is programmed with a CTCSS/DCS code, you will only hear transmissions from other radios using the same channel and code.
- The default setting for CTCSS/DCS is often off.
- These codes must be set using programming software (e.g., CHIRP) and a programming cable.
- For communication, all radios in your group must use the same channel frequency and CTCSS/DCS code.
Maintenance
- Cleaning: Use a soft, damp cloth to clean the radio's surface. Do not use harsh chemicals or abrasive cleaners.
- Battery Care: To prolong battery life, avoid overcharging and fully discharging the battery regularly. Store batteries in a cool, dry place when not in use.
- Antenna: Do not bend or twist the antenna excessively, as this can damage it and affect radio performance.
- Storage: If storing the radio for an extended period, remove the battery.
Troubleshooting
If you encounter issues with your radio, refer to the table below for common problems and solutions:
| Problem | Possible Cause | Solution |
|---|---|---|
| No power | Battery low or not installed correctly. | Charge the battery. Reinstall the battery securely. |
| Cannot transmit or receive | Incorrect channel. Out of range. Low battery. | Verify channel setting. Move closer to other radios. Charge battery. |
| Poor audio quality | Low volume. Obstructions. Interference. | Adjust volume. Move to a clearer area. Check for sources of interference. |
| Hearing other conversations | No CTCSS/DCS set or incorrect code. | Program CTCSS/DCS codes for privacy. Ensure all group members use the same code. |
| Radio does not charge | Charger not connected. Faulty battery/charger. | Ensure charger is plugged in. Check connections. Try another battery or charger if available. |
Specifications
| Feature | Specification |
|---|---|
| Model | BF-88A |
| Frequency Range | 400-470 MHz (UHF) |
| Number of Channels | 16 |
| Battery Voltage | 3.7 Volts |
| Battery Capacity | 1500 mAh (Li-ion) |
| Talking Range (Max) | Up to 3 Kilometers (environment dependent) |
| Special Features | VOX, LED Flashlight, Waterproof (Water Resistance Level: Waterproof) |
| Item Weight | 1.39 Pounds (approx. 0.63 kg for 2 radios) |
| UPC | 816617020849 |

Image: BAOFENG BF-88A radios in typical usage environments.
Warranty and Support
BAOFENG products are designed for reliability and performance. For warranty information, technical support, or service inquiries, please refer to the contact information provided with your purchase documentation or visit the official BAOFENG website. Keep your purchase receipt as proof of purchase for warranty claims.