1. Product Overview
The Sysracks 6U Wall Mount Data Server IT/AV Enclosure Cabinet, part of the SRW Series, is designed for housing 19-inch IT, A/V, and Telecommunication equipment. This cabinet is suitable for home and office projects, LAN, and communication centers, offering stability, performance, and security for your server equipment. It is particularly well-suited for SOHO (Small Office/Home Office) environments.

Image: Front view of the Sysracks 6U Wall Mount Network Data Server Cabinet.
2. Features
- 6U Capacity: Accommodates 19-inch standard equipment with an 18-inch external depth (15-inch max total depth for devices).
- Cooling Fan: Pre-installed active cooling fan in the top for efficient heat dissipation.
- Power Distribution Unit (PDU): Includes an 8-outlet power bar for convenient power distribution.
- Vented Shelf: One vented tray is included for equipment placement.
- Adjustable Feet: Standing adjustable feet (levelers) are provided for floor placement.
- Mounting Hardware: Set of 20 bolts and nuts (cage hardware) included.
- Dust-Tight Cable Entries: Brush-type cable entries ensure dust protection.
- Lockable Access: Lockable glass front door in a perforated metal frame and removable side panels with lockable latch handles for security.
- U-Marking Rails: Vertical mounting rails with U-markings for easy equipment installation.
- Load Capacity: Supports up to 180 pounds.
- Material: Constructed from Alloy Steel with powder paint coating for durability and corrosion resistance.
3. What's in the Box
Your Sysracks 6U Wall Mount Network Data Server Cabinet package includes the following components:
- 6U Server Cabinet Enclosure (main frame)
- Cooling Fan (pre-installed in top cover)
- 8-Outlet Power Bar
- Vented Shelf
- Standing Adjustable Feet (Levelers)
- Mounting Hardware (20 pcs bolts and nuts)
- Keys for front door and side panels
- Brush-Type Cable Entries
- U-Mark Vertical Mounting Rails
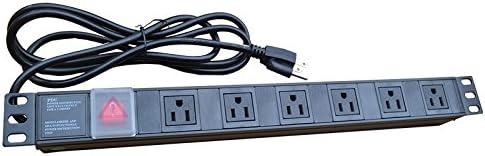
Image: 8-Way Power Distribution Unit (PDU).

Image: Vented Shelf.

Image: Cage Hardware (20 pcs bolts and nuts).
4. Safety Information
Please read and understand all safety instructions before assembling, installing, or operating the Sysracks 6U cabinet. Failure to follow these instructions may result in injury or damage to the equipment.
- Weight: The cabinet weighs approximately 55 pounds. Exercise caution when lifting and moving. It is recommended to have at least two people for assembly and installation.
- Mounting: Ensure the mounting surface (wall or floor) can support the total weight of the cabinet and all installed equipment (up to 180 pounds). Use appropriate mounting hardware for your specific wall type (e.g., wood studs, concrete).
- Electrical Safety: Ensure all electrical connections are made by qualified personnel and comply with local electrical codes. Do not overload the power distribution unit.
- Ventilation: Do not obstruct the ventilation holes or the cooling fan. Proper airflow is crucial to prevent overheating of internal components.
- Stability: If using as a floor-standing unit, ensure the adjustable feet are properly installed and leveled to prevent tipping.
- Security: Keep the doors and side panels locked to prevent unauthorized access to sensitive equipment.
5. Assembly Instructions
The Sysracks 6U cabinet is designed for straightforward assembly. Follow these steps carefully. An electric driver is recommended for faster assembly.
5.1. Frame Assembly
- Join the frames with the Top/Bottom Covers to form a single construction. Use the provided screws from Plastic Bag #1.
- Install the rear panel using 4 X M4 self-tapping screws from Plastic Bag #5.
- Install the brush-type cable entries using M6 bolts/nuts. Use 2 bolts/nuts for each cable entry from Plastic Bag #2.
- Install the vertical mounting rails. The distance between the rails should be determined based on the depth of your equipment or supplied shelves. Use M6 bolts/nuts or the hardware set to install shelves at the desired height.
5.2. Door and Side Panel Installation
- Install the side panel locking mechanism.
- Install the front door locking mechanism.
- Use the plastic bushings (or adjustable washers if needed) when mounting the front door to ensure smooth operation.
5.3. Caster/Feet Installation
- If using casters for mobility, install them using M6 bolts and nuts.
- If using as a stationary floor unit, install the standing adjustable feet (levelers) to ensure stability and proper leveling.
Video: Assembly instructions for the Sysracks Wall Mount Server Network Cabinet SRW Series. This video demonstrates the step-by-step process of assembling the cabinet frame, installing components like rails and shelves, and attaching the doors and side panels.
Video: SYSRACKS SRW-WALL MOUNT MODEL ASSEMBLY INSTRUCTION. This video provides a visual guide to assembling the Sysracks SRW wall mount cabinet, detailing how to connect the various parts and secure them.
6. Installation
6.1. Wall Mounting
- Choose Location: Select a sturdy wall location capable of supporting the cabinet's weight plus equipment. Consider proximity to power outlets and network connections.
- Mark Mounting Holes: Use the provided mounting hole drilling template (if available) or measure carefully to mark the positions for the mounting screws on the wall. Ensure marks are level and spaced correctly.
- Drill Pilot Holes: Drill pilot holes appropriate for your chosen wall anchors/screws.
- Secure Cabinet: Carefully lift the cabinet and align its mounting holes with the drilled holes. Secure the cabinet to the wall using appropriate heavy-duty screws and anchors (not included, as wall types vary).
6.2. Floor Standing Installation
- Attach Feet/Casters: Ensure the adjustable feet or casters are securely attached to the bottom of the cabinet as per assembly instructions.
- Position Cabinet: Place the cabinet in its desired location.
- Level Cabinet: If using adjustable feet, adjust them to ensure the cabinet is stable and level on the floor.
7. Operating Instructions
Once the cabinet is assembled and installed, you can begin populating it with your network and server equipment.
- Install Equipment: Mount your 19-inch standard equipment (e.g., switches, servers, patch panels) onto the vertical mounting rails using the provided cage hardware. Utilize the vented shelf for non-rack-mountable devices.
- Connect Power: Plug your equipment into the 8-outlet power bar. Ensure the power bar is connected to a suitable power source.
- Cable Management: Route network and power cables through the brush-type cable entries to maintain a tidy and organized setup. Use cable ties or other management accessories to secure cables.
- Cooling: The pre-installed top fan will help circulate air. Ensure the fan is powered and operating correctly. The perforated front door also aids in passive ventilation.
- Security: Always keep the front door and side panels locked to protect your valuable equipment from unauthorized access.

Image: Sysracks 6U cabinet with power distribution unit and network equipment installed.
8. Maintenance
Regular maintenance ensures the longevity and optimal performance of your Sysracks 6U cabinet and the equipment housed within it.
- Cleaning: Periodically clean the exterior of the cabinet with a soft, damp cloth. Avoid abrasive cleaners. For the interior, use compressed air to remove dust from equipment and fan blades.
- Fan Check: Regularly inspect the cooling fan for proper operation. Ensure it is free from obstructions and excessive dust buildup.
- Cable Inspection: Check cables for any signs of wear, fraying, or damage. Replace damaged cables immediately. Ensure cables are neatly managed to prevent interference with airflow or accidental disconnections.
- Lock Mechanism: Lubricate the lock mechanisms on the doors and side panels periodically to ensure smooth operation.
- Mounting Security: For wall-mounted units, periodically check the mounting screws and anchors to ensure they remain secure.
9. Troubleshooting
This section provides solutions to common issues you might encounter with your Sysracks 6U cabinet.
- Overheating Equipment:
- Ensure the top cooling fan is operational.
- Check that ventilation holes on the cabinet and equipment are not blocked.
- Verify proper cable management to allow for unobstructed airflow.
- Consider adding additional fans if ambient temperatures are high or equipment density is significant.
- Unstable Cabinet (Floor Standing):
- Adjust the leveling feet to ensure all four corners are firmly on the ground and the cabinet is stable.
- Ensure the floor surface is even and capable of supporting the weight.
- Difficulty Locking Doors/Panels:
- Check for any obstructions preventing the door or panel from closing completely.
- Ensure the locking mechanism is aligned correctly.
- Apply a small amount of lubricant to the lock if it feels stiff.
- Loose Wall Mount:
- Immediately remove equipment to reduce weight.
- Inspect mounting screws and anchors. Tighten or replace as necessary.
- If the wall material is compromised, consider relocating the cabinet or reinforcing the mounting area.
10. Specifications
| Feature | Specification |
|---|---|
| Model | 6U SRW Series |
| Type | Wall Mount Data Server IT/AV Enclosure Cabinet |
| External Dimensions (H x W x D) | 14 x 24 x 18 inches (355.6 x 609.6 x 457.2 mm) |
| Usable Depth | 15 inches (381 mm) |
| Weight | 55 pounds (24.9 kg) |
| Load Capacity | Up to 180 pounds (81.6 kg) |
| Material | Alloy Steel |
| Color | Black |
| Cooling | Active (pre-installed top fan) and Passive (perforated front door) |
| Security | Lockable glass front door, removable lockable side panels |
11. Warranty and Support
For warranty information and customer support, please refer to the official Sysracks website or contact your retailer. Keep your purchase receipt for warranty claims.
Sysracks offers a range of protection plans for extended coverage. For details on 3-Year, 4-Year, or Complete Protect plans, please visit the Sysracks store or contact customer service.
For additional assistance, you may visit the Sysracks Store on Amazon.