Introduction
This manual provides essential information for the proper installation, operation, and maintenance of your Wellmate WM-12 / WM0150 Classic Fiberglass Tank. Wellmate composite tanks are designed for residential and commercial applications, offering durability and corrosion resistance. Their fiberglass construction prevents rust, and the epoxy-resin sealed outer shell resists dents and scratches, minimizing maintenance. These tanks are lighter than steel tanks, facilitating quicker and more cost-effective installation. The lead-free construction ensures no undesirable chemicals are introduced into the water. The WM-Series provides features such as a replaceable air cell for easier field servicing, greater drawdown for efficiency, and a wider pressure setting differential for flexibility.
Product Overview
The Wellmate Classic Fiberglass Tank is engineered with several key components for optimal performance and longevity:
- Durable Interior Air Cell: Fully replaceable and constructed of heavy-gauge engineered polymer.
- Seamless Inner Shell: Molded from premium, high-density polyethylene.
- Outer Shell: Composed of continuous fiberglass strands sealed with high-grade epoxy resin.
- Sturdy Molded Polymeric Base: Provides corrosion and impact protection.
- Bottom Inlet/Outlet Drain: A one-piece drain custom molded from high-impact PVC.

Setup and Installation
Proper installation is crucial for the performance and longevity of your Wellmate tank. It is recommended that installation be performed by a qualified professional.
- Site Selection: Choose a location that is protected from freezing temperatures and direct sunlight. Ensure adequate space for maintenance and future servicing.
- Foundation: The tank must be placed on a level, solid surface capable of supporting the full weight of the tank when filled with water.
- Plumbing Connections: Connect the tank to your water system using appropriate plumbing fittings. Ensure all connections are watertight and comply with local plumbing codes. Use thread sealant on all threaded connections.
- Pressure Setting: The tank's pre-charge pressure should be set according to the pump cut-in pressure, typically 2 PSI below the pump cut-in pressure. This adjustment should be made when the tank is empty of water.
- System Start-up: Slowly fill the system with water, checking for leaks. Bleed air from the system as it fills.
Refer to the detailed specifications table for model-specific dimensions and connection types.
Operating Instructions
Once properly installed, the Wellmate tank operates automatically in conjunction with your water pump system. The tank stores pressurized water, reducing pump cycling and providing a consistent water supply.
- The tank's air cell maintains a cushion of air that compresses as water enters the tank, storing energy.
- When water is drawn from the system, the compressed air pushes the water out, maintaining pressure until the pump activates.
- Monitor your system's pressure gauge periodically to ensure it is operating within the expected range.
Maintenance
Wellmate tanks are designed for minimal maintenance due to their corrosion-proof composite construction. However, periodic checks are recommended to ensure optimal performance.
- Annual Air Charge Check: Annually, check the tank's air pre-charge pressure. This should be done when the tank is empty of water. If the pressure is low, recharge it to the recommended level (typically 2 PSI below the pump cut-in pressure) using an air pump.
- Inspect for Leaks: Periodically inspect all plumbing connections for any signs of leaks. Address any leaks promptly.
- Air Cell Replacement: The interior air cell is replaceable, allowing for easier field servicing should it ever require replacement. Consult a professional for this procedure.
- Cleanliness: Keep the exterior of the tank clean. The scratch-resistant paint helps maintain its appearance.
Troubleshooting
If you experience issues with your water pressure system, consider the following common troubleshooting steps:
- Low Water Pressure: Check the tank's air pre-charge. If it's low, recharge it. Also, inspect for any blockages in the plumbing or issues with the pump.
- Frequent Pump Cycling: This often indicates a loss of air pre-charge in the tank or a ruptured air cell. Check and adjust the air charge. If the problem persists, the air cell may need replacement.
- Waterlogged Tank: If the tank feels heavy when empty or if water comes out of the air valve when pressed, the air cell may be ruptured. This requires air cell replacement.
- Leaks: Tighten any loose connections. If a leak persists from the tank body, contact a qualified technician.
For persistent issues, it is recommended to contact a qualified plumbing professional.
Specifications
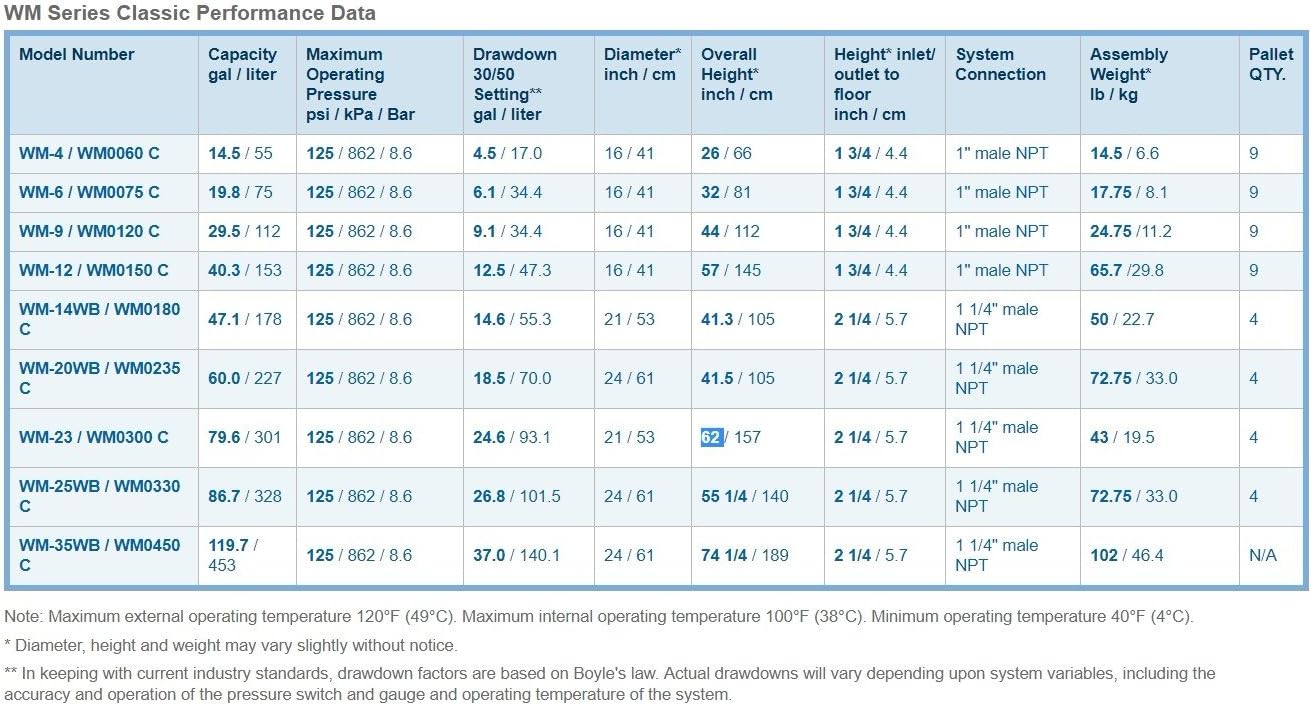
The Wellmate WM-12 / WM0150 Classic Fiberglass Tank has the following general specifications:
- Manufacturer: Wellmate
- Model: WM-12 / WM0150
- Material: Fiberglass
- Item Weight: Approximately 65.7 pounds
- Assembled Diameter: 16 Inches
- Date First Available: April 18, 2018
For detailed performance data across various models, refer to the table below:
Warranty Information
Wellmate products typically come with a manufacturer's warranty covering defects in materials and workmanship. Specific warranty terms, including duration and coverage details, may vary. Please refer to the warranty documentation provided with your purchase or contact Wellmate customer support for detailed information. An extended labor warranty option may be available to homeowners.
Support and Contact
For technical assistance, replacement parts, or further inquiries regarding your Wellmate WM-12 / WM0150 Classic Fiberglass Tank, please contact Wellmate customer support. Contact information can typically be found on the manufacturer's website or on the product packaging.
Manufacturer: Wellmate
Website: (Refer to official Wellmate website for current contact details)
Customer Service: (Refer to official Wellmate website for current contact details)


