
1. Introduction
This manual provides essential instructions for the safe and effective use of your Bi Rod Y-shaped Waist Support Belt G80057. This accessory is designed to provide comfortable and stable support when operating long Bi Rod selfie sticks or similar equipment, distributing weight and reducing strain during extended use. Please read this manual thoroughly before use and keep it for future reference.
2. Safety Information
- Always ensure the belt is securely fastened before attaching any equipment.
- Do not overload the belt beyond its intended capacity. Refer to the specifications of your Bi Rod for weight limits.
- Regularly inspect all buckles, straps, and attachment points for wear or damage. Discontinue use if any damage is found.
- Ensure the equipment attached to the belt is balanced to prevent sudden shifts or loss of control.
- Avoid using the belt in situations where it could snag on objects or restrict movement, leading to falls or injury.
3. Product Overview
Familiarize yourself with the components of your Bi Rod Y-shaped Waist Support Belt.
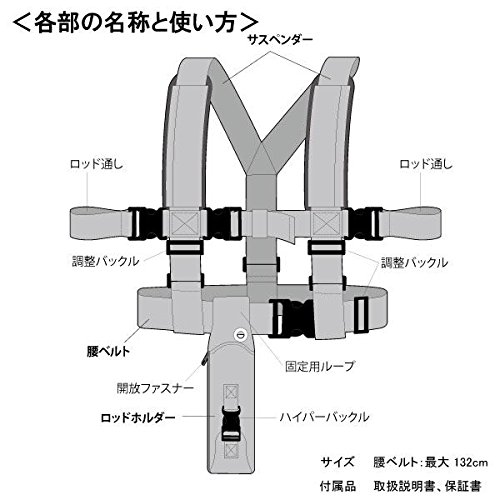
Figure 3.1: Diagram illustrating the various parts of the Bi Rod Y-shaped Waist Support Belt, including the suspenders, rod loops, adjustment buckles, waist belt, release zipper, rod holder, and hyper buckle. The maximum waist belt size is 132cm.
- Suspender: Shoulder straps for distributing weight.
- Rod Loop: Loops on the side for securing the Bi Rod.
- Adjustment Buckle: Used to adjust the length of straps for a snug fit.
- Waist Belt: Main belt component that wraps around the waist.
- Release Zipper: For quick detachment or adjustment of the rod holder.
- Rod Holder: The primary attachment point for the Bi Rod.
- Hyper Buckle: A robust buckle for secure fastening of the waist belt.
4. Setup and Wearing Instructions
Follow these steps to properly set up and wear your Bi Rod Y-shaped Waist Support Belt.
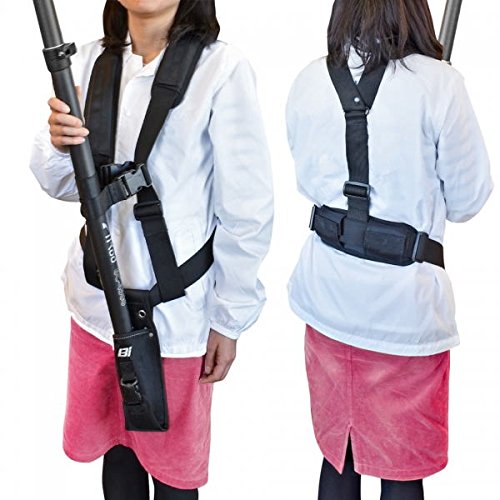
Figure 4.1: Front view of the Bi Rod Y-shaped Waist Support Belt being worn, demonstrating how the rod is held by the rod holder and supported by the shoulder straps.

Figure 4.2: Rear view of the Bi Rod Y-shaped Waist Support Belt being worn, showing the Y-shaped suspenders and how they distribute weight across the back.
- Adjust Waist Belt: Wrap the waist belt around your waist and secure the Hyper Buckle. Adjust the belt length using the adjustment buckles until it fits snugly but comfortably. The maximum waist belt size is 132cm.
- Position Suspenders: Place the Y-shaped suspenders over your shoulders. Adjust their length using the adjustment buckles to ensure the rod holder is at a comfortable height and the weight is evenly distributed.
- Attach Bi Rod: Insert the base of your Bi Rod into the Rod Holder. Use the Rod Loops on the side straps to further secure the Bi Rod, preventing it from swinging or shifting during use.
- Final Check: Before operation, perform a final check to ensure all buckles are securely fastened and the Bi Rod is stable.
5. Operating Instructions
The Bi Rod Y-shaped Waist Support Belt is designed to enhance the stability and ease of use of your Bi Rod. Here are some general operating guidelines:
- Weight Distribution: The Y-shaped suspenders are crucial for distributing the weight of the Bi Rod across your shoulders and back, reducing strain on your arms and waist. Ensure they are properly adjusted.
- Stability: The Rod Holder and Rod Loops provide a stable base for the Bi Rod, allowing for smoother movements and more precise positioning, especially when extended to full length.
- Movement: When moving, be mindful of the extended length of the Bi Rod. The belt allows for greater freedom of movement compared to holding the rod by hand, but caution is still advised.
- Quick Release: In situations requiring quick detachment, utilize the Release Zipper on the rod holder.
Demonstration Videos (Bi Rod System)
Video 5.1: This video demonstrates the use of a long extending smartphone selfie stick (Bi Rod system), showcasing its stability and various applications. The waist support belt is designed to complement such equipment by providing ergonomic support.
Video 5.2: A promotional video for the lapset 5m selfie stick, illustrating how such long rods can be used for high-angle photography. The Bi Rod Y-shaped Waist Support Belt helps manage the weight and leverage of these extended devices.
6. Maintenance
- Cleaning: Wipe the belt with a damp cloth and mild soap if it becomes dirty. Do not use harsh chemicals or abrasive cleaners. Allow to air dry completely before storage.
- Storage: Store the belt in a cool, dry place away from direct sunlight and extreme temperatures. Ensure it is clean and dry before storing to prevent mold or mildew.
- Inspection: Periodically check all stitching, straps, buckles, and the rod holder for any signs of wear, fraying, or damage.
7. Troubleshooting
- Belt feels uncomfortable: Adjust the waist belt and suspender lengths. Ensure the weight of the Bi Rod is evenly distributed. The belt should be snug but not restrictive.
- Bi Rod feels unstable: Double-check that the Bi Rod is fully inserted into the Rod Holder and secured by the Rod Loops. Ensure all buckles are tightened.
- Buckles are difficult to fasten/unfasten: Check for any debris or obstruction in the buckle mechanism. Clean if necessary. If damaged, discontinue use.
8. Specifications
| Feature | Detail |
|---|---|
| Model Number | G80057 |
| Product Weight | 1.03 Kilograms |
| Package Dimensions | 29.9 x 28 x 13 cm |
| Waist Belt Size | Max 132 cm |
| Color | Black |
| Pattern | Solid |
9. Warranty and Support
This product comes with a standard warranty as per local regulations. Please refer to the warranty card included with your purchase for specific terms and conditions. For technical support, replacement parts, or any inquiries, please contact your retailer or the manufacturer directly. Keep your proof of purchase for warranty claims.


