1. Introduction
This instruction manual provides essential information for the proper installation, operation, and maintenance of your Artraise filter replacement kit for Shark Navigator Lift-Away vacuum cleaners. Regular filter maintenance is crucial for sustaining your vacuum's suction power and ensuring clean air output.
2. Product Contents
Your Artraise filter replacement kit includes the following components:
- 1 x Premium H12 HEPA Post-Motor Filter
- 3 x High-Grade Foam Filters
- 3 x High-Grade Felt Filters

Image: Complete Artraise filter replacement kit.
3. Compatibility
This filter kit is compatible with a wide range of Shark Navigator Lift-Away upright vacuum models. Please verify your vacuum model number before installation.
Compatible Models:
- CU500, CU520
- NV350, NV350_26, NV350A_26, NV350E, NV350Q, NV350T, NV350W, NV350W_N, NV350WC
- NV351, NV351C, 351WM1, NV351WM2
- NV352, NV352C, NV352CFS, NV352E, NV352Q
- NV354C, NV355, NV355C, NV355CFS
- NV356E, V356K, NV356Q
- NV357, NV358
- NV360, NV360K, NV361BK, NV361PR
- NV370, NV370_26, NV380, NV391, V391C
- UV440, UV440CCO, UV440CCOFS, UV490CCO
- UV500WM, UV540, UV541CCO, UV550
- ZU503AMZ
This kit replaces parts XFF350 & XHF350.

Image: Visual guide to compatible Shark Navigator models.

Image: How to locate your vacuum's model number.
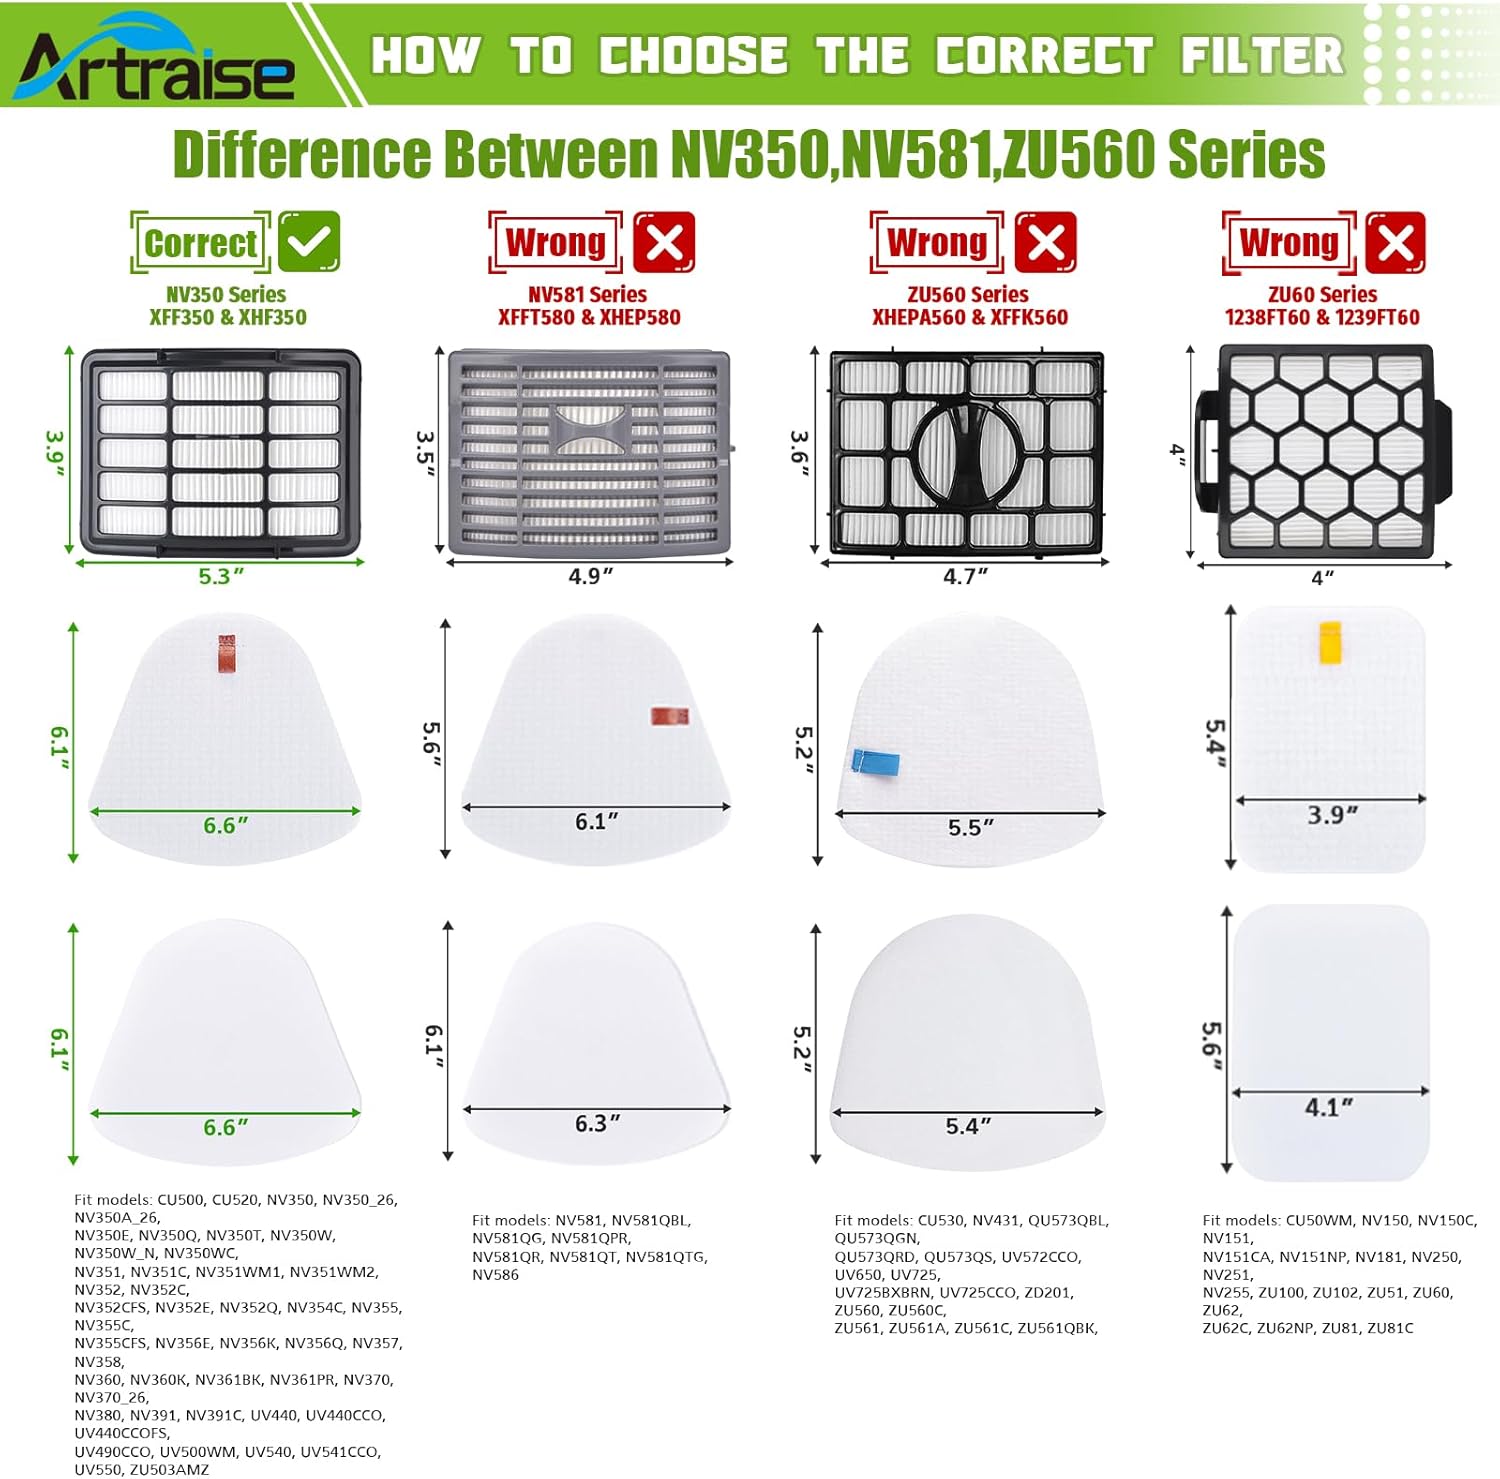
Image: Guide to choosing the correct filter for your Shark vacuum series.
4. Setup and Installation
Follow these steps to replace the filters in your Shark Navigator Lift-Away vacuum:
4.1. Removing Old Filters
- Ensure the vacuum is unplugged from the power outlet.
- Locate the filter compartments. The foam and felt filters are typically located in the dust cup assembly, while the HEPA filter is usually at the bottom front of the motor base.
- Remove the dust cup and separate the foam and felt filters. Discard the old filters.
- Open the HEPA filter cover (usually by pressing a latch) and remove the old HEPA filter. Discard it.
4.2. Installing New Filters
- Place a new felt filter into the dust cup, followed by a new foam filter on top.
- Insert the new HEPA filter into its compartment in the motor base and close the cover securely.
- Reattach the dust cup to the vacuum cleaner.

Image: Step-by-step filter installation process.
Video: A demonstration of replacing filters in a Shark Navigator NV350 vacuum.
5. Operating
Once the new filters are correctly installed, your Shark Navigator Lift-Away vacuum is ready for operation. The filters ensure efficient dust and allergen capture, contributing to a cleaner home environment.
6. Maintenance
Regular cleaning and replacement of filters are essential for maintaining optimal vacuum performance and extending the lifespan of your appliance.
6.1. Cleaning Foam and Felt Filters
- Remove the foam and felt filters from the dust cup.
- Rinse them thoroughly under running water until the water runs clear.
- Squeeze out excess water and allow them to air dry completely for at least 24 hours before reinserting them into the vacuum. Do not use a dryer or heat to dry them.
- It is recommended to wash these filters monthly.
6.2. Replacing HEPA Filter
The HEPA filter is not washable and should be replaced every 6 to 12 months, or as needed, depending on usage. Refer to section 4.1 and 4.2 for removal and installation instructions.

Image: Cleaning washable foam and felt filters.
7. Troubleshooting
If your vacuum experiences reduced suction or emits an unusual odor, the filters may be clogged or require replacement. Follow the maintenance steps in Section 6 to clean or replace the filters. Ensure all filters are correctly installed and completely dry before operating the vacuum.
8. Specifications
| Feature | Detail |
|---|---|
| Brand | Artraise |
| Model Info | #XFF350&XHF350 |
| Item Weight | 1.6 ounces |
| Product Dimensions | 5 x 5 x 0.7 inches |
| Material Type | Foam, Plastic |
| Included Components | 1 HEPA filter, 3 Foam filters, 3 Felt Filters |
| Reusability | Reusable (Foam & Felt filters) |
9. Important Notes
- Always ensure filters are completely air-dried before reinstallation to prevent damage to the vacuum and mold growth.
- Do not operate the vacuum without all filters properly in place.
- For optimal performance, use only genuine Artraise replacement filters.