Introduction
This manual provides detailed instructions for the safe and effective use of your CENTROPOWER 10 Pairs 12V 5A DC Power Plug Connectors. These connectors are designed for various low-voltage DC applications, offering a reliable and easy-to-install solution for power connections.
Product Overview
The CENTROPOWER DC Power Plug Connectors provide a robust and convenient method for connecting power to various electronic devices. Each set includes both male and female connectors, featuring screw terminals for solder-free wire attachment.
Package Contents:
- 10 x Male DC Power Plug Barrel Connectors (5.5mm x 2.1mm)
- 10 x Female DC Power Plug Barrel Connectors (5.5mm x 2.1mm)

Figure 1: Male and Female DC Power Plug Connectors.
Specifications
| Connector Type | DC Power Plug (Male & Female) |
| Barrel Size | 5.5mm (outer diameter) x 2.1mm (inner diameter) |
| Voltage Rating | 1V - 36V DC |
| Current Rating | Up to 5A |
| Wire Gauge Compatibility | 16-26 AWG |
| Connection Method | Screw Terminals (solder-free) |
| Material | Pure Copper Core, PVC Insulation |
| Dimensions (approx.) | Male: 37mm (L) x 14mm (W) x 13mm (H); Female: 36mm (L) x 14mm (W) x 13mm (H) |
| Model Number | 8541689448 |
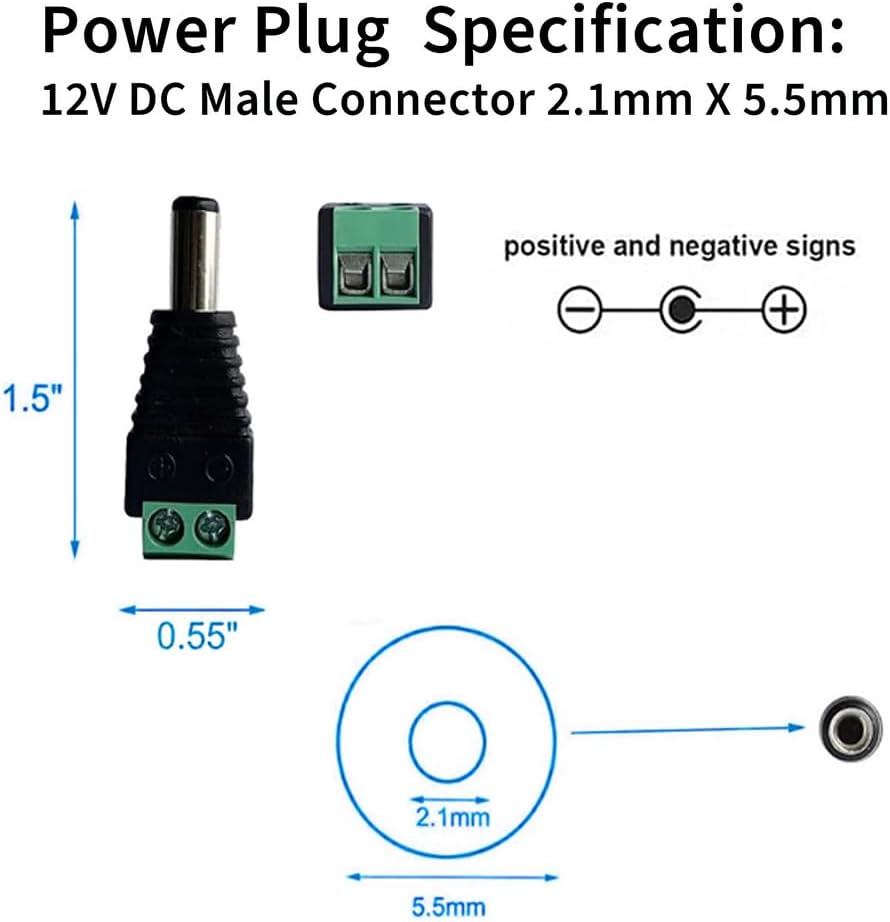
Figure 2: Male Connector Specifications (5.5mm x 2.1mm).

Figure 3: Female Connector Specifications (5.5mm x 2.1mm).
Setup and Installation
These connectors are designed for easy, solder-free installation. Follow these steps to connect your wires:
- Prepare the Wire: Strip approximately 5-7mm of insulation from the ends of your 16-26 AWG power wires. Ensure the wire strands are neatly twisted.
- Identify Polarity: Observe the '+' and '-' markings on the green screw terminal block of the connector. Match the positive wire (typically red) to the '+' terminal and the negative wire (typically black) to the '-' terminal.
- Loosen Screws: Using a small screwdriver, loosen the two screws on the green terminal block.
- Insert Wires: Carefully insert the stripped end of the positive wire into the '+' terminal hole and the negative wire into the '-' terminal hole. Ensure no stray wire strands are touching each other or the opposite terminal.
- Tighten Screws: Securely tighten the screws to firmly hold the wires in place. Gently tug on the wires to confirm they are properly seated and cannot be easily pulled out.
- Repeat for all connections.

Figure 4: Step-by-step wire connection process.
Important: Always ensure correct polarity when connecting wires to prevent damage to your devices. The double-layer injection molding provides secure polarity connection and insulation.
Operating Instructions
Once wires are securely connected to the screw terminals, the DC power plugs are ready for use. Simply connect the male plug to a female jack, or vice-versa, depending on your application.
Applications:
- DC 1V/3V/5V/9V/12V/24V/36V power supplies
- LED strip lighting
- CCTV cameras and security systems
- Audio/video connections
- Various DIY electronic projects

Figure 5: Common applications for DC power connectors.
Maintenance
These DC power connectors require minimal maintenance. To ensure optimal performance and longevity:
- Keep connectors clean and free from dust and debris.
- Avoid exposing connectors to excessive moisture or extreme temperatures.
- Periodically check wire connections to ensure screws remain tight.
- Do not exceed the specified current rating of 5A to prevent overheating.
Troubleshooting
If you encounter issues with your DC power connectors, consider the following:
- No Power:
- Verify that the power source is active and providing the correct voltage.
- Check all wire connections for tightness and correct polarity (+ to +, - to -).
- Ensure the wire gauge (16-26 AWG) is appropriate and the wires are fully inserted into the terminals.
- Inspect wires for any breaks or damage.
- Intermittent Connection:
- Retighten all screw terminals. Loose connections can cause intermittent power.
- Ensure the male and female connectors are fully seated.
- Difficulty Inserting Wires:
- Ensure the screws are sufficiently loosened.
- Twist stranded wires tightly before insertion to prevent fraying.
- For very fine strands, a small amount of solder on the tip can help, but is generally not required.
Warranty and Support
CENTROPOWER products are designed for reliability and durability. For any technical assistance or quality-related concerns, please contact CENTROPOWER customer support. Refer to your purchase documentation for specific warranty details.
Manufacturer: CENTROPOWER