SWM 202364
SWM 7-inch Touch Screen Android Car Stereo User Manual
Model: 202364
Introduction
Thank you for choosing the SWM 7-inch Touch Screen Android Car Stereo. This device is designed to enhance your in-car entertainment and navigation experience with its advanced features, including a responsive touch screen, Android operating system, Bluetooth connectivity, FM radio, and GPS navigation. This manual provides detailed instructions for installation, operation, maintenance, and troubleshooting to ensure optimal performance and longevity of your device.
Safety Information
Please read all safety instructions carefully before installing and operating the device. Failure to follow these instructions may result in injury or damage to the device or vehicle.
- Professional Installation Recommended: Due to the complexity of car electrical systems, professional installation is highly recommended.
- Power Supply: Ensure the device is connected to a 12V DC power supply with negative grounding.
- Wiring: Do not short-circuit any wires. Insulate all unused wires.
- Driving Safety: Do not operate the device in a way that distracts you from driving. Always prioritize road safety.
- Temperature: Avoid exposing the device to extreme temperatures or direct sunlight for prolonged periods.
- Cleaning: Use a soft, dry cloth for cleaning. Do not use abrasive cleaners or solvents.
Package Contents
Verify that all items listed below are included in your package:

Figure 1: Included Components
This image displays the complete set of items you should find in your product box, ensuring you have all necessary parts for installation and operation.
- 1 x SWM Car MP5 (Main Unit)
- 1 x USB Extension Cable
- 2 x Buttcock Lines (Wiring Harnesses)
- 1 x Set of Installing Accessories (Mounting Brackets, Screws)
- 1 x GPS Antenna
Product Overview
Front Panel

Figure 2: Front Panel Display
The front panel features a 7-inch capacitive touch screen, providing access to all functions. Physical buttons for power, volume, and navigation are located on the left side for quick access.
Rear Connections

Figure 3: Rear Panel Connections
The rear panel houses all necessary input and output ports for vehicle integration. These include connections for power, speakers, GPS antenna, radio antenna, and reverse camera input.
- Power/Horn Line Socket: Main power input and vehicle horn integration.
- Audio Output Jack: Connects to external amplifiers or speakers.
- GPS Antenna Socket: Dedicated port for the included GPS antenna.
- Radio Antenna Socket: Connects to the vehicle's FM/AM antenna.
- Reverse Video Input: For connecting a rear-view camera.
Dimensions

Figure 4: Product Dimensions
The stereo unit measures approximately 178mm in width, 102mm in height, and 58mm in depth, designed for a standard 2-DIN car stereo slot.
Setup & Installation
Proper installation is crucial for the performance and safety of your car stereo. If you are unsure about any steps, consult a professional installer.
Wiring Diagram
Refer to the wiring diagram provided with your product's specific wiring harnesses. Key connections typically include:
- Yellow Wire (B+): Connect to constant 12V power supply.
- Red Wire (ACC): Connect to ignition switched 12V power supply.
- Black Wire (GND): Connect to vehicle chassis ground.
- Speaker Wires: Connect to corresponding vehicle speaker wires (e.g., Front Left +, Front Left -, etc.). Ensure correct polarity.
- Reverse Wire: Connect to the vehicle's reverse light signal for automatic rear camera display.
- Antenna Connections: Connect the radio antenna and GPS antenna to their respective ports on the rear of the unit.
Mounting
Use the provided mounting brackets and screws to secure the unit into your vehicle's 2-DIN dashboard opening. Ensure the unit is firmly in place to prevent vibration and movement.
Initial Power-On
After all connections are made, turn on your vehicle's ignition. The stereo should power on automatically. If not, check all wiring connections.
Operating Instructions
User Interface Navigation

Figure 5: Interface Display Examples
The system features an intuitive touch-screen interface. Swipe left or right to navigate between home screens and access various applications like Navigation, Bluetooth, Radio, and Music.
Basic Operations
- Power On/Off: Press the power button on the front panel or use the vehicle's ignition.
- Volume Control: Use the volume buttons on the front panel or the touch screen controls.
- Mute: Tap the mute icon on the screen or press the dedicated mute button if available.
Radio (FM Tuner)
From the main menu, tap the "Radio" icon.
- Auto Scan: Tap the "Scan" button to automatically search and save available radio stations.
- Manual Tuning: Use the arrow buttons to fine-tune the frequency.
- Preset Stations: Tap and hold a numbered button to save the current station to that preset.
Bluetooth Connectivity

Figure 6: Bluetooth Interface and Usage
The Bluetooth feature allows for hands-free calling and audio streaming from your smartphone. The image shows the Bluetooth connection screen and examples of its use for phone calls.
- Tap the "Bluetooth" icon on the home screen.
- On your smartphone, search for available Bluetooth devices and select "SWM" (or similar device name).
- Confirm the pairing code if prompted.
- Once connected, you can make/receive calls and play music through the car stereo.
Navigation (GPS)
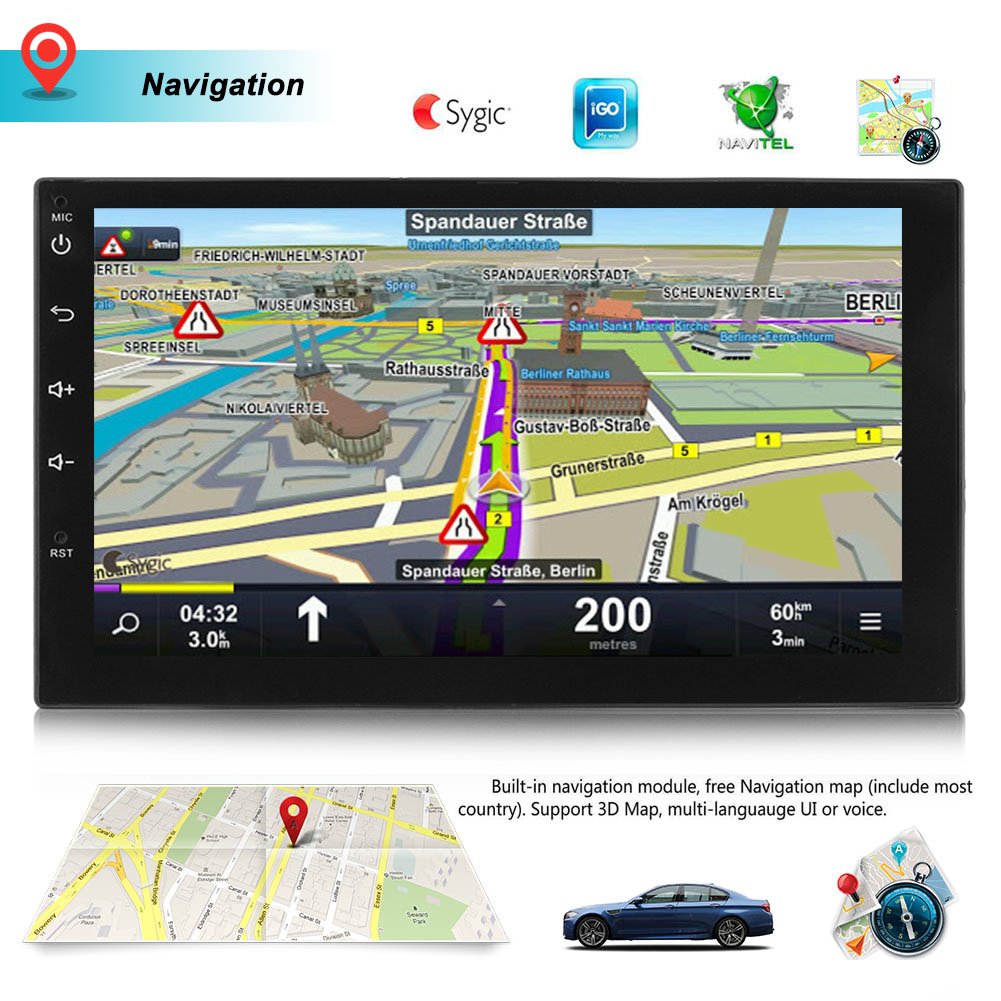
Figure 7: Navigation Interface
The built-in GPS module allows for precise navigation. The image shows a typical navigation screen with map details and route information.
Tap the "Navi" icon to launch the pre-installed navigation application. Ensure the GPS antenna is properly connected and positioned for optimal signal reception.
Media Playback (MP5)
The unit supports various audio and video formats via USB. Connect a USB drive to the provided USB extension cable.
- Supported Audio Formats: MP3, WMA, WAV, OGG, FLAC, APE.
- Supported Video Formats: MP4, AVI, MKV, etc. (check specific codec support in system settings).
- Tap the "Music" or "Video" icon to browse and play media files.
Smartphone Connection (Mirror Link)
The device supports screen mirroring for both Android and iOS phones. Follow the on-screen instructions within the "Mirror Link" application to establish a connection.
System Settings

Figure 8: System Settings Interface
Access various system settings, including time, general preferences, and sound adjustments, through the settings menu. This image shows examples of these configuration screens.
Tap the "Settings" icon to access system configurations:
- General Settings: Adjust display brightness, button sounds, and other general preferences.
- Sound Settings: Control equalizer, balance, fader, and subwoofer settings.
- Time Settings: Set date and time, or enable automatic time synchronization via GPS.
- Language Settings: Select your preferred system language.
- Network Settings: Configure Wi-Fi connections for internet access.
Maintenance
Regular maintenance helps prolong the life of your car stereo.
- Cleaning the Screen: Use a soft, lint-free cloth to gently wipe the touch screen. For stubborn smudges, slightly dampen the cloth with water or a screen cleaner designed for electronics. Do not spray liquid directly onto the screen.
- General Cleaning: Keep the unit free from dust and debris. Use a soft brush or compressed air to clean vents and button crevices.
- Software Updates: Periodically check the manufacturer's website for available software updates to ensure optimal performance and access to new features.
- Avoid Liquids: Do not allow liquids to spill onto or into the unit.
Troubleshooting
If you encounter issues with your SWM car stereo, refer to the following common problems and solutions:
| Problem | Possible Cause | Solution |
|---|---|---|
| No Power | Incorrect wiring; Blown fuse; Vehicle battery issue. | Check power and ground connections. Inspect vehicle's fuse box and the stereo's inline fuse. Ensure vehicle battery is charged. |
| No Sound | Speaker wires disconnected; Volume too low; Mute function active; Incorrect audio settings. | Verify speaker wire connections. Increase volume. Disable mute. Check audio output settings in the sound menu. |
| Bluetooth Not Connecting | Device not in pairing mode; Incorrect pairing code; Interference. | Ensure Bluetooth is enabled on both devices and the stereo is in pairing mode. Re-enter pairing code. Try pairing in a different location. Reset Bluetooth on both devices. |
| GPS Signal Lost/Inaccurate | GPS antenna not properly connected or positioned; Obstruction. | Ensure GPS antenna is securely connected and placed in an area with a clear view of the sky (e.g., dashboard). Avoid metal obstructions. |
| Touch Screen Unresponsive | System freeze; Dirt on screen. | Perform a soft reset (locate the small reset button, usually recessed, and press with a non-metallic pointed object). Clean the screen. |
| Radio Reception Poor | Antenna not connected; Weak signal area; Interference. | Check radio antenna connection. Try tuning to stronger stations. Move away from sources of electrical interference. |
Specifications
Key technical specifications for the SWM 7-inch Touch Screen Android Car Stereo:
- System: Android 7.1
- Screen Resolution: 1024 x 600 HD capacitive screen
- Processor: Quad-core (specific model may vary)
- Internal Storage: 16GB Flash
- RAM: 1GB
- Connectivity: Built-In Bluetooth, Wi-Fi, USB
- Tuner Technology: FM Radio
- Navigation: Built-in GPS Navigation
- Audio Output Mode: Stereo
- Number of Channels: 4
- Supported Audio Formats: MP3, WMA, WAV, OGG, FLAC, APE
- Compatible Devices: Smartphone (Android & iOS for Mirror Link)
- Color: Black
- Material: Other (composite materials)
- Model Number: 202364
Warranty and Support
This product comes with a standard manufacturer's warranty. Please refer to the warranty card included in your package for specific terms and conditions, including warranty period and coverage details.
For technical support, troubleshooting assistance beyond this manual, or warranty claims, please contact the seller or manufacturer directly using the contact information provided with your purchase or on the product packaging. Keep your purchase receipt as proof of purchase for warranty purposes.
Ask a question about this manual
Ask about setup, troubleshooting, compatibility, parts, safety, or missing instructions. Manuals+ will review the question and use this page’s manual context to help answer it.