Medion P66080
MEDION P66080 Wake-up Light Instruction Manual
Model: P66080
1. Introduction
This manual provides detailed instructions for the operation and maintenance of your MEDION P66080 Wake-up Light. Please read this manual thoroughly before using the device to ensure proper function and safety. The MEDION P66080 is designed to enhance your morning routine with a natural sunrise simulation and offers various features including a PLL FM radio, multiple alarm settings, and a sleep function.

Image 1.1: MEDION P66080 in a Bedroom Setting
This image shows the MEDION P66080 Wake-up Light positioned on a wooden bedside table next to a bed, illustrating its typical placement and size in a home environment.
2. Safety Information
- Ensure the device is placed on a stable, flat surface.
- Do not expose the device to water or excessive moisture.
- Keep the device away from heat sources and direct sunlight.
- Use only the provided power adapter.
- Do not attempt to open or repair the device yourself. Contact qualified service personnel.
3. Package Contents
Verify that all items are present in the package:
- MEDION P66080 Wake-up Light
- Power Adapter
- Instruction Manual
4. Product Overview
The MEDION P66080 is a wake-up light designed to simulate natural sunrise for a gentle awakening. It features a PLL FM radio, multiple alarm settings, and a sleep function.
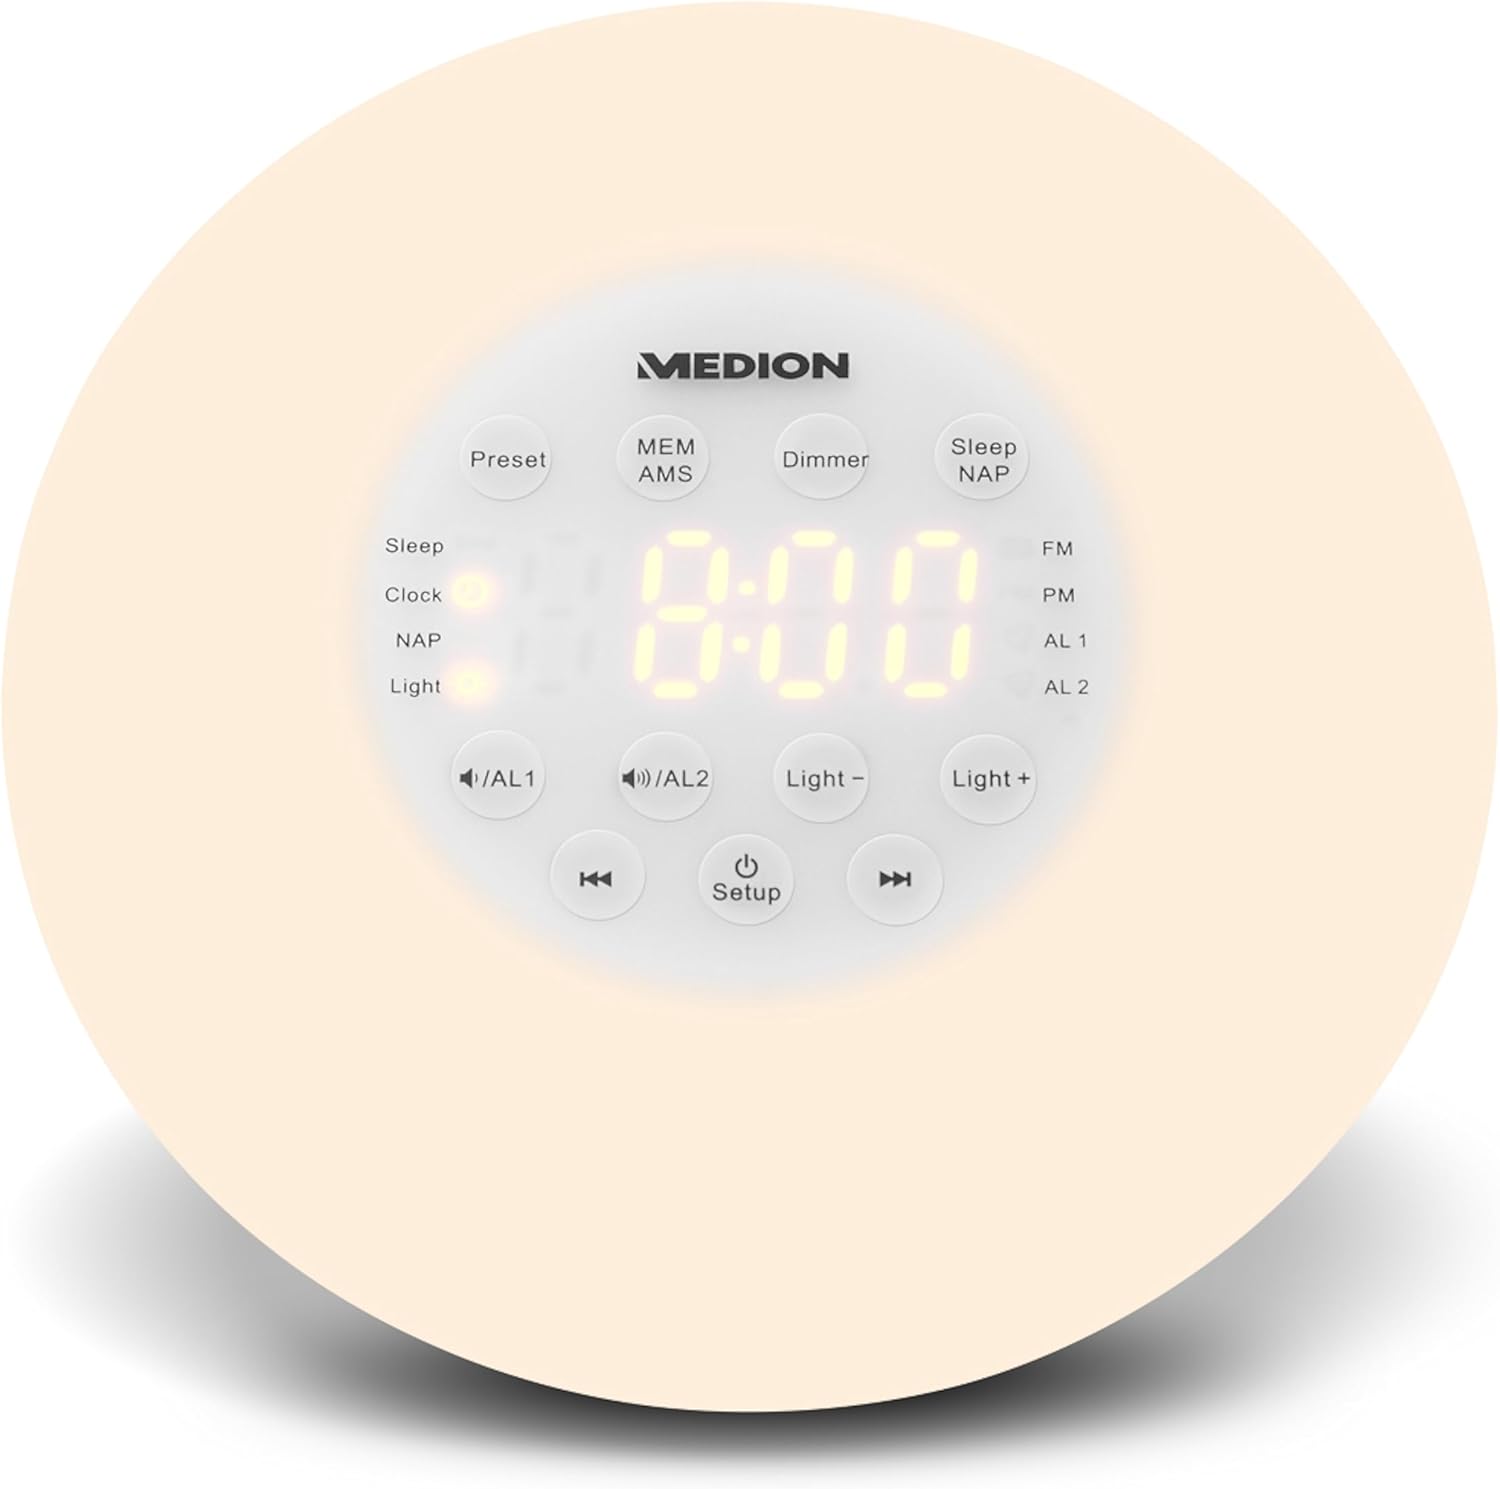
Image 4.1: Front Panel Controls
This image displays the front of the MEDION P66080 Wake-up Light, highlighting the central LED display showing "8:00" and various touch-sensitive control buttons arranged around it. Buttons include "Preset", "MEM AMS", "Dimmer", "Sleep NAP", "FM", "AL 1", "AL 2", "Light -", "Light +", volume controls, and "Setup".
4.1 Control Buttons and Display
- Display: Shows time, alarm status, and radio frequency.
- Setup Button: Enters setup mode for time and alarm settings. Also acts as a power button for the light.
- Light + / Light - Buttons: Adjust light intensity. Also used for adjusting values in setup modes.
- << /AL1 Button: Decreases volume, navigates backward in settings. Used to activate/deactivate/set Alarm 1.
- >> /AL2 Button: Increases volume, navigates forward in settings. Used to activate/deactivate/set Alarm 2.
- FM Button: Toggles FM radio mode.
- Preset Button: Recalls radio presets.
- MEM AMS Button: Saves radio presets, performs automatic station scan.
- Dimmer Button: Adjusts display brightness.
- Sleep NAP Button: Activates sleep timer or NAP timer.
5. Setup
5.1 Power Connection
- Unpack the device and place it on a stable surface.
- Connect the power adapter to the DC input port on the back of the wake-up light.
- Plug the power adapter into a standard electrical outlet. The display will illuminate.
5.2 Setting the Clock
- Press and hold the Setup button until the hour digits flash.
- Use the Light + or Light - buttons to adjust the hour.
- Press the Setup button again to confirm the hour and move to minute setting.
- Use the Light + or Light - buttons to adjust the minutes.
- Press the Setup button one more time to confirm and exit clock setting mode.
6. Operating Instructions
6.1 Setting Alarms (AL1 / AL2)
The device features two independent alarms, AL1 and AL2.
- To activate/deactivate Alarm 1: Briefly press the << /AL1 button. The AL1 icon will appear/disappear on the display.
- To set Alarm 1: Press and hold the << /AL1 button until the hour digits flash.
- Use the Light + or Light - buttons to adjust the alarm hour.
- Press the << /AL1 button again to confirm the hour and move to minute setting.
- Use the Light + or Light - buttons to adjust the alarm minutes.
- Press the << /AL1 button to confirm the minutes.
- Next, select the alarm sound source (radio or natural sound) and volume using the Light + or Light - buttons.
- Press the << /AL1 button to confirm and exit alarm setting.
- Repeat steps for Alarm 2 using the >> /AL2 button.
6.2 Sunrise Simulation
The wake-up light simulates a sunrise 30 minutes before your set alarm time. The light gradually increases in brightness, reaching its maximum intensity at the alarm time. This feature is automatically activated when an alarm is set.
6.3 PLL FM Radio Operation
- Press the FM button to turn on the radio. The current frequency will be displayed.
- Use the << /AL1 or >> /AL2 buttons to manually tune the frequency.
- Press and hold the << /AL1 or >> /AL2 buttons for automatic station search.
- To save a preset: Tune to the desired station, then press and hold the MEM AMS button until "PXX" flashes. Use Light + or Light - to select a preset number, then press MEM AMS again to save.
- To recall a preset: Press the Preset button repeatedly to cycle through saved stations.
- To perform an automatic memory scan (AMS): Press and hold the MEM AMS button. The radio will scan and save available stations automatically.
- Adjust volume using the << /AL1 (decrease) or >> /AL2 (increase) buttons.
- Press the FM button again to turn off the radio.
6.4 Sleep Function (Sleep Timer)
The sleep function allows the radio or light to gradually dim and turn off after a set period (up to 90 minutes).
- While the radio is playing or the light is on, press the Sleep NAP button.
- Repeatedly press the Sleep NAP button to cycle through available sleep times (e.g., 90, 60, 30, 15 minutes, OFF).
- The selected time will be displayed briefly, and the device will turn off after that duration.
6.5 NAP Timer
The NAP timer provides a short alarm for naps.
- Press and hold the Sleep NAP button until the NAP icon appears and the time flashes.
- Use the Light + or Light - buttons to set the desired nap duration (e.g., 10, 20, 30 minutes).
- Press the Sleep NAP button again to confirm. The NAP timer will start.
- To cancel the NAP timer, press the Sleep NAP button again.
6.6 Snooze Function
When an alarm sounds, press the Setup button (or any other button except the alarm off button) to activate the snooze function. The alarm will pause for a period between 1 and 60 minutes and sound again.
6.7 Light Control
The wake-up light can also be used as a bedside lamp.
- To turn the light on/off: Briefly press the Setup button.
- Use the Light + and Light - buttons to adjust the brightness level when the light is on.
- Press the Dimmer button to adjust the brightness of the display itself.
7. Maintenance
- Cleaning: Disconnect the power before cleaning. Use a soft, dry cloth to wipe the surface of the device. Do not use abrasive cleaners or solvents.
- Storage: If not in use for an extended period, store the device in a cool, dry place, away from direct sunlight.
8. Troubleshooting
| Problem | Possible Cause | Solution |
|---|---|---|
| Device does not power on. | Power adapter not connected or faulty outlet. | Ensure power adapter is securely connected and the outlet is functional. |
| Alarm does not sound. | Alarm not activated or volume too low. | Check if the alarm icon is displayed. Increase alarm volume. |
| Poor radio reception. | Antenna not extended or interference. | Extend the FM antenna fully. Reposition the device to reduce interference. |
| Light does not turn on. | Light function not activated or brightness set to minimum. | Activate the light function and increase brightness using the Light + button. |
9. Specifications
- Model: MEDION P66080
- Power Source: Electric Corded (2.3E+2 VAC)
- Light Type: LED
- Tuner Technology: FM with PLL-tuning
- Radio Bands Supported: FM
- Display Type: LED
- Special Features: Built-in clock, Sunrise Simulation, Sleep Timer, NAP Timer, Snooze Function
- Dimensions: 18 x 0.03 x 18 cm (Product); 453.59 g (Weight)
- Connectivity: 3.5 mm Jack (for compatible devices like headphones, MP3 players)
10. Warranty and Support
For warranty information and technical support, please refer to the warranty card included with your product or visit the official Medion website. Keep your proof of purchase for warranty claims.
Medion Official Website: www.medion.com