Introduction
This manual provides instructions for the safe and effective use, setup, maintenance, and troubleshooting of your kleankin Outdoor Portable Travel Toilet. Please read this manual thoroughly before initial use and retain it for future reference.

Image: The kleankin portable travel toilet, designed for outdoor use.
Safety Information
- Ensure the toilet is placed on a stable, level surface before use.
- Do not overfill the freshwater or waste tanks.
- Always close the slide valve completely after flushing to prevent odors and leaks.
- Use only biodegradable toilet chemicals designed for portable toilets. Do not use household cleaners or harsh chemicals.
- Empty the waste tank regularly to prevent overflow and maintain hygiene.
- Keep out of reach of children when not in use.
Components Overview
The kleankin portable toilet consists of two main detachable parts: the upper seat and freshwater tank assembly, and the lower waste holding tank. Key components include:
- Flush Pump: Activates the flushing mechanism.
- Water Filler Cap: For adding fresh water to the upper tank.
- Waste Tank Cap: For sealing and emptying the lower waste tank.
- Side Latches: Securely connect and disconnect the upper and lower tanks.
- Double Sealed Valve: Prevents odors from escaping the waste tank.
- Slide Valve Handle: Opens and closes the valve between the seat and waste tank.
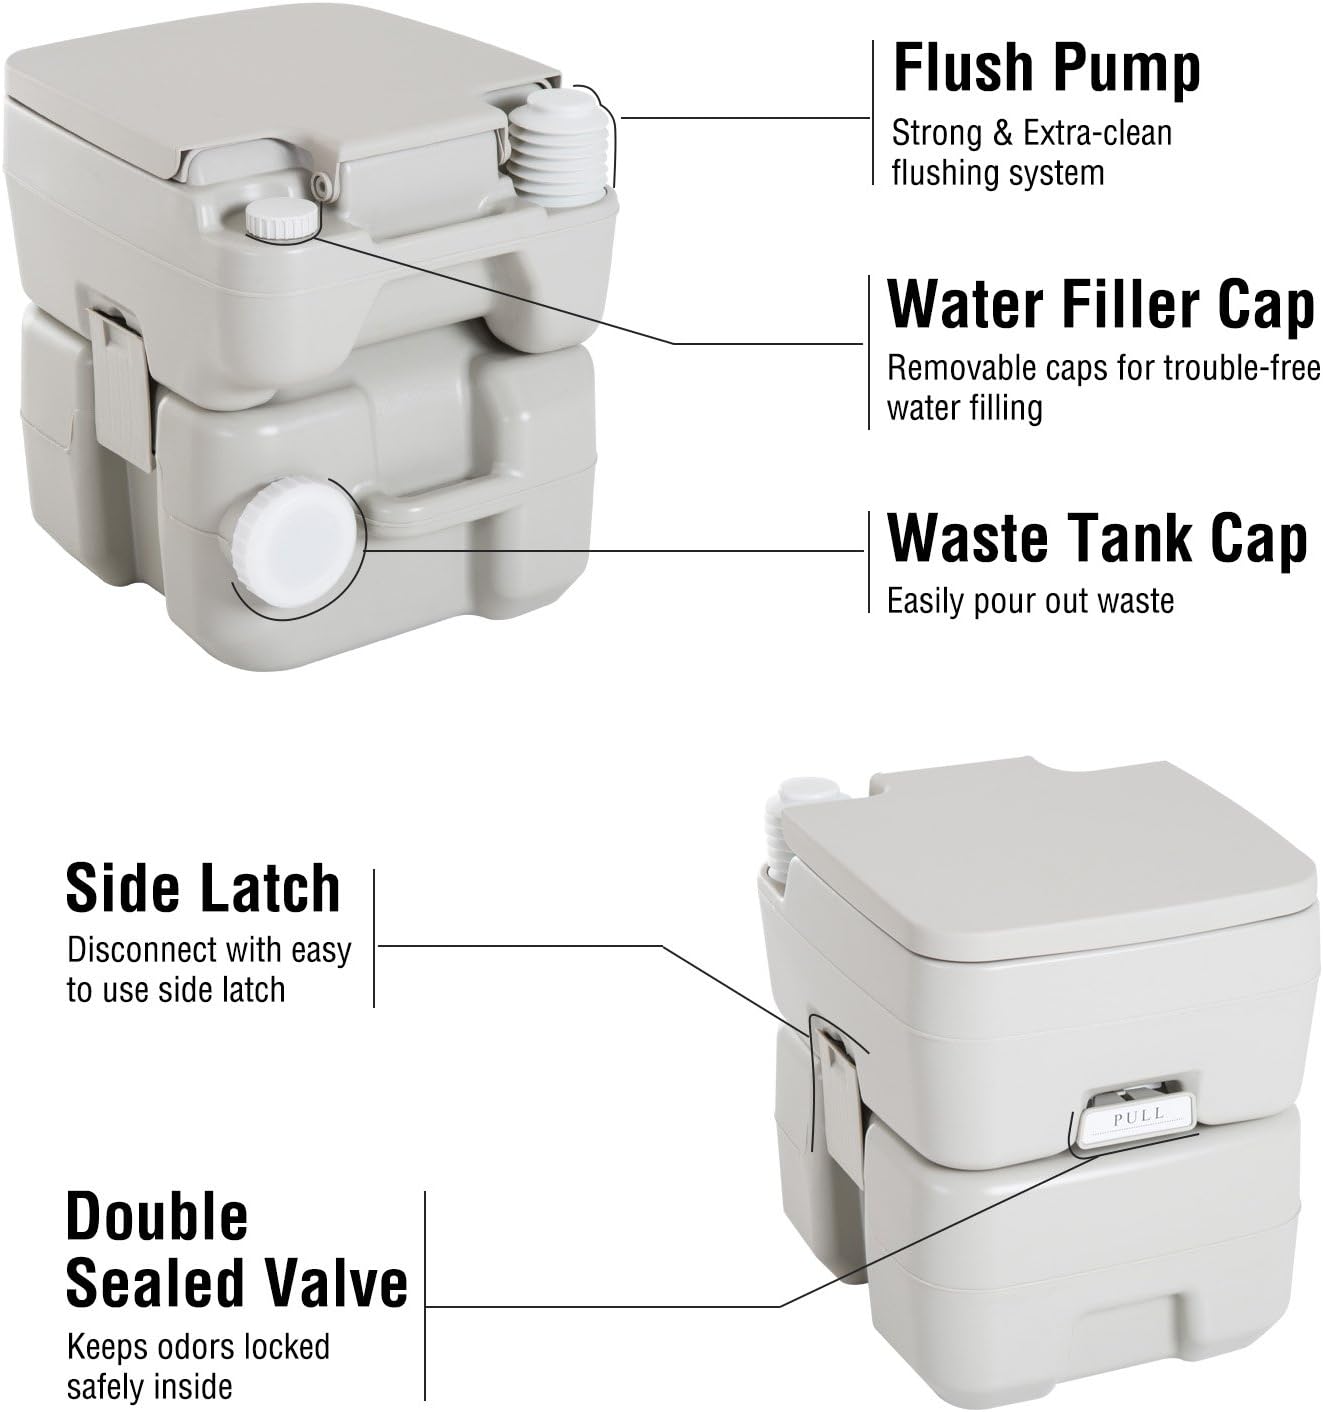
Image: Detailed view of the toilet's components, including the flush pump, water filler cap, waste tank cap, side latch, and double sealed valve.
Setup Instructions
- Separate the Tanks: Release the side latches to separate the upper seat/freshwater tank from the lower waste tank.
- Fill Freshwater Tank: Unscrew the water filler cap on the upper tank. Fill the tank with clean water, adding a recommended portable toilet chemical if desired. Do not overfill. Securely replace the cap.
- Prepare Waste Tank (Optional): For odor control, add a small amount of water and a recommended portable toilet chemical to the waste tank through the slide valve opening before reattaching the upper tank.
- Reattach Tanks: Align the upper tank with the lower waste tank and press down firmly until the side latches click into place, ensuring a secure connection.
- Position Toilet: Place the assembled toilet on a firm, level surface.

Image: The portable toilet disassembled into its two main parts: the upper seat unit and the lower waste tank, highlighting the connecting latches.
Operating Instructions
- Before Use: Ensure the slide valve handle is pushed in (closed position) to seal the waste tank.
- After Use: Pull the slide valve handle out to open the valve.
- Flush: Press the flush pump multiple times to rinse the bowl with fresh water. The 3-way pistol flush system ensures thorough cleaning.
- Close Valve: Push the slide valve handle back in firmly to close the valve and seal the waste tank, preventing odors.

Image: A hand operating the flush pump, demonstrating the water flow during flushing.
Maintenance
Emptying the Waste Tank
- Ensure the slide valve is closed.
- Release the side latches and separate the upper tank from the lower waste tank.
- Carry the waste tank to an approved disposal site. The integrated handle on the tank facilitates transport.
- Unscrew the waste tank cap and carefully pour out the contents.
- Rinse the waste tank thoroughly with water. You may add a small amount of cleaning solution designed for portable toilets and shake the tank before rinsing.
- Replace the waste tank cap securely.

Image: The waste tank being carried by its handle, illustrating the ease of transport for emptying.
Cleaning and Storage
- Clean the toilet regularly with mild soap and water. Avoid abrasive cleaners.
- Ensure all parts are dry before storing.
- Store the toilet in a cool, dry place, away from direct sunlight.

Image: The portable toilet highlighting its capacity for over 50 flushes and ease of cleaning.
Troubleshooting
| Problem | Possible Cause | Solution |
|---|---|---|
| Odors escaping | Slide valve not fully closed; waste tank overfilled; insufficient chemical treatment. | Ensure slide valve is fully closed. Do not overfill. Add appropriate portable toilet chemical. |
| Poor flush performance | Low water level in freshwater tank; flush pump issue. | Refill freshwater tank. Check flush pump for blockages or damage. |
| Leaking between tanks | Tanks not securely latched; seal damaged. | Ensure side latches are fully engaged. Inspect rubber seals for damage and replace if necessary. |
| Difficulty separating/reattaching tanks | Latches stuck or misaligned. | Ensure latches are fully disengaged/engaged. Apply a small amount of silicone lubricant to moving parts if needed. |
Specifications
| Feature | Detail |
|---|---|
| Model Number | 713-033 |
| Product Dimensions (L x W x H) | 16.3" x 14.4" x 16.5" (41.5 cm x 36.5 cm x 42 cm) |
| Freshwater Tank Capacity | 2.6 Gallons (approx. 10 Liters) |
| Waste Holding Tank Capacity | 5.3 Gallons (approx. 20 Liters) |
| Material | High Density Polyethylene (HDPE), Acrylonitrile Butadiene Styrene (ABS) |
| Item Weight | 5.22 kg (11.5 lbs) |
| Flush System | 3-Way Pistol Pump |
| Color | Grey |

Image: The portable toilet with its length, width, and height dimensions clearly marked.
Warranty and Support
Warranty Information
This kleankin product is covered by a 90-day warranty against manufacturer defects from the date of purchase. This warranty covers defects in materials and workmanship under normal use. It does not cover damage caused by misuse, abuse, accidents, unauthorized repairs, or normal wear and tear.
Customer Support
For technical assistance, warranty claims, or questions regarding your kleankin portable toilet, please contact the manufacturer:
- Manufacturer: Aosom Canada
- Contact Information: Markham, Ontario, CA
- Telephone: 1-416-792-6088
Please have your model number (713-033) and proof of purchase available when contacting support.