1. Introduction
This manual provides detailed instructions for the installation, operation, and maintenance of your Dahua Professional 4 Megapixel IP POE Dome Camera. Please read this manual thoroughly before using the product to ensure proper and safe operation.
The Dahua IPC-HDW4433C-A is a high-performance dome camera designed for professional surveillance applications. It features a 4-megapixel CMOS sensor, a 2.8mm fixed lens, Smart IR illumination up to 50 meters, and an integrated microphone. It supports Power over Ethernet (PoE) for simplified installation and is rated IP67 for outdoor use.
2. Safety Information
Observe the following safety precautions to prevent injury or damage to the product:
- Ensure the power supply meets the camera's requirements (DC 12V or PoE 802.3af).
- Do not expose the camera to extreme temperatures outside its operating range (-30°C to +60°C).
- Avoid direct exposure to strong light sources, which may affect image quality or damage the sensor.
- Handle the camera with care. Do not drop or subject it to strong vibrations.
- Installation should be performed by qualified personnel in accordance with local electrical codes.
- Do not disassemble the camera. Refer all servicing to qualified service personnel.
3. Package Contents
Verify that all items are present in the package:
- Dahua 4MP IP POE Dome Camera (IPC-HDW4433C-A)
- Mounting Screws and Wall Plugs
- Installation Template
- Quick Start Guide
- Waterproof Connector (for Ethernet cable)
Note: The power adapter is sold separately.
4. Product Overview
Familiarize yourself with the camera's components and interfaces.
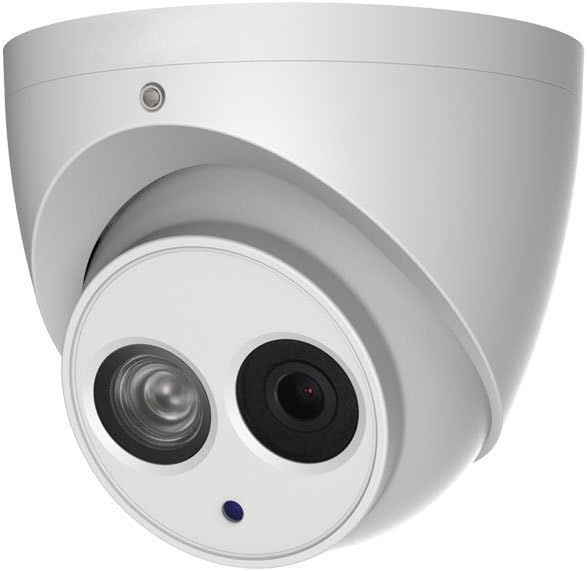
Figure 4.1: Front view of the Dahua dome camera, showing the main lens and IR illuminator.

Figure 4.2: Rear view of the camera showing the integrated Ethernet (RJ45) and DC 12V power cables.
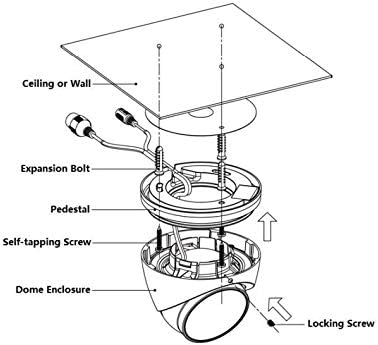
Figure 4.3: Diagram illustrating the camera's main body (1), reset button (2), RJ45 network connector (3), and DC 12V power input (4).
Key Components:
- Lens: 2.8mm fixed lens with a 99° horizontal field of view.
- IR Illuminator: Smart IR LED array for night vision up to 50 meters.
- Microphone: Integrated for audio capture.
- RJ45 Port: For network connection and Power over Ethernet (PoE).
- DC 12V Input: Alternative power input if PoE is not used.
- Reset Button: Used to restore factory settings (refer to operating section).
5. Setup and Installation
This section guides you through the physical installation of the camera.
5.1 Mounting Location Considerations:
- Choose a location that provides the desired field of view and is within range of your network and power source.
- Ensure the mounting surface is strong enough to support the camera's weight (approx. 350g).
- Avoid direct sunlight or strong artificial light pointing into the lens.
- The camera is IP67 rated, suitable for outdoor use.
5.2 Installation Steps:
- Prepare the Mounting Surface:
Use the provided installation template to mark the drilling points on the wall or ceiling. Drill pilot holes for the expansion bolts.

Figure 5.1: Mounting dimensions for the camera base, showing a diameter of 106mm and screw hole spacing of 49mm.

Figure 5.2: Detailed dimensions of the camera, including overall height (95mm) and base diameter (110mm).
- Attach the Pedestal:
Secure the camera's pedestal (mounting base) to the prepared surface using the expansion bolts and self-tapping screws. Ensure it is firmly attached.
Figure 5.3: Exploded view showing the dome enclosure, dome body, pedestal, and mounting hardware (expansion bolts, self-tapping screws).
- Connect Cables:
Route the Ethernet cable (for PoE) or a separate DC 12V power cable and Ethernet cable through the cable entry point in the pedestal. Connect the RJ45 connector to your network switch/NVR (PoE enabled) or connect the DC 12V power adapter (sold separately) and then the RJ45 connector.
Use the waterproof connector for the Ethernet cable if installing outdoors to ensure IP67 protection.
- Attach the Dome Body:
Align the dome body with the pedestal and secure it. Some models may require twisting or using small locking screws to fix the dome body to the pedestal.

Figure 5.4: Assembly diagram showing how the dome enclosure attaches to the pedestal and the dome body.
- Adjust Camera Angle:
Once mounted, adjust the camera's angle to achieve the desired surveillance coverage. The 3-axis design allows for flexible positioning on walls and ceilings.
6. Operating Instructions
After physical installation, configure and operate your camera.
6.1 Initial Setup and Network Configuration:
- Power On: Connect the camera to power via PoE or a 12V DC adapter. The camera will power on automatically.
- Discover Device: Use Dahua's configuration tool (e.g., ConfigTool) on a computer connected to the same network to discover the camera.
- Initialize Device: For first-time use, you will need to initialize the camera by setting a strong password.
- Network Settings: Configure the camera's IP address (DHCP or static). Ensure it is accessible from your network.
- Access via Web Browser: Open a web browser and enter the camera's IP address to access its web interface. Log in with the username (default: admin) and the password you set.
6.2 Key Features and Settings:
- Video Compression: Supports H.265/H.264/MJPEG. H.265 offers better compression efficiency.
- Resolution: Configurable resolutions up to 4MP (2592x1520).
- Day/Night Mode: Automatic switching with mechanical IR-cut filter.
- Smart IR: Automatically adjusts IR intensity to prevent overexposure.
- WDR (120dB): Real Wide Dynamic Range for clear images in high-contrast lighting.
- 3D DNR: 3D Digital Noise Reduction for cleaner images in low light.
- IVS (Intelligent Video System): Includes features like tripwire, intrusion detection, abandoned/missing object detection, and facial detection. Configure these in the web interface.
- Privacy Masking: Set up to 4 privacy zones to block out sensitive areas.
- Audio: Integrated microphone for audio monitoring.
- Compatibility: Compatible with Onvif 2.42, PSIA, CGI, GB/T28181 for integration with NVRs and VMS.
6.3 Resetting to Factory Defaults:
To reset the camera, locate the reset button (refer to Figure 4.3). With the camera powered on, press and hold the reset button for approximately 10 seconds until the camera reboots. This will restore all settings to their factory defaults, including the IP address and login credentials.
7. Maintenance
Regular maintenance ensures optimal performance and longevity of your camera.
- Cleaning the Lens: Gently wipe the lens with a soft, clean cloth. If necessary, use a mild lens cleaning solution. Avoid abrasive materials.
- Cleaning the Housing: Wipe the camera's metal housing with a damp cloth. Do not use strong detergents or solvents.
- Firmware Updates: Periodically check the Dahua official website for firmware updates. Keeping the firmware updated can improve performance, add new features, and enhance security.
- Cable Inspection: Regularly inspect all cables for signs of wear, damage, or corrosion, especially for outdoor installations.
- Environmental Checks: Ensure the camera's operating environment remains within specified temperature and humidity ranges.
8. Troubleshooting
This section addresses common issues you might encounter.
| Problem | Possible Cause | Solution |
|---|---|---|
| No image/video output. | No power; Network cable disconnected; Incorrect IP address; Camera not initialized. | Check power supply (PoE or 12V DC). Verify network cable connection. Ensure correct IP address and network settings. Initialize the camera if it's new or reset. |
| Poor image quality. | Dirty lens; Incorrect focus (though fixed lens, check for obstructions); Insufficient lighting; Incorrect video settings. | Clean the lens. Ensure adequate lighting or enable Smart IR. Adjust video settings (e.g., WDR, 3D DNR) in the web interface. |
| Cannot access camera via network. | IP address conflict; Network configuration error; Firewall blocking access. | Verify IP address and subnet mask. Use ConfigTool to find the camera. Check firewall settings on your PC/network. Try resetting the camera to factory defaults. |
| IR not working at night. | IR setting disabled; Insufficient power. | Ensure Smart IR is enabled in settings. Verify stable power supply. |
If the problem persists after trying these solutions, contact Dahua technical support or your local distributor.
9. Specifications
Detailed technical specifications for the Dahua IPC-HDW4433C-A camera.
| Feature | Specification |
|---|---|
| Model Number | IPC-HDW4433C-A |
| Image Sensor | 1/3" 4 Megapixel Progressive CMOS |
| Effective Pixels | 2592(H) x 1520(V) |
| Scanning System | Progressive |
| Minimum Illumination | 0.002 Lux (Color), 0.0002 Lux (B/W), 0 Lux (IR On) |
| IR Distance | Up to 50 meters (1 LED Array) |
| Lens Type | Fixed Lens |
| Focal Length | 2.8mm |
| Angle of View | 99° (Horizontal) |
| Video Compression | H.265/H.264/MJPEG |
| Resolution | 4MP (2592x1520), 4MP (2560x1440), 3MP (2304x1296), 1080P (1920x1080), etc. |
| Frame Rate | Main Stream: 4MP (1~25/30fps); Sub Stream: D1 (1~25/30fps); Third Stream: 720p (1~12fps) |
| Bit Rate Control | CBR/VBR |
| WDR | 120dB (True WDR) |
| Day/Night | Auto (ICR) / Color / B/W |
| Noise Reduction | 3D DNR |
| Audio | Built-in Microphone |
| Intelligent Video System (IVS) | Tripwire, Intrusion, Abandoned/Missing Object, Facial Detection |
| Network Interface | RJ-45 (10/100Base-T) |
| Network Protocols | HTTP, TCP, ARP, RTSP, RTP, UDP, SMTP, FTP, DHCP, DNS, DDNS, PPPOE, IPv4/v6, SNMP, QoS, UPnP, NTP |
| Interoperability | ONVIF (Profile S/G), PSIA, CGI, GB/T28181 |
| Power Supply | DC 12V, PoE (802.3af) |
| Power Consumption | Max 5.6W (IR On) |
| Operating Temperature | -30°C to +60°C (-22°F to +140°F) |
| Operating Humidity | Less than 95% RH |
| Ingress Protection | IP67 |
| Casing Material | Metal |
| Dimensions | Ø 110mm x 95mm (Ø 4.33" x 3.74") |
| Weight | 350g (0.77 lb) |
10. Warranty and Support
For warranty information, please refer to the warranty card included with your product or visit the official Dahua website. Technical support can be obtained through your local distributor or by contacting Dahua's customer service directly.
For the latest drivers, software, and documentation, please visit the official Dahua support portal.