1. Introduction
This manual provides detailed instructions for the operation and maintenance of your NB NOIZZYBOX Retro XS Vintage 3-Band DSP Radio. This device combines classic radio functionality (FM/AM/SW) with modern connectivity options including Bluetooth 5.3, USB, TF card, and AUX input. Please read this manual thoroughly before use to ensure proper operation and to maximize your listening experience.
2. Product Overview
Familiarize yourself with the components and controls of your Retro XS Vintage radio.
2.1 Front Panel

Figure 1: Front View of the Radio. This image displays the front of the NB NOIZZYBOX Retro XS Vintage radio. Visible features include the circular speaker grille on the left, the illuminated tuning dial on the right, and a row of control buttons and two rotary knobs at the bottom. The brand logo "NB NOIZZYBOX" is also present.
- Speaker Grille: Audio output.
- LED Tuning Dial: Displays radio frequencies and illuminates when powered on.
- Control Buttons: (From left to right) Play/Pause/Mode, Previous Track/Rewind, Next Track/Fast Forward.
- Band Selector Knob: Switches between SW, AM, FM, and Bluetooth modes.
- Volume/Power Knob: Turns the unit ON/OFF and adjusts the volume level.
2.2 Side Panel
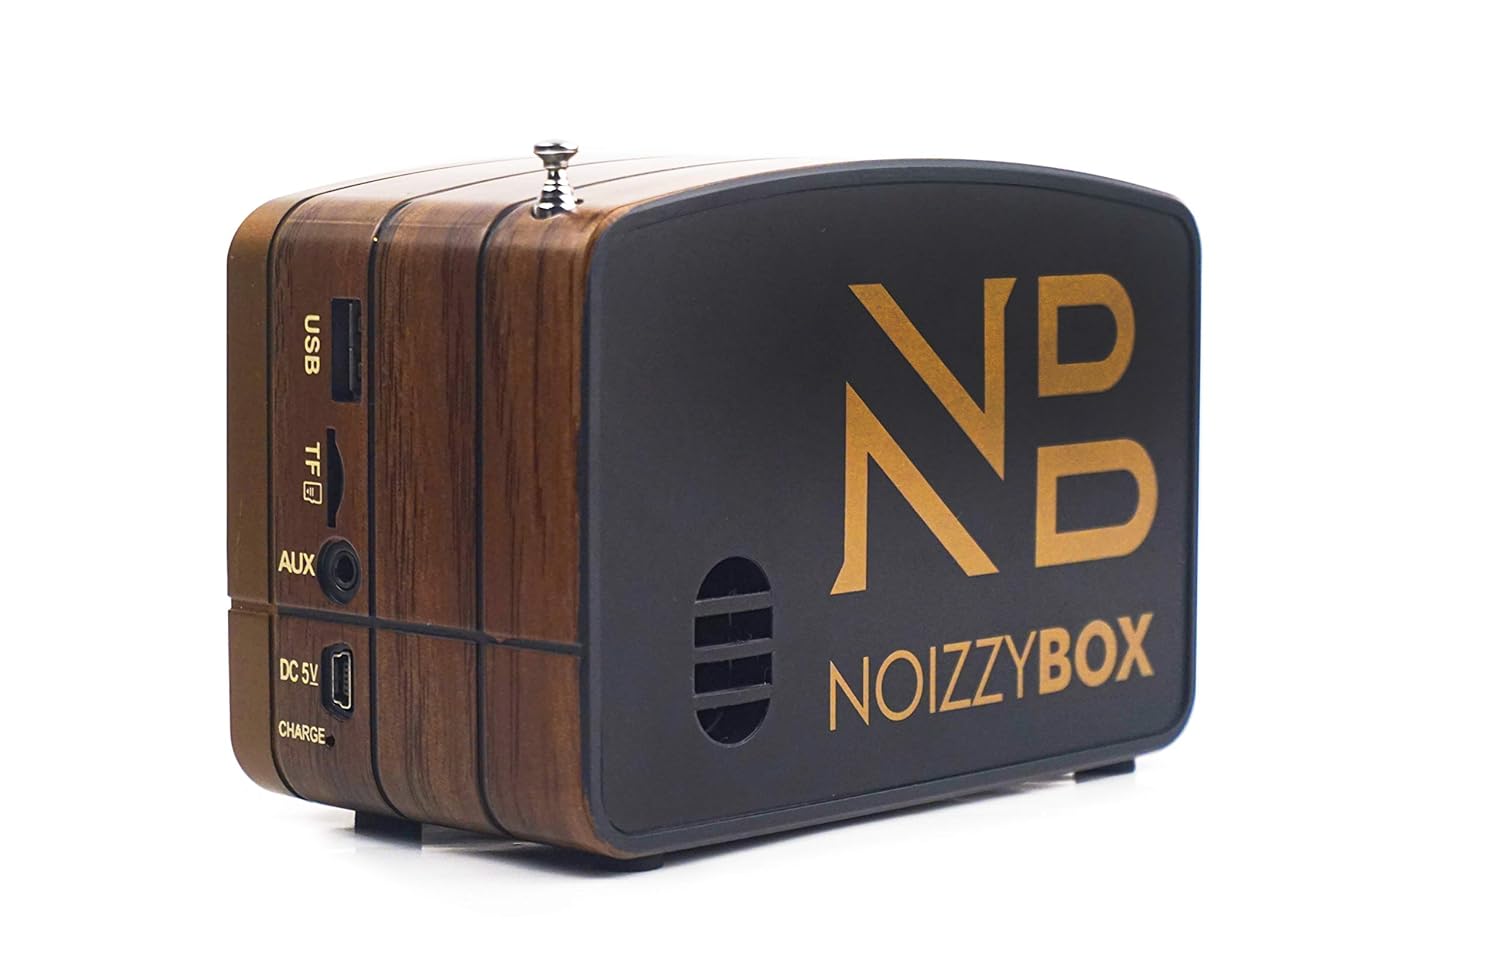
Figure 2: Side View with Ports. This image shows the left side panel of the radio, highlighting the various input ports. From top to bottom, these include a USB port, a TF (Micro SD) card slot, an AUX input jack, and a DC 5V charging port.
- USB Port: For USB flash drive playback.
- TF Card Slot: For Micro SD card playback.
- AUX Input: For connecting external audio devices via a 3.5mm cable.
- DC 5V CHARGE Port: For charging the internal battery.
2.3 Top Panel

Figure 3: Top View with Antenna. This image illustrates the top of the radio with its telescopic antenna fully extended, used for enhancing radio signal reception.
- Telescopic Antenna: Extends for improved FM and SW radio reception.
3. Setup
3.1 Initial Charging
- Locate the included charging cable.
- Connect the small end of the charging cable to the DC 5V CHARGE port on the side of the radio.
- Connect the other end of the charging cable to a standard USB power adapter (not included) or a powered USB port.
- Allow the radio to charge fully before first use. The charging indicator (if present, usually a small LED) will typically change color or turn off when charging is complete.
Note: A USB power adapter is required and not included. Use a standard 5V USB charger.
3.2 Antenna Adjustment
For optimal FM and SW radio reception, extend the telescopic antenna fully. For AM reception, the internal antenna is generally sufficient, but rotating the unit may improve signal quality.
4. Operating Instructions
4.1 Power On/Off and Volume Control
- To power on the radio, rotate the Volume/Power Knob clockwise until you hear a click and the unit powers on.
- Continue rotating the knob clockwise to increase the volume. Rotate counter-clockwise to decrease the volume.
- To power off, rotate the Volume/Power Knob counter-clockwise until it clicks off.
4.2 Radio Operation (FM/AM/SW)
- Power on the radio using the Volume/Power Knob.
- Rotate the Band Selector Knob to select your desired radio band: FM, AM, or SW.
- For FM and SW, extend the telescopic antenna for better reception.
- Carefully rotate the Tuning Knob (located on the LED dial) to scan for radio stations. The frequency will be indicated on the illuminated dial.
- Adjust the antenna position or the radio's orientation for optimal signal clarity.
4.3 Bluetooth Mode
- Power on the radio.
- Rotate the Band Selector Knob to 'BT' (Bluetooth) mode. The radio will emit an audible prompt indicating it is ready for pairing.
- On your mobile device (smartphone, tablet, etc.), enable Bluetooth and search for available devices.
- Select "Retro XS Vintage" (or similar name) from the list of devices to pair.
- Once paired, you can play audio from your device through the radio.
- Use the radio's control buttons (Play/Pause, Previous/Next) or your connected device to control playback.
4.4 USB/TF Card Playback
- Power on the radio.
- Insert a USB flash drive into the USB port or a TF (Micro SD) card into the TF card slot on the side panel.
- The radio should automatically switch to USB or TF card mode and begin playing audio files. If not, press the 'Play/Pause/Mode' button to cycle through modes until USB/TF mode is active.
- Use the control buttons (Play/Pause, Previous/Next) to manage playback.
4.5 AUX Input Mode
- Power on the radio.
- Connect one end of a 3.5mm audio cable (not included) to the AUX input port on the side of the radio.
- Connect the other end of the cable to the headphone jack or audio output of your external audio device (e.g., MP3 player, phone).
- The radio should automatically switch to AUX mode. If not, press the 'Play/Pause/Mode' button to cycle through modes until AUX mode is active.
- Control playback and volume primarily from your external audio device.
5. Charging the Battery
The Retro XS Vintage radio features a built-in rechargeable Lithium-Ion battery.
- When the battery is low, the audio output may become distorted or the unit may power off.
- To charge, connect the provided charging cable to the DC 5V CHARGE port and a 5V USB power source.
- The charging time may vary depending on the power source.
- Avoid overcharging the battery by disconnecting the charger once fully charged.
6. Maintenance
- Cleaning: Use a soft, dry cloth to clean the exterior of the radio. Do not use abrasive cleaners, waxes, or solvents.
- Storage: When not in use for extended periods, store the radio in a cool, dry place.
- Battery Care: To prolong battery life, avoid fully discharging the battery frequently. Charge it regularly, even if not in constant use.
- Antenna: Handle the telescopic antenna gently to prevent bending or breakage. Retract it when not in use.
7. Troubleshooting
| Problem | Possible Cause | Solution |
|---|---|---|
| No power/Unit does not turn on. | Battery is discharged. | Charge the battery fully. |
| Poor radio reception. | Antenna not extended; weak signal; interference. | Extend the telescopic antenna. Rotate the radio for better AM reception. Move away from electronic devices causing interference. |
| Bluetooth not connecting. | Radio not in Bluetooth mode; device not discoverable; already connected to another device. | Ensure radio is in BT mode. Make sure Bluetooth is enabled on your device and it's in pairing mode. Disconnect from other Bluetooth devices. |
| No sound from USB/TF card. | Incorrect mode; unsupported file format; corrupted files. | Ensure radio is in USB/TF mode. Check if audio files are in a supported format (e.g., MP3). Try a different USB drive/TF card. |
| Volume knob static/crackling. | Dust or wear in the potentiometer. | This may indicate internal wear. If persistent, contact customer support. |
8. Specifications
| Brand | NB NOIZZYBOX |
| Model Number | Retro XS Vintage |
| Speaker Type | Outdoor (Portable) |
| Connectivity Technology | Bluetooth 5.3, USB, TF Card, AUX |
| Radio Bands | FM, AM, SW (3-Band DSP Radio) |
| Output Power | 10 Watts (Peak Power Handling) |
| Battery | 1 Lithium Ion battery (included) |
| Charging Input | DC 5V |
| Product Dimensions (LxWxH) | 13 x 7 x 8 cm |
| Item Weight | 500 g |
| Included Components | Speaker, Charging Cable, Owner's Manual |

Figure 4: Product Dimensions. This image provides a visual representation of the radio's dimensions: 13cm length, 7cm width, and 8cm height.
9. Safety Information
- Do not expose the unit to rain, moisture, or extreme temperatures.
- Avoid dropping or subjecting the unit to strong impacts.
- Do not disassemble or attempt to repair the unit yourself. Refer all servicing to qualified personnel.
- Keep out of reach of children.
- Use only the specified charging voltage (DC 5V).
- Dispose of batteries and electronic components responsibly according to local regulations.
10. Warranty and Support
Your NB NOIZZYBOX Retro XS Vintage radio comes with a manufacturer's warranty. Please refer to the warranty card included in your packaging for specific terms and conditions.
For technical support, service, or warranty inquiries, please contact:
- Manufacturer: NRJ Ventures
- Customer Support Email: support@noizzybox.com
Additional warranty plans may be available from your retailer.